How do I tell when mini cheesecakes are fully baked?You need simple ingredients that blend well together. The mix of creamy cheese, tart lemon, and sweet blueberries creates a delightful treat.List of Essential Ingredients
– 1 cup graham cracker crumbs
– 1/4 cup unsalted butter, melted
– 2 cups cream cheese, softened
– 1/2 cup granulated sugar
– 1/4 cup sour cream
– 1/4 cup fresh lemon juice
– Zest of 1 lemon
– 2 large eggs
– 1 cup fresh blueberries (plus extra for topping)
– 1 teaspoon vanilla extract
– Pinch of salt
Suggested Substitutes for Key Ingredients
If you don’t have graham crackers, use crushed cookies or oats for the crust. For butter, coconut oil works well. You can also swap cream cheese with ricotta or vegan cream cheese. If you want less sugar, try honey or maple syrup. Finally, if you can’t find fresh blueberries, frozen ones are a good choice.
Step-by-Step Instructions
Preparing the Oven and Muffin Tin
First, I set my oven to 325°F (160°C). This temperature helps the cheesecakes bake evenly. I then take a muffin tin and line it with cupcake liners. If I don’t have those, I lightly grease the tin. This will help the mini cheesecakes pop out easily later.
Crafting the Graham Cracker Crust
Next, I make the crust. In a bowl, I combine 1 cup of graham cracker crumbs with 1/4 cup of melted unsalted butter. I mix it until all the crumbs are coated. Then, I spoon about 1 tablespoon of this mixture into each cupcake liner. I press down firmly with my fingers. This forms a solid base for the cheesecake.
Mixing the Cheesecake Batter
Now, I move on to the filling. In a large bowl, I beat 2 cups of softened cream cheese with an electric mixer. I make sure it is smooth. Gradually, I add 1/2 cup of granulated sugar, 1/4 cup of sour cream, 1/4 cup of fresh lemon juice, and the zest of 1 lemon. I mix until everything is well combined.
Filling the Muffin Tins
I add 2 large eggs one at a time, mixing slowly after each addition. I am careful not to overmix. After that, I gently fold in 1 cup of fresh blueberries and 1 teaspoon of vanilla extract. The batter looks creamy and full of flavor! Next, I carefully pour the filling over the crusts in the muffin tin, filling each about 3/4 full.
Baking and Cooling the Cheesecakes
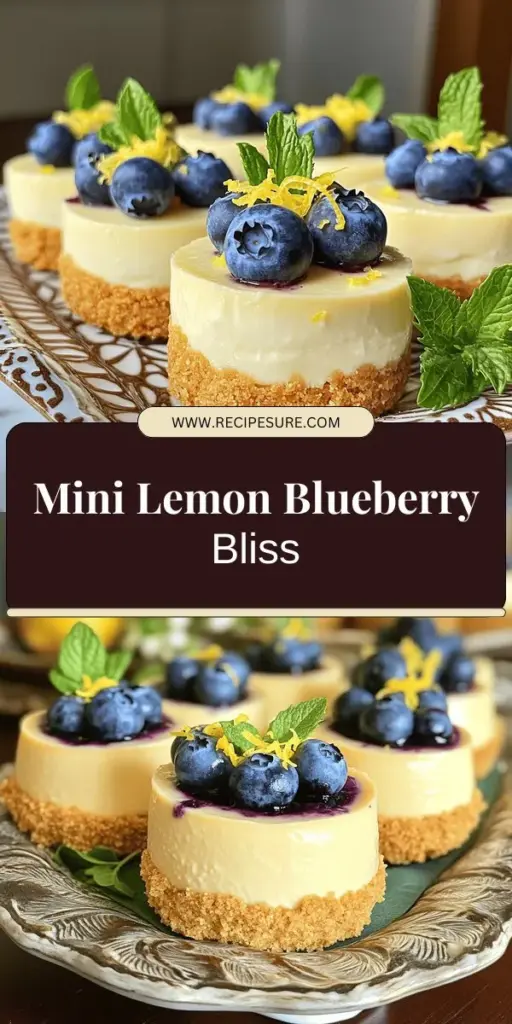
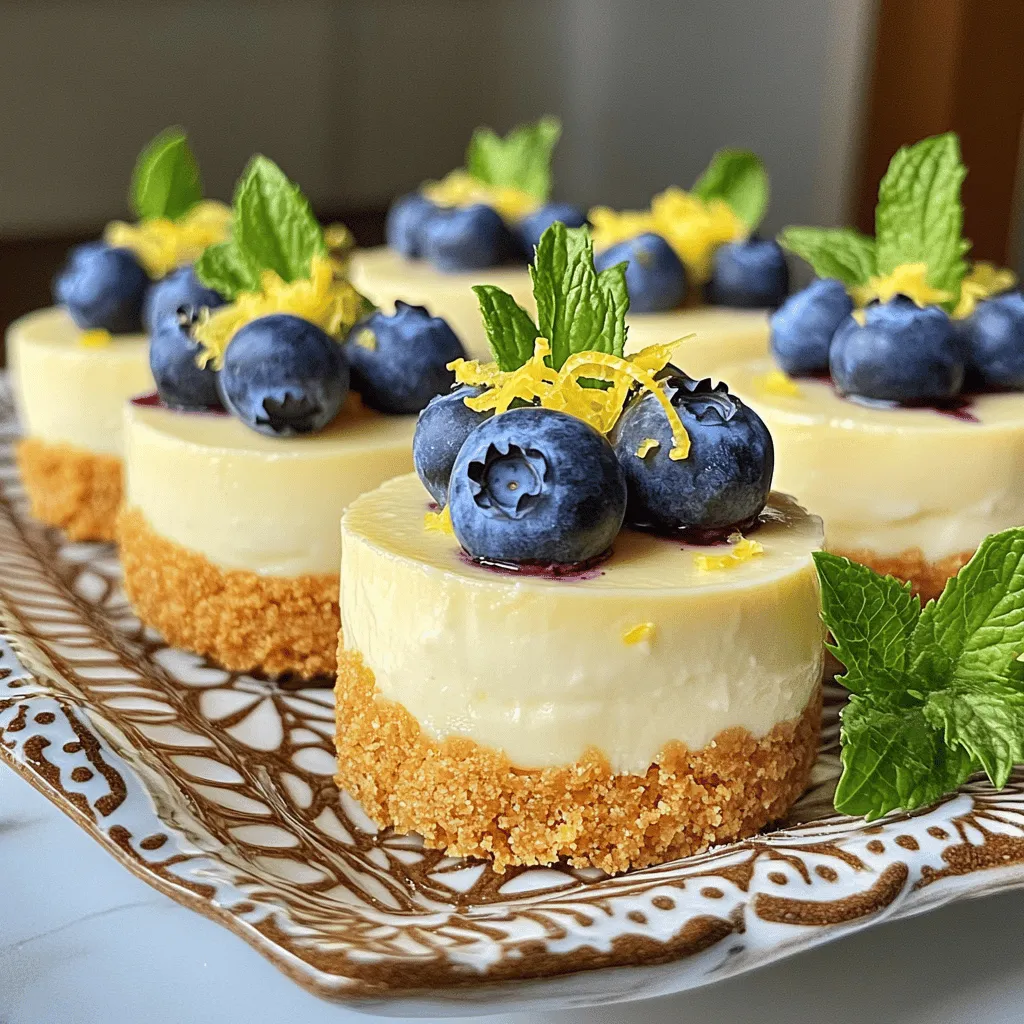
I place the muffin tin in the oven and bake for 18-20 minutes. The cheesecakes should be set but still have a slight jiggle in the center. Once done, I remove them from the oven and let them cool at room temperature for about 30 minutes. After that, I refrigerate them for at least 2 hours to set completely. When I’m ready to serve, I add extra blueberries on top for a pop of color and flavor.
Tips & Tricks
Achieving the Perfect Cheesecake Texture
To get a smooth and creamy texture, use softened cream cheese. Cold cream cheese will not mix well. Make sure you beat it until it’s fluffy. Don’t rush this step; it makes a big difference. Mix the batter just until smooth after adding the eggs. Overmixing can make the cheesecake dense.
How to Avoid Cracks on the Surface
Cracks often happen when cheesecakes bake too fast. Bake at 325°F (160°C) for gentle heat. You can also use a water bath. Place your muffin tin inside a larger pan filled with water. This keeps moisture in and helps prevent cracks. Let the cheesecakes cool slowly in the oven with the door slightly open. This step helps them set without cracking.
Ideal Storage Conditions for Mini Cheesecakes
Store your mini cheesecakes in the fridge. Use an airtight container to keep them fresh. They can last up to five days chilled. If you want to keep them longer, freeze them. Wrap each cheesecake in plastic wrap and place them in a freezer-safe bag. They will stay good for up to three months. Thaw them in the fridge before serving for the best flavor.

Variations
Adding Different Fruit Toppings
You can mix up the toppings for your mini lemon blueberry cheesecakes. Fresh fruit adds color and taste. Try strawberries, raspberries, or blackberries. Each fruit gives a new twist to the dish. You can also use canned fruit. Just make sure to drain it well. This keeps the crust from getting soggy. Feel free to layer the fruits for a fun look!
Alternative Flavors for the Filling
While lemon and blueberry are a classic pair, you can try new flavors too. For a chocolate twist, add cocoa powder to the filling. If you love tropical tastes, mix in coconut or pineapple. You could even add a splash of almond extract for a nutty flavor. Adjust the sugar as needed to balance the taste. The options are endless!
Gluten-Free or Vegan Adjustments
You can make these cheesecakes gluten-free by using gluten-free graham crackers. This small change keeps the crust tasty and safe for those with gluten issues. For a vegan version, swap cream cheese for a plant-based option. Use coconut cream or cashew cream for the filling. Replace eggs with flax eggs or applesauce. These adjustments keep the cheesecakes creamy and delicious.
Storage Info
Refrigeration Guidelines
You should store mini lemon blueberry cheesecakes in the fridge. Use an airtight container to keep them fresh. They last up to five days. Make sure they cool completely before putting them in the container. This helps avoid sogginess.
Freezing Mini Cheesecakes
You can freeze these mini cheesecakes for later. First, let them cool down. Then, wrap each cheesecake in plastic wrap. Place them in a freezer-safe bag or container. They will stay good for about three months. When you are ready to eat them, let them thaw in the fridge overnight.
Best Practices for Reheating
To reheat mini cheesecakes, use the oven to keep them tasty. Preheat your oven to 300°F (150°C). Place the cheesecakes on a baking sheet. Heat them for about 10 minutes. Be careful not to overheat, as they can get dry. You can also enjoy them cold right from the fridge. They taste great either way!
FAQs
Can I make these mini cheesecakes ahead of time?
Yes, you can make these mini cheesecakes ahead of time. They store well in the fridge. Prepare them a day or two ahead of your event. Just keep them covered in the refrigerator. This allows the flavors to blend and deepen. When you are ready to serve, just add fresh blueberries on top.
What can I substitute for cream cheese?
If you need a substitute for cream cheese, consider using Greek yogurt. It gives a similar tangy flavor. You can also use mascarpone cheese for a creamier texture. Soft tofu blended until smooth works well too. Each option changes the taste slightly, so choose what you prefer.
How do I tell when mini cheesecakes are fully baked?
You can tell mini cheesecakes are fully baked by checking their center. They should be set but still have a slight jiggle. Don’t worry if they seem a bit soft. They will firm up as they cool. Keep an eye on the edges, which should look slightly puffed and dry. This is your sign they are ready.
In this article, we explored how to make mini cheesecakes step by step. We covered essential ingredients and suggested substitutes. The recipe included tips for texture, avoiding cracks, and proper storage. You learned about delicious variations and helpful storage info.
Making mini cheesecakes is fun and rewarding. With the right tips, you can impress anyone. Enjoy experimenting with your new skills and flavors!