
If you’re craving a sweet treat that’s both simple and delicious, look no further! These Vegan Chocolate Peanut Butter Cups are easy to make and perfect for anyone. With rich dark chocolate and creamy peanut butter, they satisfy any sweet tooth. Plus, you only need a few key ingredients to whip them up. Let’s dive into the fun world of vegan treats and learn how to create your own delightful chocolate cups!
Ingredients
Essential Ingredients
- 1 cup dark chocolate chips (vegan)
- 1/2 cup creamy natural peanut butter
- 1/4 cup maple syrup
- 1/2 teaspoon vanilla extract
Optional Ingredients
- 1/2 cup crushed graham crackers or almond flour
- Pinch of sea salt
Equipment Needed
- Microwave-safe bowl
- Muffin tin
- Silicone muffin cups or mini cupcake liners
When you make vegan chocolate peanut butter cups, the right ingredients matter. For the base, use dark chocolate chips that are vegan. These give a rich taste. Pair that with creamy natural peanut butter. It adds a smooth texture and flavor. Maple syrup brings sweetness. This syrup is a great natural sweetener. Lastly, add vanilla extract for depth.
You can add optional ingredients for more fun. Crushed graham crackers give a nice crunch. If you need a gluten-free option, use almond flour instead. A pinch of sea salt enhances the flavor. It makes the sweet taste even better.
Gather the right tools to make this treat. A microwave-safe bowl helps you melt the chocolate. Use a muffin tin to shape the cups. Silicone muffin cups or mini cupcake liners make for easy removal. These tools help you create perfect bites every time.
Step-by-Step Instructions
Melting the Chocolate
First, grab a microwave-safe bowl. Add the dark chocolate chips. Heat them in the microwave for 30 seconds. After that, take the bowl out and stir. Repeat this until the chocolate is smooth and fully melted. This method keeps the chocolate from burning.
Preparing the Muffin Cups
Next, get your muffin tin ready. Line it with silicone muffin cups or mini cupcake liners. These help you remove the cups easily later. If you use paper liners, they might stick. So, silicone is best for easy removal.
Assembling the Cups
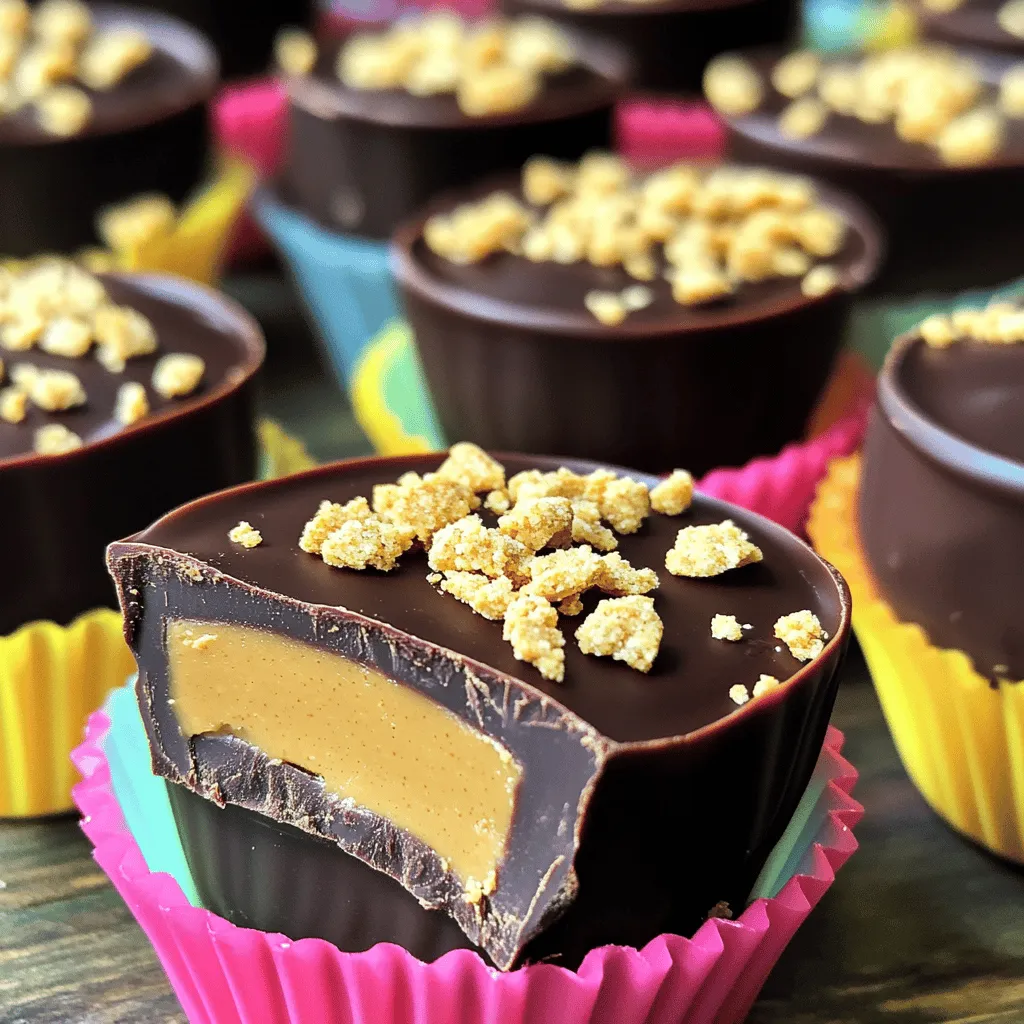
Now, it’s time to create the chocolate base. Spoon about 1 tablespoon of melted chocolate into each cup. Tilt the cup to coat the bottom and sides. Once done, freeze the cups for about 10 minutes. This makes them firm.
While they freeze, let’s make the filling. In a bowl, mix the creamy peanut butter, maple syrup, vanilla extract, crushed graham crackers, and a pinch of sea salt. Stir until it is smooth and well combined.
After 10 minutes, take the muffin tin out of the freezer. Add about 1 tablespoon of the peanut butter mixture into the center of each cup. Leave some space at the top for the chocolate layer.
Finally, drizzle the remaining melted chocolate over the peanut butter filling. Make sure to cover it completely. Smooth the top as needed. Place the muffin tin back in the freezer for 30 minutes. This final freeze helps the cups set.
Tips & Tricks
Perfecting Your Chocolate Cups
To get the best chocolate cups, focus on consistency. The chocolate should be smooth and shiny. If it feels thick or clumpy, it may be too hot. Let it cool slightly before using.
To prevent chocolate from seizing, avoid water. Even a drop can cause issues. Use dry bowls and utensils. Also, melt the chocolate slowly in short bursts. Stir often to keep it smooth.
Flavor Enhancements
You can add spices or extracts for more depth. A pinch of cinnamon or a dash of sea salt can boost flavor. You might also try almond or hazelnut extract for a twist.
Incorporating other nut butters is a fun option too. Try cashew or sunflower seed butter. These can add a unique flavor and texture to your cups.
Serving Suggestions
Pair your chocolate cups with fresh fruit. Sliced strawberries or bananas work well. You can also serve them with vegan ice cream for a rich treat.
Store your cups in an airtight container. This keeps them fresh and tasty. For a firmer bite, place them in the fridge. For a softer treat, let them sit at room temperature.
Variations
Gluten-Free Options
To make these cups gluten-free, swap graham crackers for almond flour. Almond flour gives a nice texture. Use the same amount, about 1/2 cup. The nutty flavor of almond flour blends well with chocolate and peanut butter. It is a great choice for those who avoid gluten.
Nut-Free Alternatives
If you need a nut-free option, try seed butters instead of peanut butter. Sunflower seed butter works well and has a similar creaminess. You can also use pumpkin seed butter for a unique taste. Just use the same amount as peanut butter, 1/2 cup. These swaps keep the treat safe for those with nut allergies.
Flavor Infusions
Adding spices can elevate your vegan chocolate peanut butter cups. A pinch of cinnamon or nutmeg adds warmth. You can also try drops of peppermint or almond extract for a twist. These little changes can make a big impact on flavor.
Toppings can enhance both taste and presentation. Shredded coconut gives a tropical flair. Chopped nuts or a sprinkle of sea salt can add crunch. Feel free to get creative with your favorite flavors and toppings!
Storage Info
Storing at Room Temperature
You can store your vegan chocolate peanut butter cups at room temperature. This gives them a soft and gooey texture. Keep them in a cool, dry spot away from direct sunlight. Use a covered dish to prevent them from drying out. If you want a softer bite, this method works best.
Refrigeration Guidance
For a firmer treat, store your cups in the fridge. Use an airtight container to keep them fresh. This helps maintain their shape and flavor. Make sure the container is sealed well to block moisture. If you like a cold dessert, this is the way to go.
Freezing for Long-Term Storage
Freezing is great for long-term storage. To freeze, place the cups in a single layer on a tray. Once frozen, transfer them to a freezer bag or container. When it’s time to eat, thaw them in the fridge. This keeps their taste and texture intact. Always remember to seal the bag tightly to avoid freezer burn.
FAQs
How long do vegan chocolate peanut butter cups last?
Vegan chocolate peanut butter cups can last about one week in the fridge. Store them in an airtight container. If you keep them at room temperature, they stay good for about three days. For longer storage, you can freeze them. They will last for up to three months in the freezer.
Can I use a different type of chocolate?
Yes, you can use any type of vegan chocolate. Dark chocolate works best, but you can try milk chocolate or even white chocolate. Just make sure they are dairy-free. If you prefer a sweeter taste, choose a chocolate with a lower cocoa content.
Are there any nut-free vegan chocolate options?
Yes, there are nut-free chocolates available. Look for brands that use sunflower seed butter or soy butter. These options are great for those with nut allergies. Always check the labels to ensure they are nut-free and vegan.
These vegan chocolate peanut butter cups are easy to make and delicious. You need dark chocolate, peanut butter, maple syrup, and vanilla extract. We discussed equipment like a microwave-safe bowl and muffin tin. I shared tips for melting chocolate and preventing seizing. You can customize with flavors and storage methods.
Try these cups for a sweet treat that fits your needs. Enjoy experimenting with different ingredients and variations. You’ll impress your friends and family with your tasty creations!
