Introduction
Welcome to the world of plant-based cuisine, where flavors come alive, and health benefits abound. One dish that beautifully encapsulates these elements is the Creamy Coconut Chickpea Curry. This delightful recipe harmonizes the richness of coconut milk with the heartiness of chickpeas, creating a comforting yet vibrant meal that is perfect for any night of the week.
Coconut Chickpea Curry has gained popularity among food enthusiasts and health-conscious individuals for its ease of preparation and versatility. Whether you are a long-time vegan or simply looking to incorporate more plant-based meals into your diet, this curry serves as an excellent choice. Its creamy texture and rich flavor profile not only tantalize the taste buds but also nourish the body with vital nutrients.
Chickpeas, also known as garbanzo beans, are the star ingredient in this recipe. They are packed with protein, fiber, and essential vitamins, making them an integral part of a balanced diet. Paired with coconut milk, which offers healthy fats and a dairy-free alternative, this dish strikes a perfect balance between indulgence and wellness.
In this article, we will explore the ingredients that contribute to the amazing flavor of this curry, discuss their health benefits, and guide you through the initial preparation and cooking steps to create this culinary delight.
Understanding the Ingredients
Overview of Chickpeas
Chickpeas are a staple ingredient in many cuisines around the world, celebrated for their nutty flavor and unique texture. These legumes are not only delicious but also incredibly nutritious. A single cup of cooked chickpeas provides approximately 15 grams of protein and 13 grams of fiber, making them an excellent choice for vegetarians, vegans, and anyone looking to reduce meat consumption.
Beyond their nutritional value, chickpeas are remarkably versatile in cooking. They can be used in salads, soups, stews, and even desserts. Their ability to absorb flavors makes them an ideal addition to a wide range of dishes, including our Creamy Coconut Chickpea Curry.
Nutritional Benefits
Chickpeas are rich in essential nutrients, including iron, magnesium, and B vitamins. These nutrients play a crucial role in maintaining energy levels, supporting immune function, and promoting heart health. Additionally, the high fiber content in chickpeas aids in digestion and can help regulate blood sugar levels, making them a smart choice for those monitoring their carbohydrate intake.
The Role of Coconut Milk
Coconut milk is the other primary ingredient that makes this curry so creamy and indulgent. This luscious liquid is derived from the flesh of mature coconuts and offers a unique flavor that complements the spices and chickpeas beautifully.
Coconut milk is not only delicious but also boasts several health benefits. It contains medium-chain triglycerides (MCTs), which are a type of healthy fat that can boost metabolism and promote weight loss. Furthermore, coconut milk is a fantastic dairy-free alternative, making it suitable for those with lactose intolerance or dairy allergies.
Aromatics and Vegetables
To elevate the flavor of our Creamy Coconut Chickpea Curry, we will incorporate a variety of aromatics and vegetables. Ingredients such as onion, garlic, ginger, and bell pepper play a vital role in building a complex flavor profile that enhances the dish’s overall deliciousness.
Onions provide a sweet and savory base, while garlic and ginger introduce warmth and depth. Bell peppers contribute a slight crunch and a burst of color, making the dish visually appealing. Together, these ingredients work in harmony to create a fragrant and flavorful curry that will have everyone asking for seconds.
Spices That Make the Difference
The magic of this curry lies in the spices we choose to incorporate. Curry powder, cumin, turmeric, and chili powder are essential components that not only enhance the flavor but also provide numerous health benefits.
– Curry Powder: A blend of various spices, curry powder can include turmeric, cumin, coriander, and more. It is known for its anti-inflammatory properties and can help boost digestion.
– Cumin: This spice adds a warm, earthy flavor to the dish. It is rich in iron and has been shown to have antioxidant properties that may support heart health.
– Turmeric: Often hailed for its potent anti-inflammatory benefits, turmeric contains curcumin, which has been studied for its potential in reducing chronic disease risks.
– Chili Powder: For those who enjoy a bit of heat, chili powder adds spice and a kick to the curry. Capsaicin, the active compound in chili peppers, can boost metabolism and may aid in pain relief.
By understanding the role of each ingredient and spice in our Creamy Coconut Chickpea Curry, we can appreciate the complexity and depth of flavor that this dish offers. Now that we have set the stage with our ingredient overview, let’s move on to the preparation and cooking steps that will bring this delightful dish to life.
Preparation and Cooking Steps
Preparing Your Ingredients
The first step in crafting the perfect Creamy Coconut Chickpea Curry is to prepare your ingredients. This includes gathering all necessary items and ensuring they are ready for cooking. Here is a simple checklist of what you will need:
– Chickpeas: If using canned chickpeas, drain and rinse them under cold water. If using dried chickpeas, soak them overnight and cook them until tender.
– Coconut Milk: Choose full-fat coconut milk for a creamier texture or light coconut milk for a lower-fat option.
– Aromatics: Finely chop one medium onion, a few cloves of garlic, and a small piece of fresh ginger.
– Bell Pepper: Dice one bell pepper (color of your choice) into bite-sized pieces.
– Spices: Measure out your spices – curry powder, cumin, turmeric, and chili powder.
Tips on Chopping and Measuring
Efficient prep work is crucial for a smooth cooking experience. Here are some tips to keep in mind while chopping and measuring:
1. Knife Skills: Invest in a good chef’s knife and practice your chopping technique. Uniformly chopped vegetables cook evenly and improve the overall presentation of the dish.
2. Use a Cutting Board: Ensure your cutting board is stable. A damp cloth underneath can prevent slipping while you chop.
3. Mise en Place: This French term means “everything in its place.” Organize your ingredients before you start cooking to ensure you have everything at your fingertips.
4. Measure Spices: Use measuring spoons for spices to ensure accurate flavor. Adjust according to your taste preferences, especially if you are sensitive to spice levels.
Sautéing Aromatics: Building Flavor
Once your ingredients are prepped, it’s time to start cooking. The first step is sautéing the aromatics, which are essential for building the flavor base of our curry.
1. Heat the Oil: In a large skillet or saucepan, heat 2 tablespoons of oil over medium heat. You can use vegetable oil, coconut oil, or olive oil, depending on your preference.
2. Add the Onions: Once the oil is hot, add the chopped onions. Sauté them for about 5-7 minutes, stirring occasionally, until they become translucent and slightly golden. This process releases their natural sweetness, forming the foundation of your dish.
3. Incorporate Garlic and Ginger: Next, add the minced garlic and grated ginger. Sauté for an additional 1-2 minutes until fragrant. Be careful not to burn the garlic, as it can turn bitter and affect the dish’s overall flavor.
Importance of Cooking Times for Optimal Flavor Release
Cooking times play a vital role in flavor development. Each aromatic should be cooked just long enough to release its essential oils and flavors. Overcooking can lead to a loss of flavor and texture.
Remember, the goal is to achieve a balance where the onions are sweet, and the garlic and ginger are fragrant. Once you reach this point, you can move on to the next step.
Incorporating Vegetables
Now it’s time to add the diced bell pepper to the mix. This step adds color, texture, and additional nutrients to your curry.
1. Add the Bell Pepper: Toss in the diced bell pepper and sauté for another 3-4 minutes. You want the peppers to soften slightly but still retain some crunch. This will add a lovely texture to your curry.
2. Stir and Season: As you sauté the bell pepper, stir well to combine all the aromatics. At this point, you can also sprinkle a pinch of salt to enhance the flavors.
Toasting Spices for Depth
Toasting the spices before adding them to the dish is a crucial step that enhances the overall flavor profile. This technique releases the natural oils in the spices, intensifying their aroma and taste.
1. Add the Spices: Once the vegetables are cooked to your liking, add in your measured spices – curry powder, cumin, turmeric, and chili powder.
2. Toast the Spices: Stir the spices into the vegetable mixture and cook for about 1-2 minutes. Keep stirring to prevent burning. You’ll notice the spices becoming fragrant and aromatic, which indicates they are ready for the next step.
Combining Key Ingredients
With the spices toasted and fragrant, it’s time to bring the dish together by adding the remaining key ingredients.
1. Add the Tomatoes: Pour in one can of diced tomatoes (with juices) to the pan. This will add acidity and help balance the richness of the coconut milk.
2. Incorporate the Chickpeas: Next, add the cooked or canned chickpeas to the mixture, stirring well to combine everything evenly.
3. Stir to Combine: Ensure all ingredients are well mixed, allowing the spices to coat the chickpeas and vegetables thoroughly.
Simmering to Perfection
The final step in this part of the recipe is to simmer the curry to allow the flavors to meld together beautifully.
1. Add Coconut Milk: Pour in the coconut milk and stir to combine. The creamy texture will enrich the dish and create a luscious sauce.
2. Bring to a Simmer: Increase the heat slightly to bring the mixture to a gentle simmer.
3. Simmer and Thicken: Reduce the heat to low and let the curry simmer for about 15-20 minutes. This allows the flavors to develop and the curry to thicken. Stir occasionally to prevent sticking.
By following these steps, you will create a flavorful base for your Creamy Coconut Chickpea Curry Delight. In the next part of this article, we will cover additional cooking tips, serving suggestions, and answer some common questions about this delicious dish. Stay tuned to discover how to take your curry experience to the next level!
How to Know When the Flavors Have Melded Correctly
To achieve the perfect balance of flavors in your Creamy Coconut Chickpea Curry, it’s essential to understand the signs that indicate the dish is ready. The best indicators are the aroma and taste. When the spices have thoroughly blended, you’ll notice a fragrant bouquet filling your kitchen, showcasing the warmth of cumin, coriander, and turmeric.
Taste is another crucial factor; after simmering for about 20-30 minutes, the flavors should be well-integrated. Take a small spoonful of the curry and sample it. If the spices feel vibrant and the coconut cream provides a rich, velvety texture, you have successfully melded the flavors. If needed, feel free to adjust seasoning at this point, adding more salt, pepper, or spices to suit your palate.
Adding Spinach for Nutritional Boost
Incorporating spinach into your curry not only enhances its nutritional value but also adds a lovely pop of color and texture. Spinach is rich in vitamins A and C, iron, and dietary fiber, making it an excellent addition to your meal. To add spinach to your Creamy Coconut Chickpea Curry, simply stir in about 2 cups of fresh spinach leaves during the last 5 minutes of cooking. This timing allows the spinach to wilt perfectly without losing its nutritional benefits or vibrant color.
Benefits of Incorporating Greens, Whether Fresh or Frozen
Both fresh and frozen spinach have their advantages. Fresh spinach adds a tender texture and subtle flavor, while frozen spinach can be a convenient option as it is readily available and often more affordable. Regardless of your choice, incorporating greens into your dish elevates its health profile. Spinach is known for its antioxidants, which can help combat oxidative stress in the body.
Visual Cues for Knowing When Spinach is Ready
When adding spinach to your curry, look for visual cues to ensure it’s cooked just right. Fresh spinach should wilt down significantly, becoming tender but still vibrant green. If using frozen spinach, it will take only a few moments to heat through; watch for steam rising and ensure it’s evenly distributed throughout the dish. Avoid overcooking, as this can lead to a dull color and loss of nutrients.
Serving Suggestions
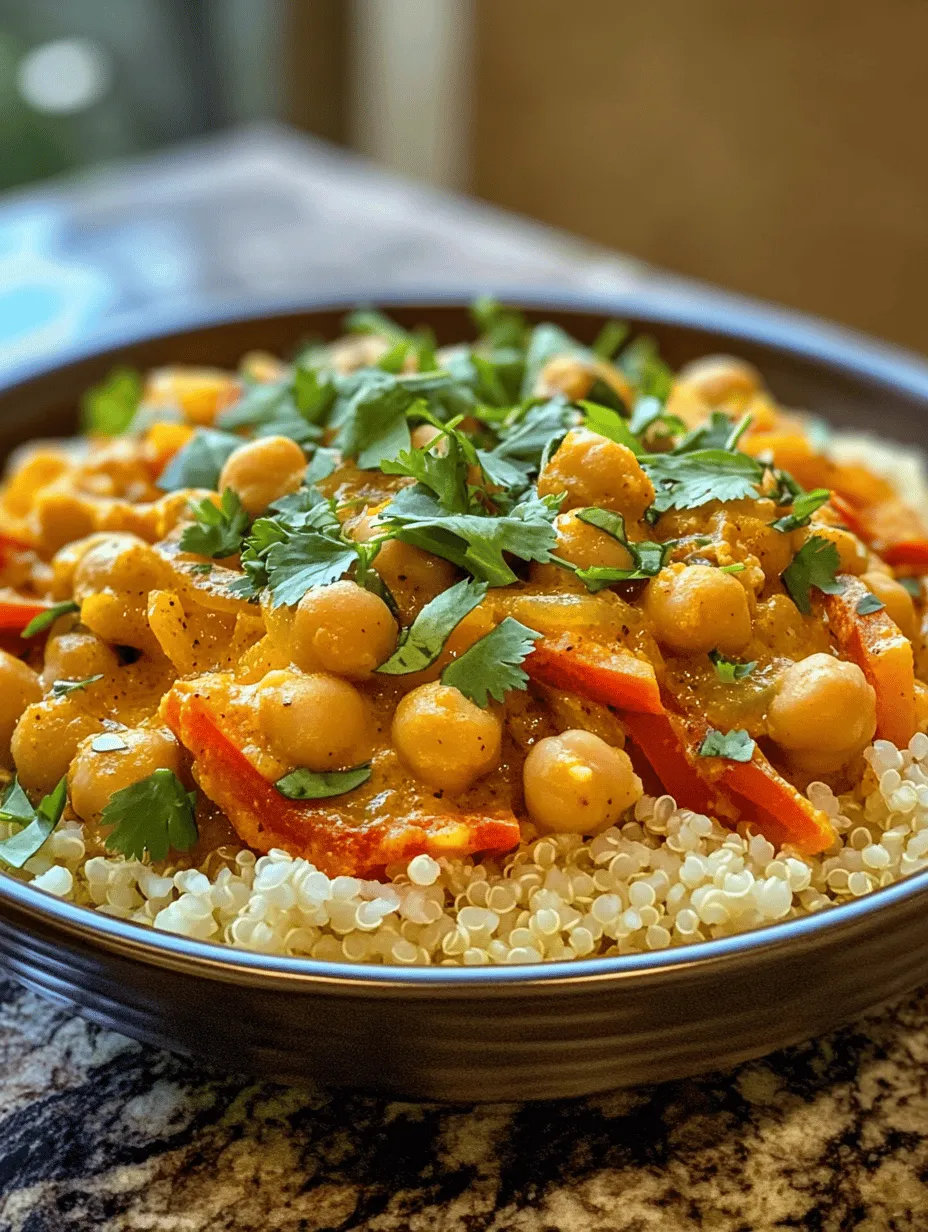
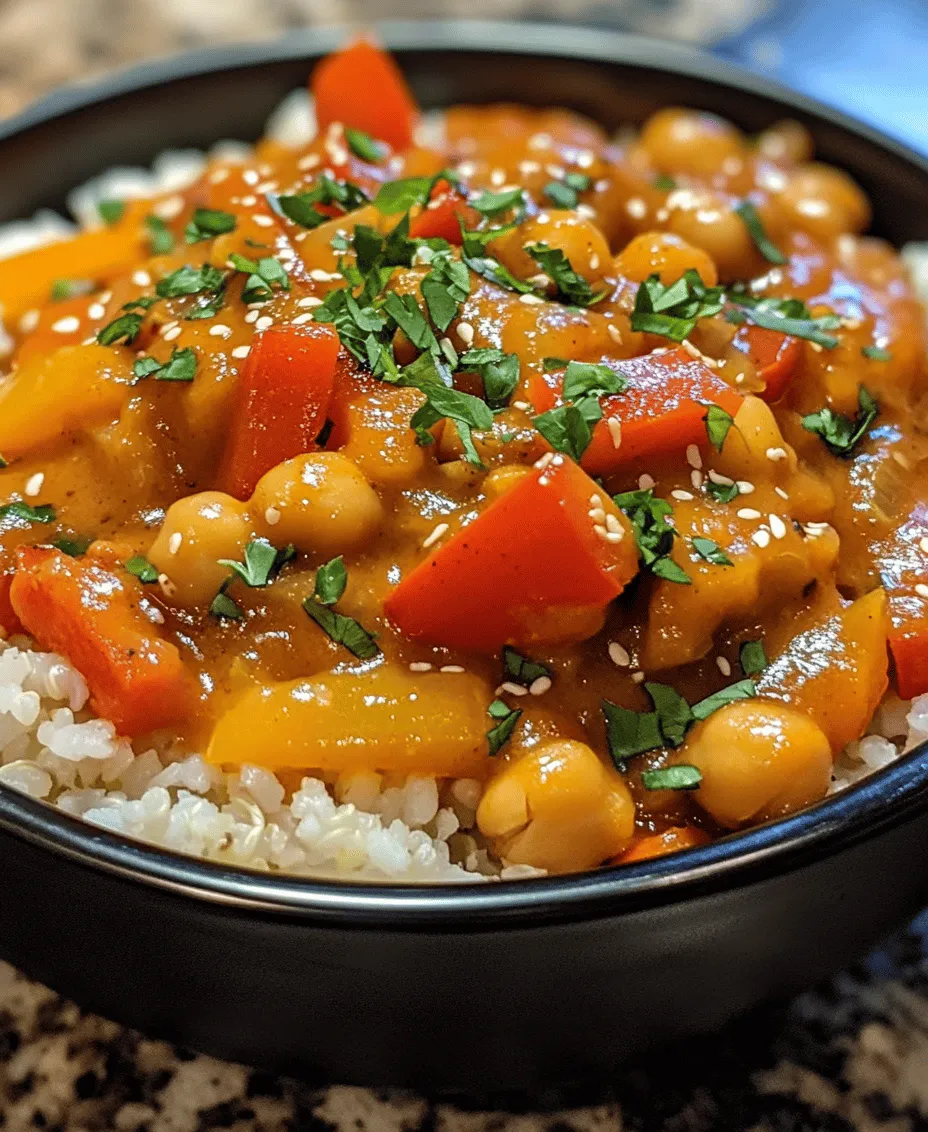
Ideal Accompaniments: Rice and Quinoa
When it comes to serving your Creamy Coconut Chickpea Curry, rice and quinoa are both popular and nutritious accompaniments. Rice, particularly jasmine or basmati varieties, offers a fragrant base that complements the rich curry flavors. On the other hand, quinoa is an excellent gluten-free option, providing additional protein and fiber.
Nutritional Comparison Between the Two Options
While both options are delicious, their nutritional profiles differ slightly. A cup of cooked jasmine rice contains about 205 calories, whereas a cup of cooked quinoa has approximately 222 calories but packs a higher protein punch, boasting around 8 grams of protein compared to rice’s 4 grams. Quinoa is also a complete protein source, meaning it contains all nine essential amino acids, making it a fantastic choice for those following a plant-based diet.
Cooking Tips for Perfect Rice or Quinoa
To achieve perfectly fluffy rice, rinse the grains under cold water to remove excess starch before cooking. Use a 1:1.5 ratio of rice to water, bringing it to a boil and then simmering covered until the water is absorbed. For quinoa, use a 1:2 ratio, bringing it to a boil and simmering until the grains are tender and the germ has separated. Both should rest covered for a few minutes post-cooking to enhance texture.
Garnishing for Flavor and Presentation
A well-garnished dish not only looks appealing but can also enhance its flavor. Fresh cilantro is a staple garnish for Coconut Chickpea Curry, adding a burst of freshness. Simply chop a handful of cilantro and sprinkle it over your curry just before serving.
Other garnishes to consider include lime wedges for a zesty kick, and chili flakes for those who enjoy an extra hit of spice. These finishing touches can elevate your dish from simple to stunning.
Nutritional Analysis
Caloric Breakdown of the Dish
When assessing the caloric content of your Creamy Coconut Chickpea Curry, a standard serving (about 1.5 cups) contains roughly 350-400 calories, depending on the coconut milk’s fat content and the quantity of chickpeas used.
Overview of Macronutrients per Serving
In each serving, you can expect approximately 15 grams of protein, 20 grams of carbohydrates, and 18 grams of fat, primarily from the coconut milk. This macronutrient profile makes it a balanced meal, offering energy and sustenance.
Health Benefits of Each Ingredient
– Chickpeas: A great source of plant-based protein and fiber, chickpeas help keep you full and satisfied while supporting digestion.
– Coconut Milk: While high in calories, coconut milk provides healthy fats that can aid in nutrient absorption and support heart health.
– Spinach: As mentioned earlier, spinach is loaded with vitamins and minerals, making it a superfood for overall health.
– Spices: The spices used not only enhance flavor but also offer anti-inflammatory benefits, contributing to better health.
How the Recipe Supports a Balanced Diet
This Creamy Coconut Chickpea Curry is an excellent representation of a balanced meal, containing protein, healthy fats, and a variety of vegetables. It’s a delicious option that supports a plant-based diet, providing necessary nutrients while being hearty and satisfying.
Discussion on Plant-Based Eating and Sustainability
Incorporating plant-based meals, such as this curry, into your diet supports not just your health, but also environmental sustainability. Plant-based eating has been associated with a lower carbon footprint and reduced resource consumption. Choosing chickpeas and vegetables over animal products can contribute positively to our planet while providing delicious meal options.
Customizing Your Coconut Chickpea Curry
Adjusting Spice Levels
One of the beauties of a curry is its adaptability. If you prefer a milder flavor, you can reduce the amount of chili powder or omit the fresh chilies altogether. For those who enjoy a spicier kick, consider increasing the chili powder or adding fresh sliced jalapeños during cooking.
Tips for Making the Curry Milder or Spicier
To make the curry milder, consider adding a tablespoon of sugar or honey to balance the heat with sweetness. Alternatively, if you want to amp up the spice, try adding a pinch of cayenne pepper or a few extra chili flakes during the cooking process.
Adding Additional Vegetables
Enhance your curry by incorporating a variety of vegetables. Zucchini, carrots, bell peppers, and peas can all add flavor, texture, and nutrients. Simply chop your chosen vegetables into bite-sized pieces and add them to the pot when you add the chickpeas to ensure they cook through.
Protein Variations
If you want to vary the protein in your dish, you can incorporate other options like tofu or tempeh. Both can be sautéed before adding to the curry, providing a lovely texture and additional flavor. Tofu absorbs the spices well, making it a wonderful addition to the creamy curry.
Storage and Reheating Tips
Best Practices for Storing Leftovers
To store your Creamy Coconut Chickpea Curry, allow it to cool to room temperature before transferring it to an airtight container. The curry will stay fresh in the refrigerator for up to 4 days. For longer storage, consider freezing portions in freezer-safe bags for up to 3 months.
How to Keep the Curry Fresh in the Refrigerator
When storing the curry in the refrigerator, ensure it is sealed properly to prevent it from absorbing other odors. Labeling the container with the date will help you track how long it has been stored.
Reheating Techniques
When reheating, you can use the stovetop or microwave. For stovetop reheating, place the curry in a saucepan over medium heat, stirring occasionally until heated through. If using a microwave, transfer the curry to a microwave-safe bowl, cover it loosely, and heat for 1-2 minutes, stirring halfway through to ensure even heating.
Methods to Ensure the Dish Retains Flavor and Texture
To retain the dish’s flavor and texture, consider adding a splash of coconut milk or water during reheating if the curry appears too thick. This will help restore its creamy consistency and ensure it remains delicious.
Conclusion
In summary, the Creamy Coconut Chickpea Curry is a delightful dish that offers a wealth of flavors and nutritional benefits. This recipe is not only delicious and satisfying but also easy to prepare, making it an excellent choice for any meal. Its richness, combined with the goodness of chickpeas and spinach, creates a nourishing experience that supports your overall health.
Whether you serve it with rice or quinoa, the versatility of this recipe allows for countless variations, letting you customize it to your taste preferences. Embrace the health benefits of plant-based eating and enjoy a sustainable, flavorful meal that you can feel good about serving to your family and friends. Try this Creamy Coconut Chickpea Curry today, and discover just how delicious and nutritious plant-based cooking can be!