Indulge in the Festive Delight of No-Bake Peppermint Oreo Truffles

WANT TO SAVE THIS RECIPE?

Introduction

The holiday season is synonymous with indulgence and celebration, and what better way to embrace the festive spirit than with delightful no-bake desserts? These treats have gained immense popularity due to their simplicity and the joy they bring to gatherings. Among the many options available, No-Bake Peppermint Oreo Truffles stand out as a crowd-pleaser. With their rich, chocolatey flavor and a refreshing hint of peppermint, these truffles are the perfect addition to any festive spread, bringing a touch of sweetness that resonates with the joy of the season.

No-bake desserts are particularly appealing during the holidays because they save time and effort while still delivering impressive results. The No-Bake Peppermint Oreo Truffles are not only easy to prepare, but they also require minimal cooking skills, making them accessible to everyone—from novice bakers to seasoned chefs. This recipe combines the beloved flavors of Oreo cookies and peppermint, resulting in a decadent treat that is sure to satisfy your sweet tooth and delight your guests.

In this article, we will take you through the preparation of these delightful truffles, providing you with detailed instructions and tips to ensure your success in the kitchen. With just a few simple ingredients, you’ll be on your way to creating a festive dessert that can be shared with loved ones or enjoyed as a special treat for yourself.

Understanding the Ingredients

To create the perfect No-Bake Peppermint Oreo Truffles, it’s essential to understand the role of each ingredient in the recipe. Let’s take a closer look at the key components that come together to create this delicious treat.

Oreo Cookies

At the heart of our truffles are Oreo cookies, which serve as the foundation. The chocolatey cookies provide a rich flavor and a satisfying crunch, making them ideal for our truffle filling. When crushed into fine crumbs, they blend seamlessly with the other ingredients, ensuring an even distribution of flavor throughout the truffles. The classic Oreo flavor is a staple in many dessert recipes, but when paired with peppermint, it transforms into a festive delight that is hard to resist.

Cream Cheese

Cream cheese is another essential ingredient in our truffles. It adds a luscious creaminess that binds the crushed Oreo cookies together, resulting in a smooth and cohesive filling. The richness of the cream cheese balances the sweetness of the cookies and the peppermint, creating a well-rounded flavor profile. It’s important to use softened cream cheese, as it will mix more easily with the Oreo crumbs and help achieve the desired texture.

Peppermint Extract

To infuse our truffles with that signature holiday flavor, we incorporate peppermint extract. This ingredient is crucial for achieving the refreshing minty taste that complements the chocolatey Oreos. When using peppermint extract, it’s important to measure carefully; a little goes a long way, and we want to ensure a balanced flavor without overpowering the other ingredients. This subtle hint of peppermint is what truly elevates the truffles, making them a festive favorite.

White Chocolate Chips

The sweet coating that envelops our truffles is made from white chocolate chips. Melting the white chocolate creates a smooth and creamy layer that adds an extra dimension of sweetness to the truffles. The contrasting flavors of the rich Oreo filling and the sweet white chocolate coating harmonize beautifully, creating a delightful treat that’s perfect for any celebration. Choosing high-quality white chocolate chips will enhance the overall flavor of your truffles.

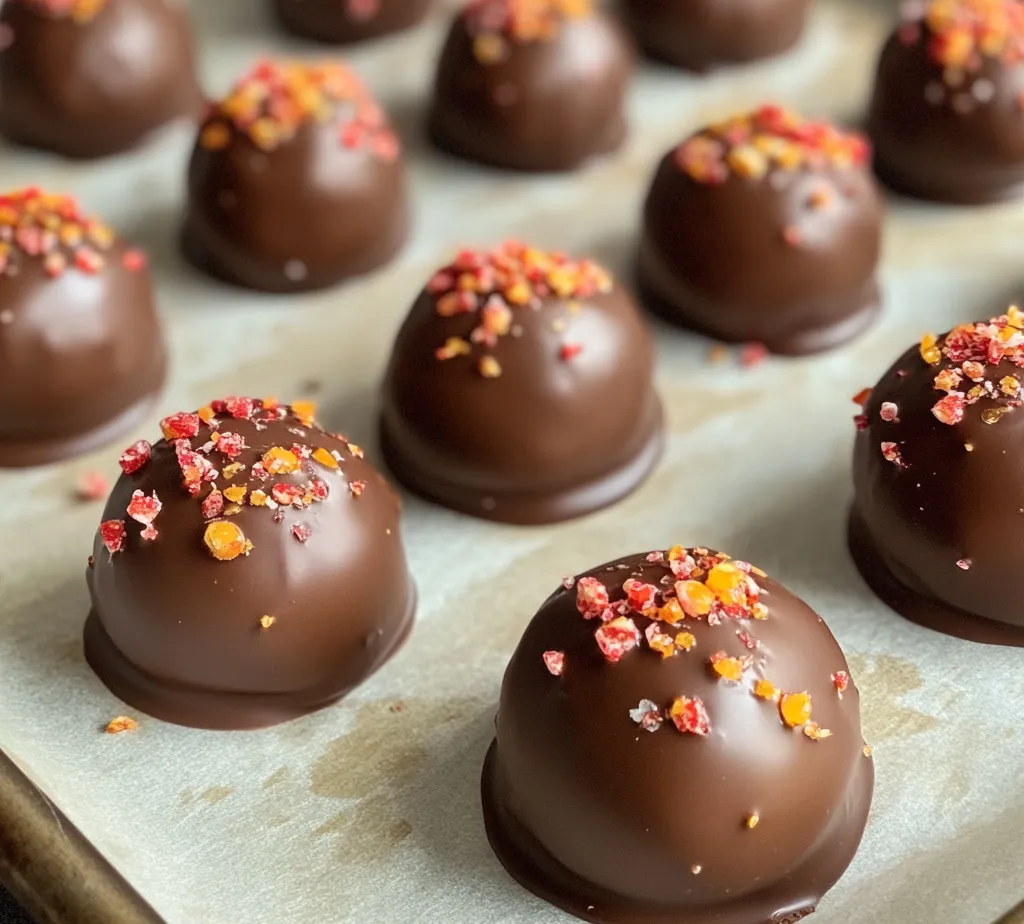
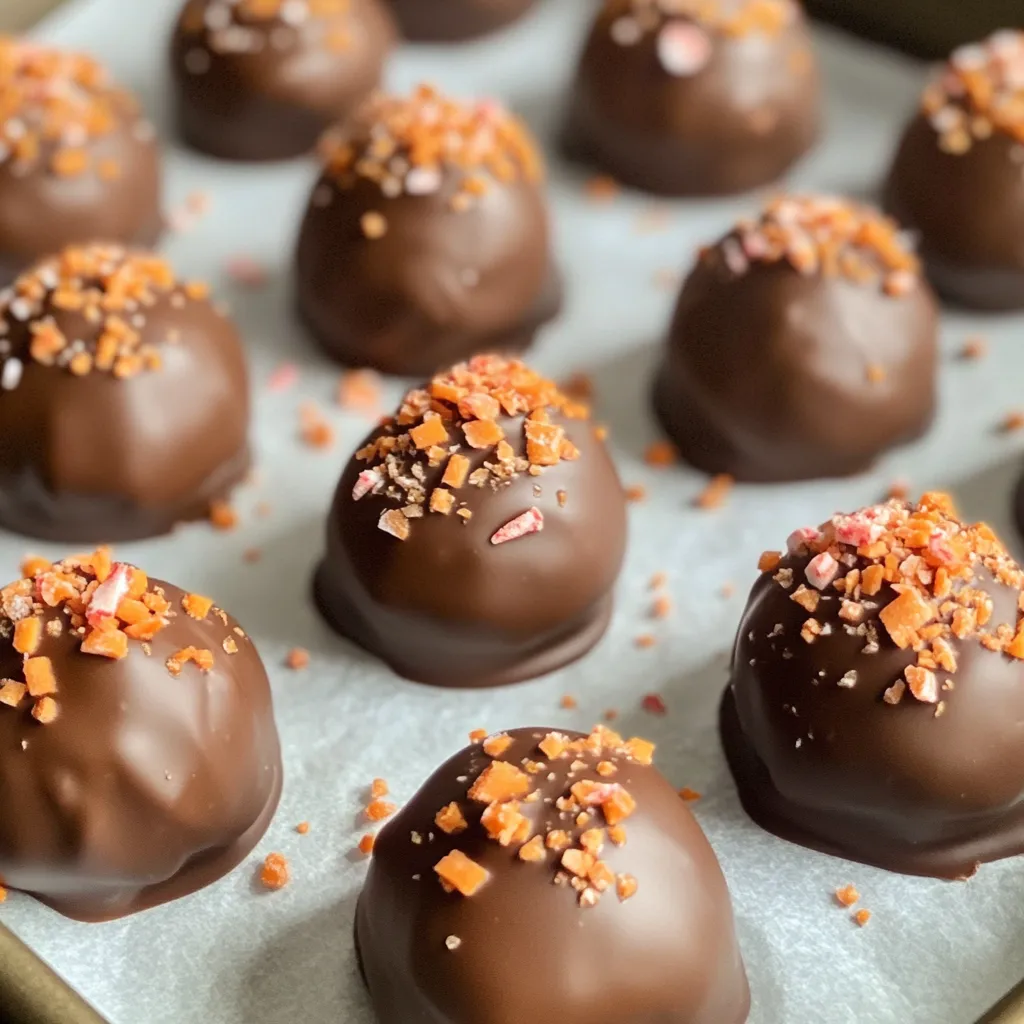
Crushed Peppermint Candies

For added visual appeal and a crunchy texture, we incorporate crushed peppermint candies into the coating. These not only add a festive touch but also provide a delightful crunch that contrasts with the smoothness of the truffles. The vibrant red and white colors of the crushed candies make for an eye-catching presentation, perfect for holiday gatherings or gifting.

Sea Salt (Optional)

While entirely optional, a sprinkle of sea salt can elevate the flavor of your No-Bake Peppermint Oreo Truffles. The salt enhances the sweetness and adds a depth of flavor that balances the richness of the cream cheese and the sweetness of the white chocolate. If you choose to include it, be sure to use it sparingly to avoid overpowering the other flavors.

Step-by-Step Preparation Guide

Now that we’ve explored the key ingredients, let’s dive into the step-by-step preparation guide for creating these delicious truffles. Follow these instructions carefully to ensure your No-Bake Peppermint Oreo Truffles turn out perfectly.

Crushing the Oreos

The first step in making the truffles is to crush the Oreo cookies into fine crumbs. This can be done in a few different ways, depending on your preference and available kitchen tools:

Food Processor: This is the quickest and most efficient method. Simply place the Oreo cookies in a food processor and pulse until they reach a fine crumb consistency. Be sure to scrape down the sides as needed to ensure even crushing.

Manual Method: If you don’t have a food processor, you can place the Oreos in a resealable plastic bag and use a rolling pin to crush them. This method requires a bit more effort, but it works just as well. Aim for a fine crumb texture to ensure a smooth mixture.

Once the Oreos are crushed, transfer them to a mixing bowl and set them aside while you prepare the other ingredients.

Mixing with Cream Cheese

Next, we’ll mix the crushed Oreos with softened cream cheese. It’s crucial that the cream cheese is at room temperature, as this will make it easier to combine with the cookie crumbs:

1. In a large mixing bowl, add the crushed Oreos.

2. Using a spatula or an electric mixer, gradually incorporate the softened cream cheese into the cookie crumbs. Mix until the mixture is well combined and forms a cohesive dough. The mixture should be thick and slightly sticky.

Incorporating Peppermint Extract

After achieving a smooth mixture, it’s time to add the peppermint extract. The amount you use will depend on your personal taste preferences, but a good starting point is 1 teaspoon:

1. Pour the peppermint extract into the Oreo and cream cheese mixture.

2. Mix thoroughly to ensure that the peppermint flavor is evenly distributed throughout the filling. Taste the mixture and adjust the amount of peppermint extract as needed, keeping in mind that the flavor will intensify slightly after chilling.

Forming the Truffles

Once your mixture is well combined, it’s time to shape the truffles. This step can be fun and allows you to get creative with the size and shape of your treats:

1. Using a cookie scoop or your hands, portion out the mixture and roll it into balls, approximately 1 inch in diameter. You can make them smaller or larger based on your preference, but keeping them uniform will ensure even coating later on.

2. Place the formed truffles on a parchment-lined baking sheet, spacing them about an inch apart to allow for easy coating later.

Chilling Process

Chilling the truffles is an essential step that allows them to firm up and makes them easier to coat with white chocolate:

1. Once all the truffles are formed, place the baking sheet in the refrigerator for about 30 minutes. This chilling period will help the truffles hold their shape during the coating process.

Melting and Coating the Truffles

After chilling, your truffles are ready to be coated in white chocolate. Here’s how to do it safely and effectively:

Techniques for Melting White Chocolate Chips

Melting white chocolate can be done using different methods, but the key is to avoid overheating, which can cause the chocolate to seize. Here are two popular methods:

Microwave Method: Place the white chocolate chips in a microwave-safe bowl. Heat them in the microwave in 30-second intervals, stirring in between each interval. This method allows you to control the temperature and prevents burning. Continue until the chocolate is fully melted and smooth.

Double Boiler Method: If you prefer, you can use a double boiler. Fill a saucepan with a small amount of water and bring it to a simmer. Place a heatproof bowl over the saucepan (making sure it doesn’t touch the water) and add the white chocolate chips to the bowl. Stir gently until melted and smooth.

Once your white chocolate is melted, it’s time to coat the chilled truffles.

Importance of Using Microwave-Safe Bowls and Stirring Intervals

When using the microwave method, it’s crucial to use microwave-safe bowls to avoid any damage or melting. Additionally, stirring at intervals is essential to help distribute the heat evenly and prevent any hot spots that could cause the chocolate to seize.

Now that you have your melted white chocolate and chilled truffles, you’re ready to take your No-Bake Peppermint Oreo Truffles to the next level. The next steps will involve dipping each truffle in the white chocolate and adding the finishing touches, ensuring that each truffle is a festive masterpiece.

Stay tuned for the next part of this guide, where we’ll cover the coating process and how to add that final festive touch to your truffles!

The holiday season is synonymous with indulgence and celebration, and what better way to embrace the festive spirit than with delightful no-bake desserts? These treats have gained immense popularity due to their simplicity and the joy they bring to gatherings. Among the many options available, <strong>No-Bake Peppermint Oreo Truffles</strong> stand out as a crowd-pleaser. With their rich, chocolatey flavor and a refreshing hint of peppermint, these truffles are the perfect addition to any festive spread, bringing a touch of sweetness that resonates with the joy of the season.” /></p>
</p>
<h3>Alternative Methods for Melting Chocolate</h3>
</p>
<p>When it comes to melting chocolate for your No-Bake Peppermint Oreo Truffles, achieving the perfect consistency is crucial. While the microwave is a popular method for convenience, using a double boiler can provide more control and help prevent burning. To set up a double boiler, fill a saucepan with an inch or two of water and bring it to a simmer. Place a heatproof bowl on top of the saucepan, ensuring that the bottom of the bowl doesn’t touch the water. Add your chocolate to the bowl, stirring gently until it melts into a smooth, glossy mixture. This method allows for even heat distribution, making it less likely for your chocolate to seize or burn.</p>
</p>
<h3>Coating the Truffles Effectively</h3>
</p>
<p>Once your truffles are formed and chilled, it’s time to coat them in the melted chocolate. To achieve a beautiful finish, it’s important to work efficiently. Start by using a fork or toothpick to pick up each truffle and dip it into the melted chocolate. Make sure to coat the truffle completely, allowing any excess chocolate to drip off before placing it back on the parchment-lined baking sheet. This method not only keeps your hands clean but also ensures that each truffle is evenly coated.</p>
</p>
<p>To avoid clumping, you might want to gently tap the fork against the side of the bowl to remove excess chocolate. If the chocolate starts to thicken as you work, you can return it to the heat source for a few seconds to re-melt it. Maintaining an appropriate temperature is crucial in this step to ensure a smooth coating.</p>
</p>
<h3>Decorating for a Festive Touch</h3>
</p>
<p>Decorating your truffles can elevate their appearance and flavor, making them even more enticing. Toppings are essential for adding visual appeal and a burst of flavor. For a festive touch, finely crush peppermint candies and sprinkle them over the coated truffles while the chocolate is still warm. The vibrant red and white colors will not only enhance the look of your truffles but will also provide a delightful crunch that complements the creamy interior.</p>
</p>
<p>Another optional addition is a sprinkle of flaky sea salt. This contrast of sweet and salty can elevate the overall flavor profile of the truffles, making them even more irresistible. Just a light touch of sea salt can enhance the chocolate’s richness and the peppermint’s freshness, creating a dynamic taste experience.</p>
</p>
<h3>Chilling and Serving Suggestions</h3>
</p>
<p>After decorating, place the truffles in the refrigerator for about 30 minutes to let the chocolate set completely. This final chilling step ensures that the chocolate has hardened nicely and the truffles maintain their shape when served. For best results, make sure your refrigerator is set to a consistent temperature, avoiding areas where the door frequently opens.</p>
</p>
<p>When it comes time to serve, presentation is key. Arrange the truffles on a decorative platter, or place them in festive treat boxes for gifting. You can use holiday-themed serving dishes to enhance the festive spirit. For a more elegant touch, consider lining a cake stand with a decorative paper doily and arranging the truffles atop it.</p>
</p>
<h3>Flavor Profile and Pairings</h3>
</p>
<p>The flavor profile of No-Bake Peppermint Oreo Truffles is a delightful combination of creamy, minty, and chocolaty notes. The cream cheese provides a rich, tangy base, while the crushed Oreos contribute a satisfying crunch. The peppermint extract adds a refreshing burst, making these truffles a perfect treat for the holiday season.</p>
</p>
<p>For pairing suggestions, consider serving these truffles with a warm cup of hot chocolate or freshly brewed coffee. The rich chocolate and mint flavors harmonize beautifully with both beverages, creating a comforting treat. Additionally, these truffles can complement other holiday sweets like gingerbread cookies or festive cakes, making them an ideal addition to a dessert spread.</p>
</p>
<h3>Storing Your No-Bake Peppermint Oreo Truffles</h3>
</p>
<p>To maintain the freshness of your No-Bake Peppermint Oreo Truffles, proper storage is essential. Store them in an airtight container in the refrigerator. This will help keep them firm and prevent them from absorbing any unwanted odors from the fridge. The truffles can last up to two weeks when stored correctly, making them a great make-ahead treat for holiday gatherings.</p>
</p>
<p>If you need to store them for an extended period, consider freezing them. Place the truffles in a single layer on a baking sheet and freeze until solid. Once frozen, transfer them to an airtight container or freezer bag, separating layers with parchment paper to prevent sticking. They can be stored in the freezer for up to three months. When you’re ready to enjoy them, simply thaw them in the refrigerator overnight.</p>
</p>
<h3>Conclusion</h3>
</p>
<p>Making No-Bake Peppermint Oreo Truffles is a joyous and straightforward process that brings the flavors of the holiday season into your kitchen. These truffles are not only easy to prepare but also serve as a delightful treat that can be enjoyed year-round. Whether you’re celebrating a special occasion or simply indulging in a sweet craving, these truffles are sure to please.</p>
</p>
<p>Their creamy, minty, and chocolaty essence, combined with the festive touch of crushed peppermint and sea salt, makes them a perfect addition to any dessert table. So gather your ingredients, follow the steps, and enjoy the process of creating these homemade delights. As you share these truffles with friends and family, you’ll not only be sharing a delicious treat but also creating cherished memories around the table.</p>
</div>

The holiday season is synonymous with indulgence and celebration, and what better way to embrace the festive spirit than with delightful no-bake desserts? These treats have gained immense popularity due to their simplicity and the joy they bring to gatherings. Among the many options available, No-Bake Peppermint Oreo Truffles stand out as a crowd-pleaser. With their rich, chocolatey flavor and a refreshing hint of peppermint, these truffles are the perfect addition to any festive spread, bringing a touch of sweetness that resonates with the joy of the season.

No-Bake Peppermint Oreo Truffles

Get into the holiday spirit with these No-Bake Peppermint Oreo Truffles! These delightful treats combine rich chocolatey Oreos with creamy cream cheese and a refreshing hint of peppermint for a festive flavor explosion. Easy to make with minimal skills required, they’re perfect for gatherings or a sweet indulgence just for you. Learn how to whip up these delicious truffles and impress your friends and family this season! #NoBakeDesserts #PeppermintTruffles #HolidayTreats #OreoDelight #FestiveBaking

Ingredients
  

1 package (15.35 oz) Oreo cookies

8 oz cream cheese, softened

1 tsp peppermint extract

12 oz white chocolate chips

1-2 tbsp crushed peppermint candies (for topping)

A pinch of sea salt (optional)

Instructions
 

Crush the Oreos: In a food processor, blend the Oreo cookies into fine crumbs. If you don’t have a processor, you can place the Oreos in a resealable bag and crush them with a rolling pin.

    Mix with Cream Cheese: In a large mixing bowl, combine the crushed Oreos and softened cream cheese. Use a spatula or your hands to mix until thoroughly combined. The mixture should be moist and hold its shape when pressed.

      Add Peppermint Extract: Stir in the peppermint extract until evenly distributed throughout the mixture.

        Form the Truffles: With your hands, scoop out about 1 tablespoon of the Oreo mixture and roll it into a ball. Place the formed truffles on a parchment-lined baking sheet. Continue until all the mixture is shaped into balls.

          Chill: Place the baking sheet in the refrigerator for about 30 minutes to firm up the truffles.

            Melt the Chocolate: In a microwave-safe bowl, melt the white chocolate chips in 30-second intervals, stirring after each session until the chocolate is smooth and fully melted.

              Coat the Truffles: Using a fork or toothpick, dip each truffle into the melted white chocolate, ensuring it is fully coated. Allow excess chocolate to drip off, and then return the truffle to the parchment-lined sheet.

                Add Toppings: Before the chocolate sets, sprinkle crushed peppermint candies on top of the truffles for a festive touch. For an extra special flavor, add a pinch of sea salt.

                  Final Chill: Once all truffles are coated and topped, return them to the refrigerator for an additional 30 minutes to let the chocolate harden completely.

                    Serve and Enjoy: Once set, serve your No-Bake Peppermint Oreo Truffles cold, and enjoy the delightful combination of creamy, minty, and chocolatey flavors!

                      Prep Time: 20 minutes | Total Time: 1 hour 20 minutes | Servings: 24 truffles

                        WANT TO SAVE THIS RECIPE?

                        Leave a Comment

                        Recipe Rating


                        WANT TO SAVE THIS RECIPE?