No-Bake S’mores Fudge Bars Simple and Tasty Treat

WANT TO SAVE THIS RECIPE?

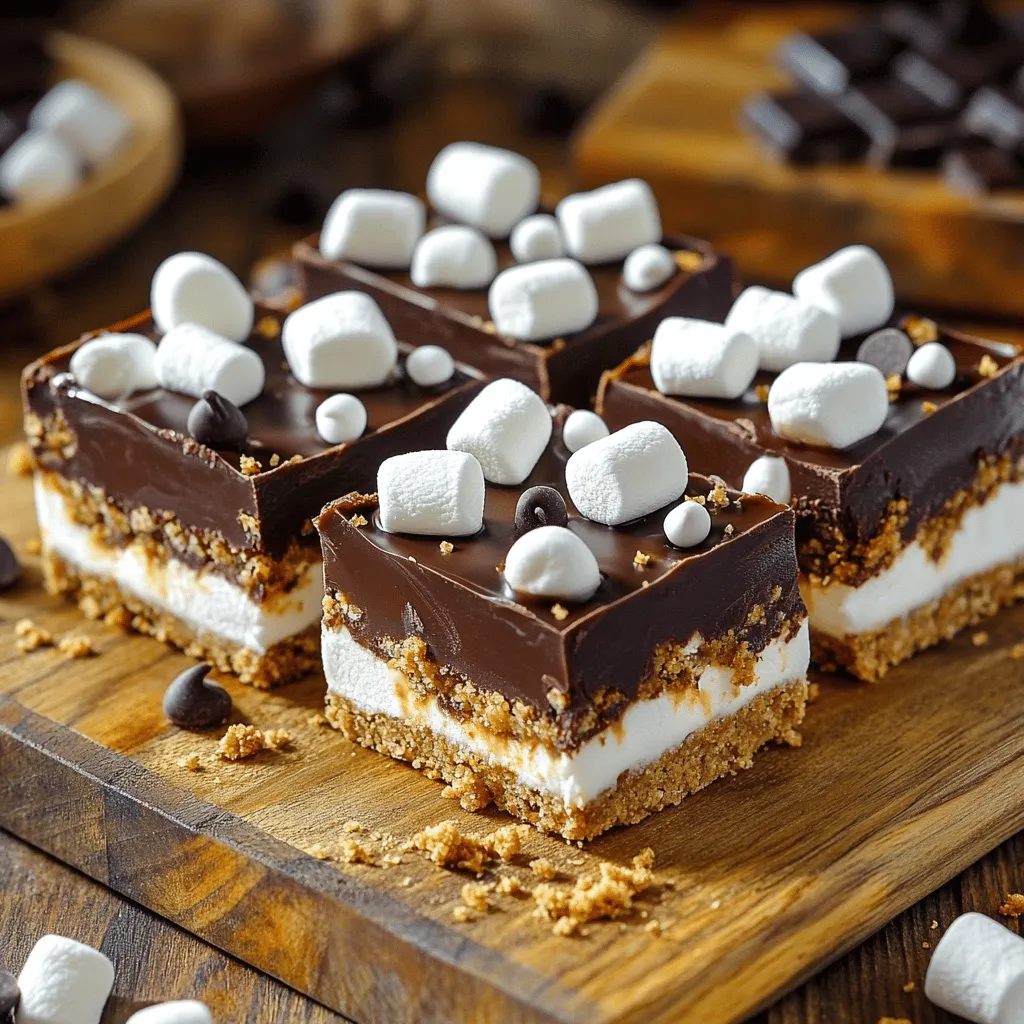
Craving something sweet and simple? You’re in the right place! No-Bake S’mores Fudge Bars are a fun twist on a classic treat. They combine the rich flavors of chocolate, marshmallows, and graham crackers without any baking. I’ll guide you through easy steps and tasty tips to create this delicious dessert. Let’s dive into the ingredients and whip up some treats that everyone will love!

Ingredients

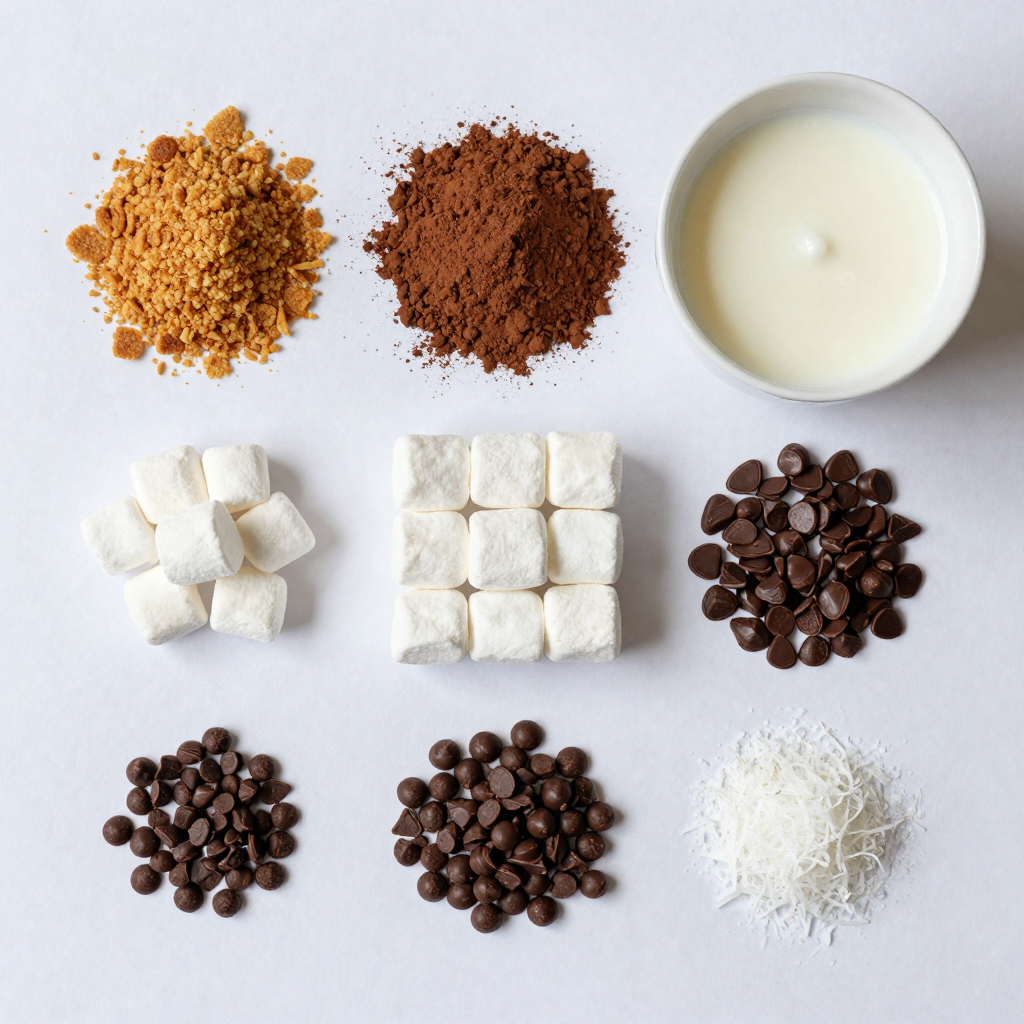
List of Required Ingredients

– 1 ½ cups graham cracker crumbs

– ½ cup unsweetened cocoa powder

– 1 cup sweetened condensed milk

– 1 cup mini marshmallows

– 1 cup semi-sweet chocolate chips

– ½ cup mini chocolate chips (for topping)

– ¼ cup unsweetened shredded coconut (optional, for added texture)

– Pinch of salt

The right ingredients make these No-Bake S’mores Fudge Bars shine. I always use fresh graham cracker crumbs for that classic flavor. Cocoa powder gives the bars a rich taste. Sweetened condensed milk binds everything together, making each bite creamy. Mini marshmallows add that perfect chewy texture. Semi-sweet chocolate chips create a smooth layer of chocolate goodness. Topping with mini chocolate chips adds extra sweetness. If you like a bit of crunch, try adding shredded coconut.

Ingredient Substitutions

Alternative options for graham cracker crumbs: You can use crushed cookies like Oreos or digestive biscuits. They work well and add a different flavor.

Sweetened condensed milk substitutes: Try coconut milk for a dairy-free option. You can also make your own using milk and sugar.

Different chocolate types for varying flavor: Dark chocolate or white chocolate can change the taste. Use your favorite type for a personal touch.

For the Full Recipe, check out the detailed instructions and enjoy making these tasty treats!

Step-by-Step Instructions

Preparation Steps

1. Mix the Dry Ingredients: In a large bowl, combine 1 ½ cups of graham cracker crumbs, ½ cup of cocoa powder, and a pinch of salt. Mix them well. This step gives the bars their base flavor and texture.

2. Melt the Chocolate: Take 1 cup of semi-sweet chocolate chips. Place them in a microwave-safe bowl. Heat in 30-second intervals. Stir after each interval until the chocolate is smooth. This method prevents burning and ensures a glossy finish.

3. Layer the Ingredients: Line an 8×8-inch baking pan with parchment paper. Leave some paper hanging over the sides. This will help you lift the bars out later. Press half of the graham cracker mixture evenly in the pan. Pour the melted chocolate over this layer. Spread it out evenly. Next, sprinkle 1 cup of mini marshmallows on top, followed by the remaining graham cracker mixture. Press the top layer down gently to stick it to the marshmallows and chocolate.

Setting the Bars

Refrigeration time is key. It helps the bars firm up nicely. Chill them for at least 4 hours. To check if they are set, gently press the top. If it feels firm, they are ready. If not, give them a little more time. Once set, lift the bars out using the parchment overhang. Cut them into squares for serving. For the full recipe, check the complete instructions.

Tips & Tricks

Achieving the Best Texture

To make sure your bars do not get too crumbly, follow these tips:

Use fresh ingredients: Old graham crackers can affect the taste and texture.

Press firmly: When you add each layer, press down with even force. This helps them stick together.

Check the ratio: Keep the graham crumbs and condensed milk balanced. Too much of one can lead to a mess.

Pressing down your layers correctly is key. If you don’t press the top layer firmly, the bars may fall apart. Use a flat spatula or your hands to get a good seal on the layers.

Enhancing Flavor

Want to make your fudge bars more exciting? Here are some great ideas:

Add spices: A pinch of cinnamon or nutmeg can bring warmth to the bars.

Try extracts: A dash of vanilla or almond extract can boost the flavor.

Unique ingredients: Swap some chocolate chips for peanut butter chips or add crushed peppermint for a seasonal twist.

Experimenting with flavors keeps things fun. Each twist can give your bars a whole new life. Enjoy the process!

Variations

Flavor Variations

You can easily customize your No-Bake S’mores Fudge Bars. Adding fruits like strawberries or bananas can brighten the flavor. The sweetness in the fruit pairs well with the rich chocolate. Simply chop the fruit and sprinkle it on top before adding the last layer of graham cracker mixture.

You can also use different nuts or seeds for added crunch. Try chopped almonds or walnuts for a nutty taste. Sunflower seeds can add a fun twist too. Just mix them into the chocolate layer or sprinkle them on top before chilling.

Dietary Modifications

If you need gluten-free options, use gluten-free graham cracker crumbs. There are many brands available now. Check the packaging to ensure they fit your needs.

For a vegan version, swap the sweetened condensed milk for coconut cream or a dairy-free condensed milk. Use vegan chocolate chips for the chocolate layers. This way, everyone can enjoy these tasty bars without missing out.

Storage Info

Proper Storage Techniques

To keep your No-Bake S’mores Fudge Bars fresh, store them in the refrigerator. Use an airtight container to prevent them from drying out. If you want to keep them for longer, wrap each bar in plastic wrap. This extra step helps keep them moist and tasty.

Freezing Instructions

You can freeze these bars for up to three months. Just make sure to cut them into squares first. Place the squares in a single layer on a baking sheet. Once frozen, move them to a freezer-safe bag or container. When you’re ready to enjoy them, thaw the bars in the fridge overnight. For a quick treat, you can serve them slightly frozen for a cool and chewy snack.

FAQs

Common Questions Answered

How long do No-Bake S’mores Fudge Bars last?

These bars can last up to one week in the fridge. Store them in an airtight container. You can also freeze them for up to three months. Just remember to wrap them well to avoid freezer burn.

Can I make No-Bake S’mores Fudge Bars ahead of time?

Yes! You can prepare these bars a day or two in advance. This makes them perfect for parties or gatherings. Just keep them in the fridge until you are ready to serve.

What should I do if my mixture doesn’t hold together?

If your mixture is too crumbly, add a bit more sweetened condensed milk. This will help bind the ingredients. Mix it in slowly until you reach the desired consistency.

Related Recipe Tips

Can I use different toppings?

Absolutely! Feel free to get creative. You can add crushed nuts, sprinkles, or even more marshmallows on top. Use what you love!

Can I substitute the cocoa powder with chocolate syrup?

You can use chocolate syrup, but it will change the texture. You may need to adjust the amount of sweetened condensed milk. Start with half the syrup and see how it mixes.

These No-Bake S’mores Fudge Bars are easy to make and share. We covered the key ingredients and their substitutions, including how to mix and set the bars. Tips on achieving the best texture and flavor variations make this treat even better. Proper storage helps keep them fresh for longer. Now you can enjoy these delicious bars any time, and impress others with your baking skills. Have fun experimenting with flavors and enjoy your tasty creation!

- 1 ½ cups graham cracker crumbs - ½ cup unsweetened cocoa powder - 1 cup sweetened condensed milk - 1 cup mini marshmallows - 1 cup semi-sweet chocolate chips - ½ cup mini chocolate chips (for topping) - ¼ cup unsweetened shredded coconut (optional, for added texture) - Pinch of salt The right ingredients make these No-Bake S’mores Fudge Bars shine. I always use fresh graham cracker crumbs for that classic flavor. Cocoa powder gives the bars a rich taste. Sweetened condensed milk binds everything together, making each bite creamy. Mini marshmallows add that perfect chewy texture. Semi-sweet chocolate chips create a smooth layer of chocolate goodness. Topping with mini chocolate chips adds extra sweetness. If you like a bit of crunch, try adding shredded coconut. - Alternative options for graham cracker crumbs: You can use crushed cookies like Oreos or digestive biscuits. They work well and add a different flavor. - Sweetened condensed milk substitutes: Try coconut milk for a dairy-free option. You can also make your own using milk and sugar. - Different chocolate types for varying flavor: Dark chocolate or white chocolate can change the taste. Use your favorite type for a personal touch. For the Full Recipe, check out the detailed instructions and enjoy making these tasty treats! 1. Mix the Dry Ingredients: In a large bowl, combine 1 ½ cups of graham cracker crumbs, ½ cup of cocoa powder, and a pinch of salt. Mix them well. This step gives the bars their base flavor and texture. 2. Melt the Chocolate: Take 1 cup of semi-sweet chocolate chips. Place them in a microwave-safe bowl. Heat in 30-second intervals. Stir after each interval until the chocolate is smooth. This method prevents burning and ensures a glossy finish. 3. Layer the Ingredients: Line an 8x8-inch baking pan with parchment paper. Leave some paper hanging over the sides. This will help you lift the bars out later. Press half of the graham cracker mixture evenly in the pan. Pour the melted chocolate over this layer. Spread it out evenly. Next, sprinkle 1 cup of mini marshmallows on top, followed by the remaining graham cracker mixture. Press the top layer down gently to stick it to the marshmallows and chocolate. Refrigeration time is key. It helps the bars firm up nicely. Chill them for at least 4 hours. To check if they are set, gently press the top. If it feels firm, they are ready. If not, give them a little more time. Once set, lift the bars out using the parchment overhang. Cut them into squares for serving. For the full recipe, check the complete instructions. To make sure your bars do not get too crumbly, follow these tips: - Use fresh ingredients: Old graham crackers can affect the taste and texture. - Press firmly: When you add each layer, press down with even force. This helps them stick together. - Check the ratio: Keep the graham crumbs and condensed milk balanced. Too much of one can lead to a mess. Pressing down your layers correctly is key. If you don’t press the top layer firmly, the bars may fall apart. Use a flat spatula or your hands to get a good seal on the layers. Want to make your fudge bars more exciting? Here are some great ideas: - Add spices: A pinch of cinnamon or nutmeg can bring warmth to the bars. - Try extracts: A dash of vanilla or almond extract can boost the flavor. - Unique ingredients: Swap some chocolate chips for peanut butter chips or add crushed peppermint for a seasonal twist. Experimenting with flavors keeps things fun. Each twist can give your bars a whole new life. Enjoy the process! {{image_2}} You can easily customize your No-Bake S’mores Fudge Bars. Adding fruits like strawberries or bananas can brighten the flavor. The sweetness in the fruit pairs well with the rich chocolate. Simply chop the fruit and sprinkle it on top before adding the last layer of graham cracker mixture. You can also use different nuts or seeds for added crunch. Try chopped almonds or walnuts for a nutty taste. Sunflower seeds can add a fun twist too. Just mix them into the chocolate layer or sprinkle them on top before chilling. If you need gluten-free options, use gluten-free graham cracker crumbs. There are many brands available now. Check the packaging to ensure they fit your needs. For a vegan version, swap the sweetened condensed milk for coconut cream or a dairy-free condensed milk. Use vegan chocolate chips for the chocolate layers. This way, everyone can enjoy these tasty bars without missing out. To keep your No-Bake S'mores Fudge Bars fresh, store them in the refrigerator. Use an airtight container to prevent them from drying out. If you want to keep them for longer, wrap each bar in plastic wrap. This extra step helps keep them moist and tasty. You can freeze these bars for up to three months. Just make sure to cut them into squares first. Place the squares in a single layer on a baking sheet. Once frozen, move them to a freezer-safe bag or container. When you're ready to enjoy them, thaw the bars in the fridge overnight. For a quick treat, you can serve them slightly frozen for a cool and chewy snack. How long do No-Bake S’mores Fudge Bars last? These bars can last up to one week in the fridge. Store them in an airtight container. You can also freeze them for up to three months. Just remember to wrap them well to avoid freezer burn. Can I make No-Bake S’mores Fudge Bars ahead of time? Yes! You can prepare these bars a day or two in advance. This makes them perfect for parties or gatherings. Just keep them in the fridge until you are ready to serve. What should I do if my mixture doesn’t hold together? If your mixture is too crumbly, add a bit more sweetened condensed milk. This will help bind the ingredients. Mix it in slowly until you reach the desired consistency. Can I use different toppings? Absolutely! Feel free to get creative. You can add crushed nuts, sprinkles, or even more marshmallows on top. Use what you love! Can I substitute the cocoa powder with chocolate syrup? You can use chocolate syrup, but it will change the texture. You may need to adjust the amount of sweetened condensed milk. Start with half the syrup and see how it mixes. These No-Bake S’mores Fudge Bars are easy to make and share. We covered the key ingredients and their substitutions, including how to mix and set the bars. Tips on achieving the best texture and flavor variations make this treat even better. Proper storage helps keep them fresh for longer. Now you can enjoy these delicious bars any time, and impress others with your baking skills. Have fun experimenting with flavors and enjoy your tasty creation!

No-Bake S’mores Fudge Bars

Indulge in the deliciousness of No-Bake S’mores Fudge Bars with this simple recipe that anyone can master! Made with graham crackers, chocolate, and marshmallows, these treats are perfect for satisfying your sweet tooth without turning on the oven. Discover how to whip up this easy dessert in just 15 minutes and enjoy them chilled. Click to explore the full recipe and impress your friends and family with this delightful no-bake treat!

Ingredients
  

1 ½ cups graham cracker crumbs

½ cup unsweetened cocoa powder

1 cup sweetened condensed milk

1 cup mini marshmallows

1 cup semi-sweet chocolate chips

½ cup mini chocolate chips (for topping)

¼ cup unsweetened shredded coconut (optional, for added texture)

Pinch of salt

Instructions
 

In a mixing bowl, combine the graham cracker crumbs, cocoa powder, and a pinch of salt. Stir well to combine.

    Add the sweetened condensed milk to the dry ingredients and mix until fully combined. The mixture should be moist and sticky.

      Line an 8x8-inch baking pan with parchment paper, leaving some overhang for easy removal later.

        Press half of the graham cracker mixture evenly into the bottom of the prepared pan.

          In a microwave-safe bowl, melt the semi-sweet chocolate chips in 30-second intervals, stirring in between until smooth.

            Pour the melted chocolate over the crust layer in the baking pan, spreading it out evenly.

              Sprinkle the mini marshmallows evenly over the chocolate layer followed by the remaining graham cracker mixture.

                Gently press the top layer down to adhere it to the marshmallows and chocolate.

                  Finish by sprinkling mini chocolate chips and shredded coconut (if using) over the top for a decorative touch.

                    Refrigerate the bars for at least 4 hours or until set. Once firm, lift the bars out of the pan using the parchment overhang and cut into squares.

                      Prep Time: 15 mins | Total Time: 4 hrs 15 mins | Servings: 16 squares

                        - Presentation Tips: Arrange the fudge bars on a serving platter, and garnish with whole marshmallows and chocolate shavings for an extra touch. Optionally, drizzle some melted chocolate over the bars before serving.

                          WANT TO SAVE THIS RECIPE?

                          Leave a Comment

                          Recipe Rating