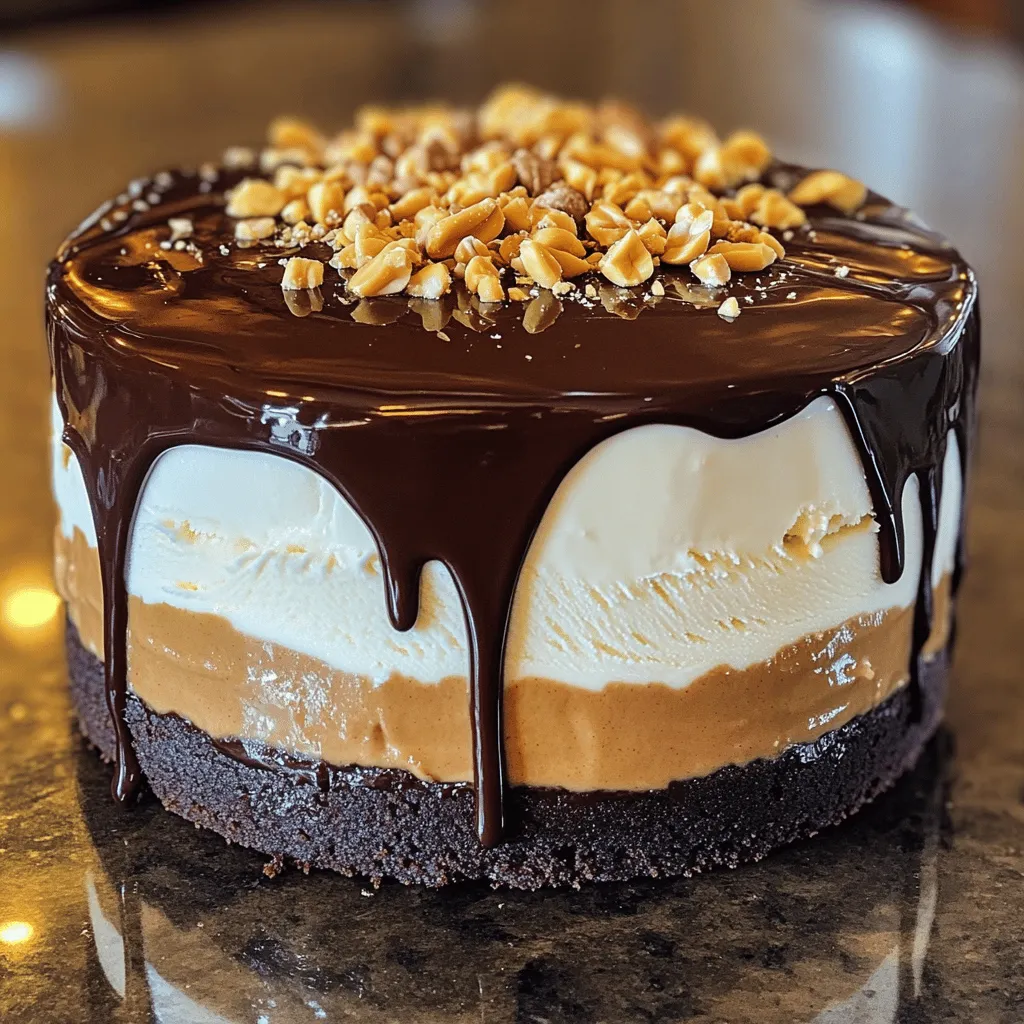
Craving something sweet and indulgent? Look no further than my Peanut Butter Fudge Ganache Ice Cream Cake Delight! This luscious dessert layers a creamy peanut butter filling with vanilla ice cream, all tucked inside a crunchy cookie crust. Topped off with rich chocolate ganache, it’s a dream come true for any sweet tooth. Join me as I guide you through every simple step to create this delicious treat that will wow your friends and family!
Ingredients
Required Ingredients
– 1 pre-made chocolate cookie crust
– 2 cups vanilla ice cream, softened
– 1 cup creamy peanut butter
– 1 cup powdered sugar
– 1 cup heavy cream
– 1 cup semi-sweet chocolate chips
– 2 tablespoons unsweetened cocoa powder
– 1 teaspoon vanilla extract
– Pinch of salt
– Crushed peanuts for topping (optional)
When making the Peanut Butter Fudge Ganache Ice Cream Cake, you need to gather some key ingredients. The pre-made chocolate cookie crust serves as a great base for this cake. It adds a rich and crunchy texture.
Next, you’ll need softened vanilla ice cream. Let it sit out for a few minutes. This makes it easier to spread. The creamy peanut butter is the star of this recipe. It adds a wonderful nutty flavor.
Powdered sugar helps sweeten the peanut butter layer. It blends well and gives a smooth finish. Heavy cream is essential for making the ganache. It gives the chocolate a silky texture.
You will also need semi-sweet chocolate chips. They melt beautifully and add great depth. Unsweetened cocoa powder enhances the chocolate flavor. A little vanilla extract brightens the taste.
Finally, a pinch of salt balances all the flavors. You can top the cake with crushed peanuts for added crunch.
Gather these ingredients, and you’re ready to create a delicious dessert!
Step-by-Step Instructions
Prepare the Peanut Butter Layer
In a medium bowl, combine one cup of creamy peanut butter and one cup of powdered sugar. Mix them until the blend is smooth and creamy. This step creates a sweet and rich layer. Set it aside for later assembly.
Assemble the Cake Layers
Take your pre-made chocolate cookie crust. Spoon half of the softened vanilla ice cream into the crust. Use a spatula to spread it evenly. Next, add the smooth peanut butter layer on top. Spread it out evenly to cover the ice cream. Finally, top this with the rest of the vanilla ice cream, smoothing it out to create a uniform layer.
Freeze the Cake
Now, place the assembled cake in the freezer. Let it freeze for about two hours. This ensures it becomes solid and easy to slice later.
Make the Ganache
In a small saucepan, combine one cup of heavy cream and one cup of semi-sweet chocolate chips over medium heat. Stir the mixture continuously until it becomes smooth and glossy. Remove it from the heat and let it cool slightly. This ganache adds a rich chocolate flavor to the cake.
Drizzle the Ganache
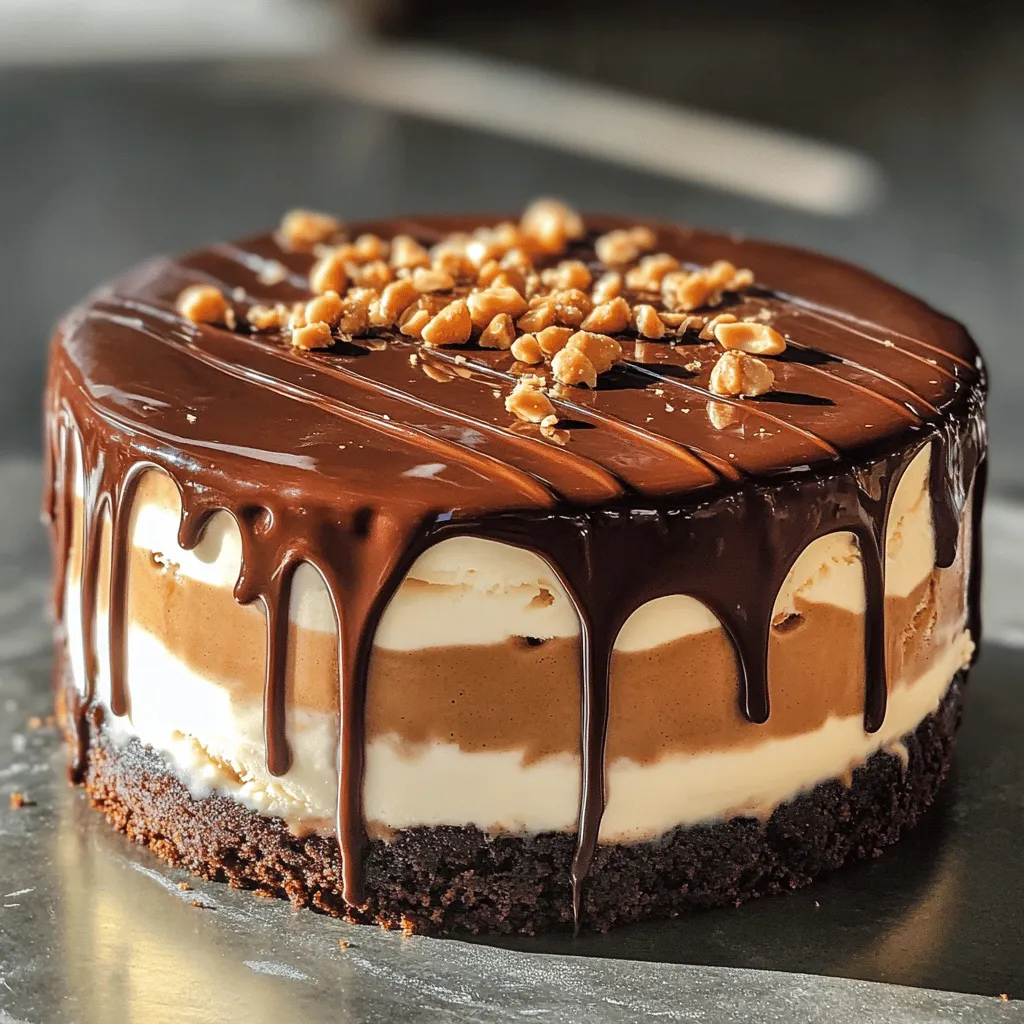
Once the ice cream cake is completely frozen, pour the chocolate ganache over the top. Let it drip down the sides for a nice finish. Use a spatula to spread it if needed. This creates a beautiful coating of chocolate.
Final Freeze
Return the cake to the freezer for an additional 30 to 45 minutes. This step sets the ganache so it stays in place when sliced.
Serve
When you are ready to serve, take the cake out of the freezer. Let it sit at room temperature for about 5 to 10 minutes. This softens it slightly for easy slicing. Slice the cake and enjoy your delicious Peanut Butter Fudge Ganache Ice Cream Cake. You can add crushed peanuts on top for extra crunch.
Tips & Tricks
Achieving the Perfect Ganache
To make the best ganache, use high-quality chocolate chips. This choice really boosts the flavor. When heating the cream, avoid overheating it. Heat it just enough to melt the chips smoothly. This helps create a glossy finish that shines.
Serving Suggestions
When serving, consider garnishing with whipped cream and crushed peanuts. This adds a nice crunch and texture. For a great look, use chilled plates. The cold plates keep the cake firm and make each slice look appealing. Drizzle any leftover ganache over the top for extra flavor.
Common Mistakes to Avoid
One common mistake is not letting the ice cream soften before assembly. Softening makes it easier to spread, ensuring even layers. Also, be careful not to overmix the peanut butter layer. Overmixing can lead to a grainy texture, which is not what you want. Follow these tips to make your cake perfect!
Variations
Flavor Variations
You can switch things up easily. Swap vanilla ice cream for chocolate or cookie dough. This change adds a rich taste. It makes the cake even more fun. You can also add different nut butters. Almond, cashew, or sunflower butter can bring new flavors. Each nut butter gives a unique twist and can surprise your taste buds.
Topping Options
Toppings can make your cake special. Use different nuts like walnuts or pecans for crunch. Sprinkles can add color and joy. You can also layer in fruits like bananas or strawberries. These fruits add freshness and a pop of flavor. They can balance the sweetness of the ganache too.
Dietary Alternatives
You can make this cake fit dietary needs. For a gluten-free option, use a gluten-free cookie crust. It keeps the base tasty and safe. If dairy is a concern, try dairy-free ice cream. Almond or coconut milk ice creams work well. These swaps still give you a delightful cake experience.
Storage Info
How to Store Leftovers
To keep your Peanut Butter Fudge Ganache Ice Cream Cake fresh, store it well. First, wrap it tightly in plastic wrap. This helps to keep moisture in and air out. You can also place the wrapped cake in a sturdy container. Make sure the container is airtight. This will protect your cake from freezer burn.
How Long Does It Last?
In the freezer, your cake should last about two months. After that, the taste may change. Look for signs of spoilage. If you see ice crystals on the surface, it’s best to toss it. Also, if it smells off, do not eat it.
Reheating Tips
When you want to serve the cake again, soften it a bit first. Let it sit at room temperature for 5 to 10 minutes. This will make slicing easier. To avoid freezer burn, always wrap leftovers well before freezing. Enjoy your sweet treat again with ease!
FAQs
Can I make this cake in advance?
Yes, you can make the cake ahead of time. Prepare the cake and freeze it. You can store it for up to a week in the freezer. Just remember to cover it well with plastic wrap or foil to keep it fresh. When you are ready to serve, let it sit out for a few minutes to soften.
Can I use crunchy peanut butter instead?
You can use crunchy peanut butter if you want some extra texture. It will add a nice crunch to each bite. However, it may change the smoothness of the peanut butter layer. If you love the crunch, go for it!
What if I don’t have a cookie crust?
If you don’t have a cookie crust, you can make one from graham crackers. Just crush about 1.5 cups of graham crackers. Mix them with ½ cup of melted butter. Press this mix into the bottom of your cake pan. This will work great as a substitute.
How to fix a runny ganache?
If your ganache is too runny, it might need more chocolate. Heat it gently again, and stir in more chocolate chips until it thickens. You can also let it cool a bit longer before pouring it on your cake. This will help it set better on top.
Is this recipe suitable for kids?
This recipe contains common allergens like peanuts and dairy. Always check for allergies before serving. If you wish to make it kid-friendly, use a nut-free butter and dairy-free ice cream. Serve smaller slices for kids to enjoy without overwhelming them.
You learned how to make a delicious ice cream cake with simple steps. Start with a chocolate cookie crust, layered with vanilla ice cream and creamy peanut butter. Don’t forget the smooth ganache topping!
Try different flavors or toppings to make it your own. Storing leftovers is easy and keeps them fresh. Enjoy making this cake for a fun treat. Your family and friends will love every bite!


