
Introduction
The allure of homemade bread is undeniable, and nothing quite compares to the warm, fragrant aroma of freshly baked Rosemary Dinner Rolls with Garlic Butter wafting through your kitchen. These soft and fluffy rolls are not only a delightful addition to any meal but also a perfect way to impress family and friends with your baking skills. With a golden crust and a tender interior infused with the earthy flavor of rosemary, these rolls elevate any dining experience, whether it’s a cozy family dinner or a festive gathering.
In this blog post, we will delve into the step-by-step process of creating these delicious rolls, while providing valuable insights into the ingredients and techniques used to achieve the perfect texture and flavor. From understanding the role of each ingredient to mastering the art of yeast activation, we’ll guide you through the intricacies of baking Rosemary Dinner Rolls with Garlic Butter.
Understanding the Ingredients
Before we embark on the baking journey, it’s essential to understand the key ingredients that contribute to the unique taste and texture of these rolls. Each element plays a crucial role in the overall outcome, and selecting the right components can make all the difference.
The Role of All-Purpose Flour
All-purpose flour is the backbone of any bread recipe, providing structure and texture. The gluten development in the flour is pivotal for creating the chewy, airy quality that makes bread enjoyable. When water is mixed with flour, gluten proteins combine to form a stretchy network that traps air bubbles produced during fermentation, leading to the rise of the bread.
While all-purpose flour is the most common choice for bread-making, there are alternatives available for those with specific dietary needs. For instance, bread flour contains a higher protein content, which can yield a chewier texture. Whole wheat flour offers a nuttier flavor and additional nutrients, but it may require adjustments in hydration due to its higher fiber content.
Active Dry Yeast: The Leavening Agent
Active dry yeast is the magical ingredient that causes dough to rise. When hydrated, yeast feeds on the sugars present in the dough, producing carbon dioxide gas as a byproduct. This gas gets trapped in the gluten structure, causing the dough to expand and develop a light, airy texture.
To ensure optimal results, it’s crucial to check the freshness of your yeast. Expired yeast will not activate properly, leading to dense, flat rolls. A simple way to test the yeast is by mixing it with warm water (about 110°F) and a pinch of sugar. If it becomes frothy and bubbly within a few minutes, it’s ready to use.
The Importance of Salt in Bread
Salt is often overlooked in baking, but it serves multiple functions. First, it enhances the flavor of the bread, balancing the sweetness and richness of other ingredients. Additionally, salt plays a vital role in controlling fermentation; it strengthens the gluten structure and regulates yeast activity, ensuring even rising.
When choosing salt for bread-making, consider using fine sea salt or kosher salt, as they dissolve easily and evenly distribute throughout the dough. Avoid using table salt, which can be overly processed and may contain additives that affect the dough’s texture.
The Sweet Touch: Sugar in Baking
Sugar is not just a sweetener; it also plays a significant role in bread-making. In this recipe, sugar contributes to the browning of the crust through caramelization and Maillard reaction, giving the rolls a beautiful golden hue. Moreover, sugar provides food for the yeast, enhancing its activity and promoting a better rise.
For this recipe, granulated sugar is ideal. However, you can also experiment with brown sugar or honey for a deeper flavor profile. Just remember to adjust the liquid content accordingly, as these alternatives can add moisture to your dough.
Water: The Unsung Hero in Bread Dough
Water is essential in bread-making, as it activates the yeast and hydrates the flour to form dough. The ideal temperature for water should be warm but not hot, typically around 110°F. If the water is too hot, it can kill the yeast; too cold, and the fermentation process will be sluggish.
The quality of water also matters. If your tap water has a strong chlorine taste, consider using filtered or bottled water to avoid any unwanted flavors in your bread.
Olive Oil and Its Flavor Profile
Olive oil adds a rich flavor and moisture to the rolls, contributing to their tender texture. It also helps to create a golden crust when baked. Using high-quality extra virgin olive oil enhances the overall taste, imparting a fruity aroma that complements the rosemary.
Should you wish to explore other oils, avocado oil or melted butter can be good substitutes, though they will alter the flavor profile slightly.
Fresh Rosemary: Aromatic and Flavorful
Fresh rosemary is the star herb in this recipe, providing a fragrant and earthy flavor that pairs beautifully with the garlic butter. When selecting rosemary, look for vibrant green leaves without any browning or wilting. To prepare it, simply rinse and pat dry, then finely chop to release its aromatic oils.
If rosemary is not available, consider substituting with other herbs such as thyme, oregano, or parsley for a different twist.
Garlic Butter: A Flavor Bomb
Garlic butter is the finishing touch that elevates these rolls to another level. The combination of melted butter and minced garlic creates a rich, savory spread that seeps into the warm rolls, enhancing their flavor.
For added depth, you can mix in herbs like parsley or chives, or even a sprinkle of Parmesan cheese for a cheesy twist. Feel free to experiment with different ratios of garlic to butter to suit your taste preferences.
Step-by-Step Guide to Making Rosemary Dinner Rolls
Now that we have a solid understanding of the ingredients, it’s time to dive into the step-by-step process of making these delightful Rosemary Dinner Rolls with Garlic Butter. The first step in this baking adventure is preparing the yeast mixture, which sets the foundation for a successful rise.
Preparing the Yeast Mixture
1. Activate the Yeast: In a small bowl, combine the warm water, sugar, and active dry yeast. Stir gently until the yeast dissolves. Allow this mixture to sit for about 5-10 minutes. During this time, you should see bubbles forming on the surface, indicating that the yeast is active and ready for use.
2. Combine Ingredients: In a large mixing bowl, combine the all-purpose flour and salt, mixing well. Make a well in the center and pour in the activated yeast mixture along with the olive oil.
3. Mix the Dough: Using a wooden spoon or your hands, gradually incorporate the flour into the wet ingredients until a shaggy dough forms. The dough should be slightly sticky but manageable. If it feels too wet, add a little more flour, one tablespoon at a time until you achieve the desired consistency.
Once you have completed these initial steps, you’ll be well on your way to creating a batch of mouthwatering Rosemary Dinner Rolls with Garlic Butter. Stay tuned for the next part, where we will continue with the kneading, rising, and baking processes that transform this dough into fluffy, aromatic rolls.
Mixing and Kneading the Dough
Once you’ve gathered your ingredients, it’s time to mix and knead the dough for your rosemary dinner rolls. Start by combining your dry ingredients—flour, sugar, salt, and yeast—in a large mixing bowl. Make a well in the center and add your wet ingredients: warm water and melted butter. Using a wooden spoon or a dough whisk, gradually incorporate the flour into the wet mixture until it starts to come together.
For optimal incorporation, mix until no dry flour remains. If you’re using fresh rosemary, chop it finely before adding it to the dough. This will release its fragrant oils and ensure even distribution throughout the rolls.
Kneading is a critical step in developing the gluten structure, which gives your rolls their light and airy texture. Turn the dough onto a lightly floured surface and begin kneading by pushing the dough away with the heels of your hands, then folding it back over itself. Rotate the dough a quarter turn and repeat. Knead for about 8-10 minutes until the dough is smooth and elastic. If the dough is too sticky, sprinkle a little more flour; if it’s too dry, wet your hands slightly and continue kneading. The goal is to achieve a soft, pliable dough that springs back when poked.
The First Rise: Importance of Fermentation
The first rise, or fermentation, is crucial in bread-making as it allows the yeast to activate and develop flavor. This process can take anywhere from 1 to 2 hours, depending on the temperature of your kitchen. During this time, the dough will double in size as the yeast consumes the sugars and produces carbon dioxide, causing the dough to rise.
To create ideal conditions for rising, choose a warm, draft-free spot. A great method is to preheat your oven to the lowest setting for just a few minutes, then turn it off and place the covered dough inside. Alternatively, you can place the bowl on a countertop near a warm stove or wrap it in a kitchen towel.
As the dough rises, you’ll notice its texture changing; it will appear puffed and airy. This is a sign of successful fermentation, and it’s essential to let it rise fully to develop the desired flavor profile.
Shaping the Rolls
After the first rise, it’s time to shape your rolls. Begin by gently deflating the dough on a floured surface. This will help release some of the gas bubbles formed during fermentation. Divide the dough into equal pieces; typically, you can aim for 12-16 pieces, depending on the size of the rolls you desire.
To shape each roll, take a piece of dough and flatten it slightly with your palm. Then, fold the edges towards the center, creating a small pouch. Flip it over and use your hands to gently roll it into a ball, ensuring a smooth top. This technique helps create surface tension, which is essential for a nice rise in the oven. Place the shaped rolls on a greased baking sheet or in a baking dish, ensuring they are spaced evenly. This spacing allows for even baking and prevents sticking.
The Second Rise: Developing Flavor and Texture
The second rise is just as important as the first, allowing your rolls to develop even more flavor and a light texture. After shaping, cover the rolls with a clean kitchen towel or plastic wrap and let them rise for another 30-45 minutes. During this time, they should puff up noticeably.
To create an optimal environment for the second rise, you can use the same method as before. If your kitchen is cooler, consider placing the rolls in the oven with just the light on or in a slightly warmed oven, ensuring the temperature remains low. This gentle warmth encourages the yeast to work its magic, leading to beautifully risen rolls.
Baking the Rolls to Perfection
Once the rolls have completed their second rise, preheat your oven to 375°F (190°C). Baking at the right temperature is critical to achieving a golden-brown crust while keeping the inside fluffy and tender.
Before placing the rolls in the oven, brush the tops with a little melted butter for added flavor and a beautiful sheen. Bake for 20-25 minutes, or until the tops are golden brown and the rolls sound hollow when tapped on the bottom. If you’re unsure, you can use an instant-read thermometer; the internal temperature should reach about 190°F (88°C).
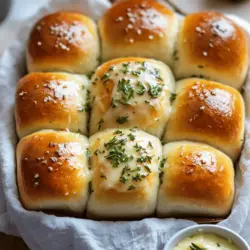
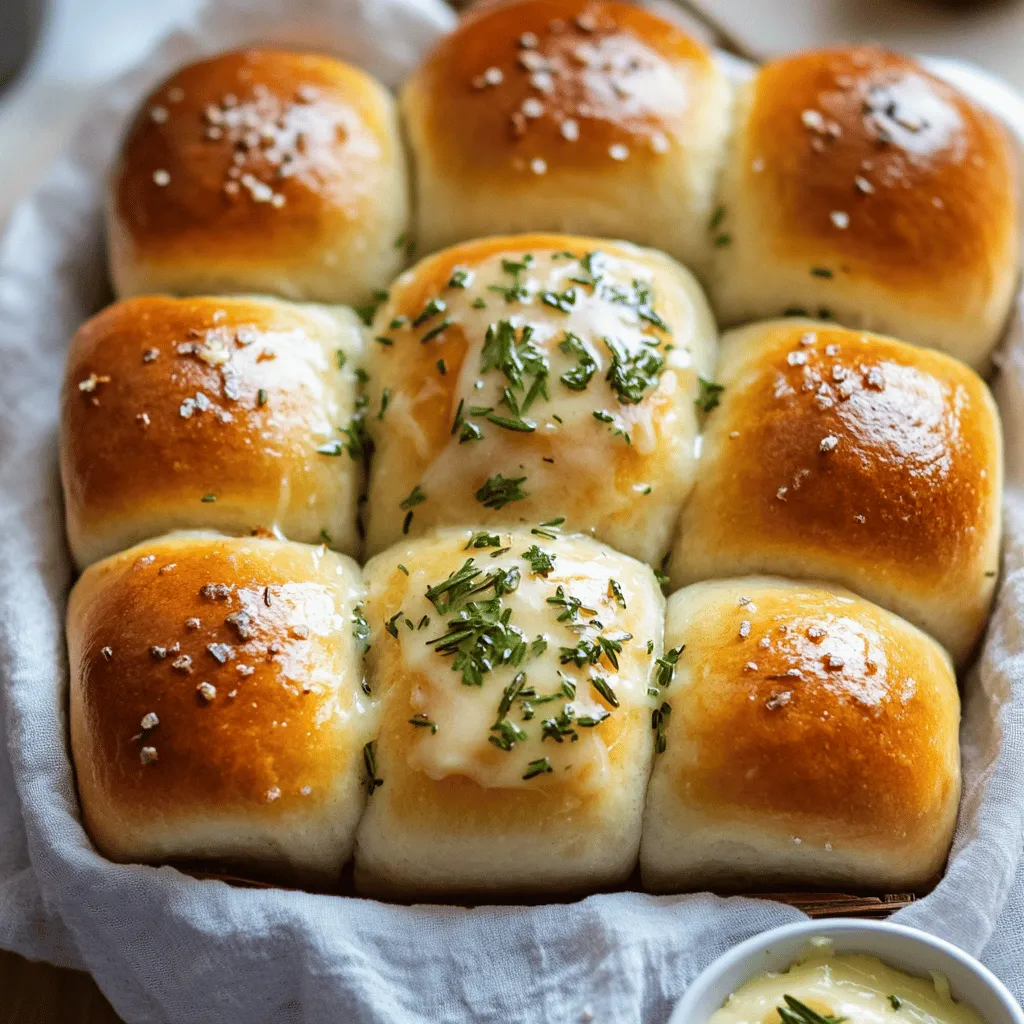
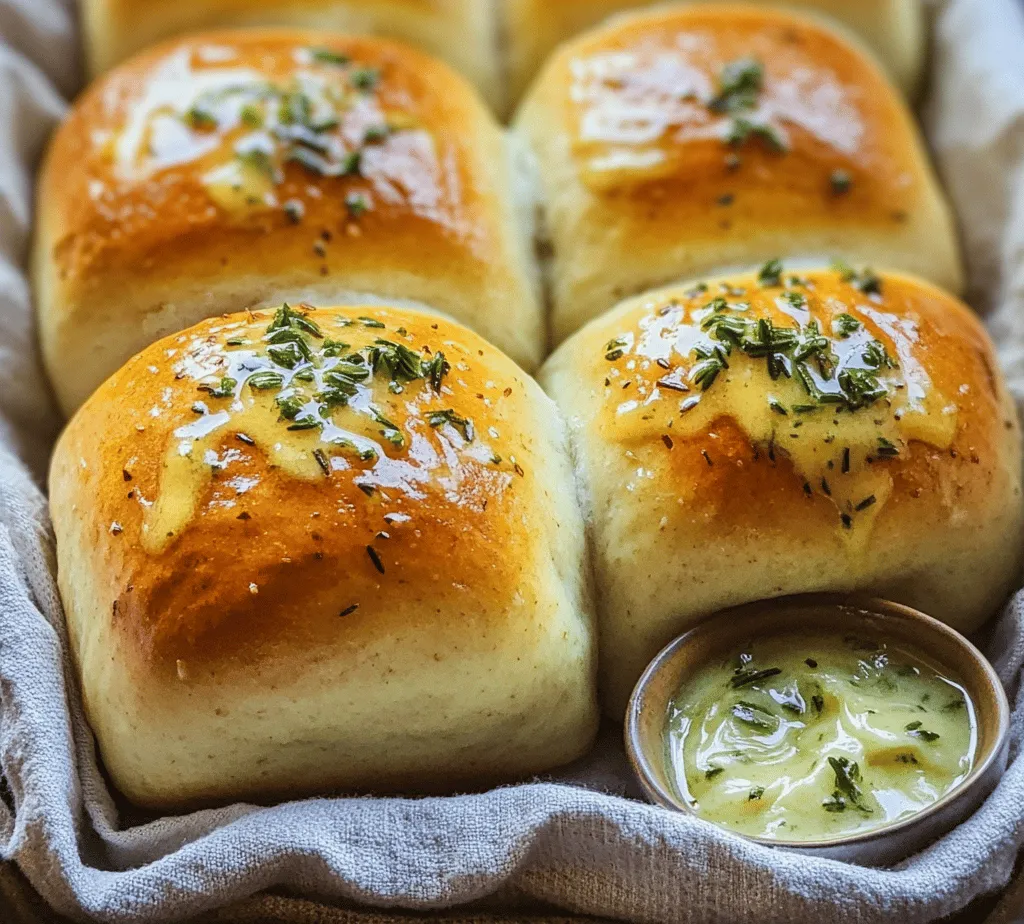
Once baked, remove the rolls from the oven and allow them to cool slightly in the pan. For an extra touch of flavor, brush them with garlic butter while they are still warm. This step infuses the rolls with a savory aroma that will have everyone eagerly waiting to dig in.
Serving Suggestions for Rosemary Dinner Rolls
Presentation Ideas
The presentation of your rosemary dinner rolls can elevate your dining experience significantly. Consider serving them in a rustic bread basket lined with a linen napkin, which adds a touch of warmth and charm to your table. For a more elegant offering, arrange the rolls in a spiral on a large serving platter, garnished with sprigs of fresh rosemary.
Pair these rolls with various dips and spreads to complement their flavor. A bowl of herbed olive oil for dipping or a homemade garlic aioli can enhance the experience. You might also consider serving them alongside a rich, creamy butter infused with fresh herbs, which can be a delightful addition.
Complementary Dishes
When it comes to main courses that pair beautifully with rosemary dinner rolls, the options are plentiful. These rolls are fantastic alongside roasted meats, such as herb-crusted chicken, roast beef, or even a savory vegetable pot pie. Their soft texture works well to soak up gravies and sauces, making each bite deliciously satisfying.
For seasonal sides, consider serving a fresh salad with citrus vinaigrette or roasted vegetables, which balance the richness of garlic butter rolls. A hearty soup, such as creamy tomato or wild mushroom, also makes a comforting pairing, perfect for colder months.
Nutrition and Health Considerations
The Nutritional Benefits of Homemade Bread
Homemade bread, such as rosemary dinner rolls, offers numerous nutritional benefits compared to store-bought options. When you make bread at home, you have complete control over the ingredients, allowing you to use high-quality, whole ingredients without preservatives or artificial additives. Whole grain flours can increase the nutritional profile, providing fiber, vitamins, and minerals that are often stripped from processed bread.
Additionally, the fermentation process involved in bread-making enhances nutrient availability, making it easier for your body to absorb the benefits of the ingredients. The fresh rosemary not only adds flavor but also contains antioxidants and anti-inflammatory properties, contributing to overall health.
Modifying the Recipe for Dietary Needs
If you have dietary restrictions or preferences, there are several modifications you can make to the rosemary dinner rolls recipe. For those who need gluten-free options, consider using a gluten-free all-purpose flour blend. Ensure you also add a binding agent, such as xanthan gum, to mimic the texture of wheat-based dough.
For health-conscious bakers, you can reduce sugar in the recipe or use natural sweeteners like honey or maple syrup. Additionally, substituting part of the all-purpose flour with whole wheat flour can provide added fiber and nutrients without sacrificing taste.
Conclusion
Making rosemary dinner rolls with garlic butter from scratch is a rewarding experience that brings warmth and comfort to any meal. By understanding the role of each ingredient and following the step-by-step guide, you can create soft, flavorful rolls that will leave a lasting impression. Baking is not just about the final product; it’s about the journey, the aromas, and the joy of sharing something homemade with loved ones. Enjoy the process, and savor the delightful results of your culinary efforts.
These rolls are perfect for family gatherings, holiday dinners, or simply as a delicious side for your weeknight meals. With their enchanting aroma and irresistible taste, rosemary dinner rolls will undoubtedly become a staple in your baking repertoire. Happy baking!