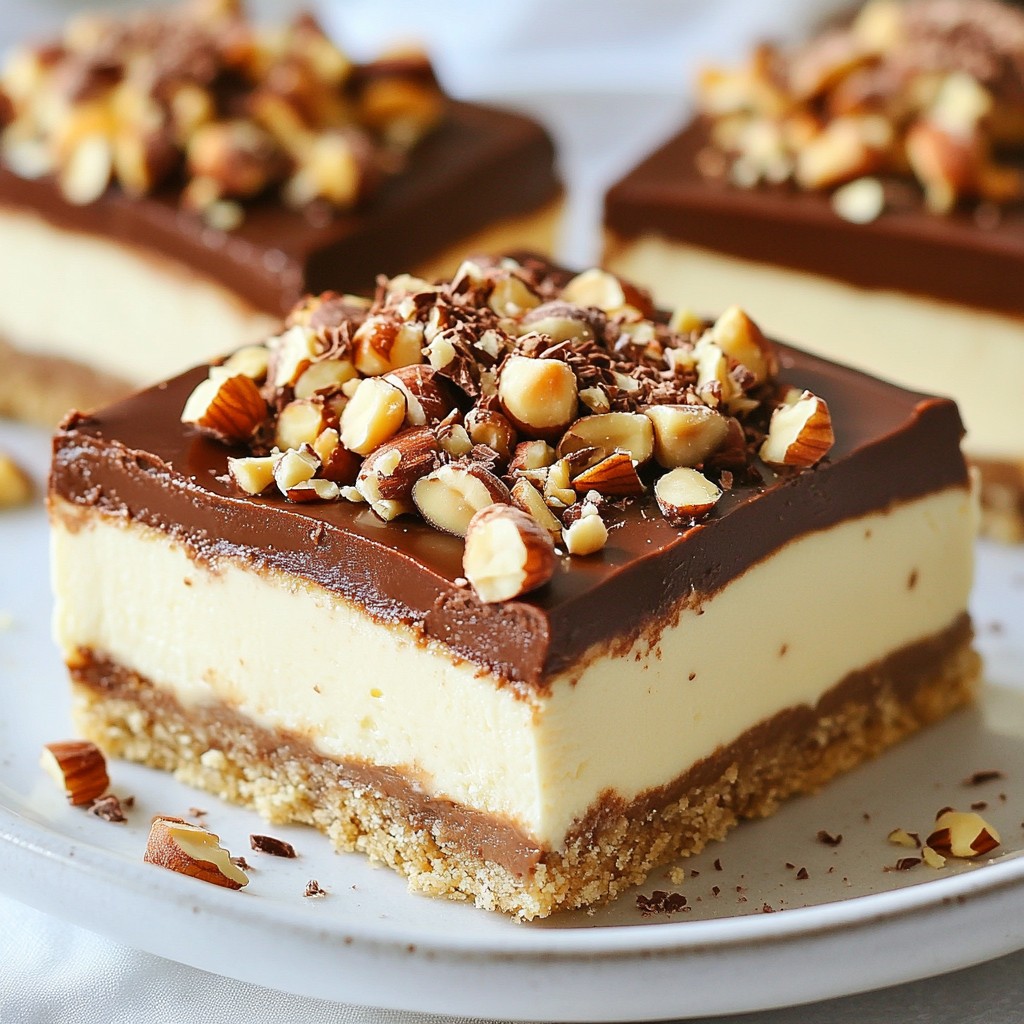
Craving a rich and creamy dessert? You’re in for a treat! These Chocolate Hazelnut Cheesecake Bars combine the smoothness of cheesecake with the nutty flavor of hazelnuts. Perfect for any occasion, these bars are simple to make and packed with taste. From the buttery graham cracker crust to the luscious filling, every bite is a delight. Let’s dive into this delicious recipe that will satisfy your sweet tooth and impress your friends!
Why I Love This Recipe
- Decadent Flavor: The rich combination of chocolate and hazelnut creates a deliciously indulgent treat that satisfies any sweet tooth.
- Easy to Make: With simple ingredients and straightforward steps, these cheesecake bars come together quickly, making them perfect for any occasion.
- Perfect for Sharing: Cut into bars, they are easy to serve at parties, potlucks, or family gatherings, ensuring everyone gets a taste.
- Chill Time Perfection: The chilling process helps the flavors meld beautifully, resulting in a creamy texture that melts in your mouth.
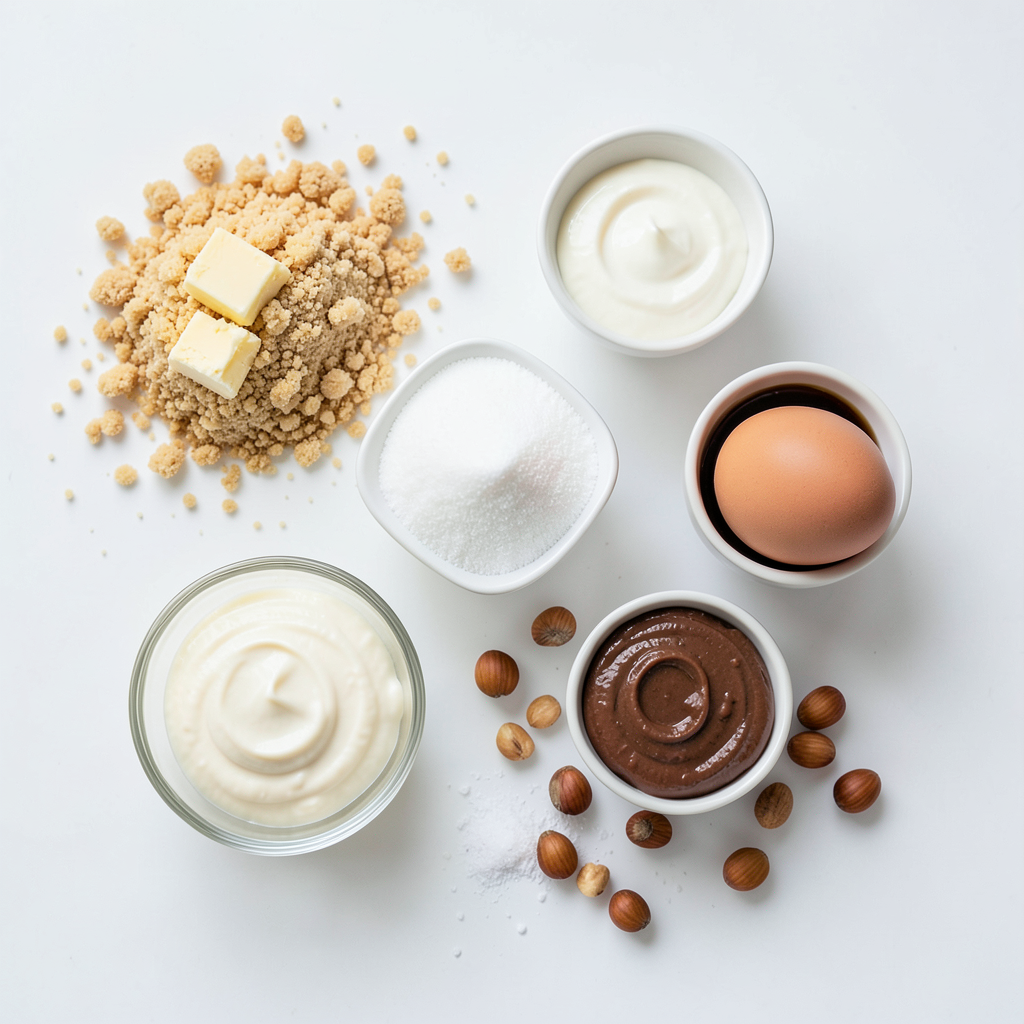
Ingredients
Crust Ingredients
- 1 ½ cups graham cracker crumbs
- ½ cup unsalted butter, melted
- ¼ cup granulated sugar
Filling Ingredients
- 2 (8 oz) packages cream cheese, softened
- ¾ cup granulated sugar
- ½ cup sour cream
- 2 large eggs
- 1 teaspoon vanilla extract
- ½ cup chocolate hazelnut spread (like Nutella)
- ¼ cup chopped hazelnuts (for topping)
- Pinch of salt
When making Chocolate Hazelnut Cheesecake Bars, the ingredients play a big role. The crust is easy. I use graham cracker crumbs mixed with melted butter and sugar. This mix forms the base, giving it a nice crunch.
For the filling, I choose cream cheese as the star. It makes the bars rich and creamy. I add sour cream for a tangy kick. The eggs help bind everything. I also fold in chocolate hazelnut spread, which adds that delicious flavor. A pinch of salt balances the sweetness.
For the topping, chopped hazelnuts add a nice crunch and extra flavor. Each ingredient counts. Together, they create a sweet treat that’s hard to resist.
Step-by-Step Instructions
Preparing the Crust
1. Preheat the oven and line the baking dish
Set your oven to 350°F (175°C). Line an 8x8 inch baking dish with parchment paper. Leave some paper hanging over the edges for easy removal later.
2. Mix the crust ingredients and press into the dish
In a medium bowl, combine 1 ½ cups graham cracker crumbs, ½ cup melted unsalted butter, and ¼ cup sugar. Stir until it looks like wet sand. Press this mixture into the bottom of the prepared dish.
3. Bake and cool the crust
Bake the crust in the preheated oven for about 10 minutes. It should be set. Remove it and let it cool while you make the filling.
Making the Filling
1. Beat cream cheese and sugar until smooth
In a large bowl, beat together 2 packages of softened cream cheese and ¾ cup granulated sugar. Use an electric mixer until the mixture is smooth.
2. Incorporate sour cream, eggs, and vanilla
Add ½ cup sour cream, 2 large eggs, and 1 teaspoon vanilla extract to the cream cheese mix. Blend until everything is just combined; don't overmix.
3. Fold in chocolate hazelnut spread
Gently fold in ½ cup chocolate hazelnut spread. Be careful not to overmix; the filling should be creamy and smooth.
Combining and Baking
1. Pour filling over the crust and spread evenly
Pour the cheesecake filling over the cooled crust. Use a spatula to spread it out evenly.
2. Bake until edges are set
Bake in the oven for 25 to 30 minutes. The edges should be set, and the center may still jiggle a bit.
3. Cool and chill the cheesecake bars
After baking, let the bars cool to room temperature. Top with ¼ cup chopped hazelnuts. Once cool, refrigerate for at least 4 hours or overnight to firm up.
Tips & Tricks
Achieving the Perfect Texture
To make your cheesecake bars smooth and creamy, use room temperature ingredients. This helps all the components mix well together. Start by letting your cream cheese and eggs sit out for about 30 minutes before you begin. This small step makes a big difference.
Once baked, let your bars cool completely at room temperature. This helps them set properly. After cooling, chill them in the fridge for at least four hours. Overnight is even better. This time allows the flavors to mix and the texture to firm up.
Presentation Ideas
For a stunning look, drizzle some chocolate hazelnut spread over the top. You can use a spoon or a squeeze bottle for this. It adds an extra layer of flavor and makes the bars look fancy.
Garnish with chopped hazelnuts for a nice crunch. Sprinkle them on top right before serving. This not only looks great, but it also adds a lovely nutty taste that pairs well with the bars.
Troubleshooting Common Issues
If you see cracks in your cheesecake, don’t worry! You can fix this by letting the bars cool slowly. Avoid opening the oven door too soon while baking. This keeps the temperature steady and helps prevent cracks.
To ensure even baking, make sure your oven is preheated properly. Use an oven thermometer to check the temperature. If your bars are browning too fast, place a piece of foil over them. This will help them bake evenly without burning.
Pro Tips
- Chill the Cream Cheese: Ensure your cream cheese is at room temperature for easier mixing and a smoother filling.
- Use Quality Chocolate Hazelnut Spread: The flavor of the bars heavily relies on the chocolate hazelnut spread, so choose a high-quality brand for the best results.
- Don’t Overbake: Keep an eye on your cheesecake bars. They should be slightly jiggly in the center when done; they will firm up as they cool.
- Let Them Chill Overnight: For the best texture and flavor, allow the cheesecake bars to chill in the refrigerator overnight before serving.
Variations
Different Nut Spreads
You can switch up the nut spread. Almond butter or peanut butter works great! They add unique flavors. Almond butter gives a nutty taste. Peanut butter adds creaminess. Both will make these bars fun and tasty.
Flavor Enhancements
Want to boost flavor? Try adding espresso or coffee. These deepen the chocolate taste. Just a little will do! You can also add citrus zest for brightness. Orange or lemon zest makes it fresh and lively. Just a hint will brighten up your bars.
Dietary Adjustments
Need to cater to diet needs? You can make a gluten-free crust. Use gluten-free graham crackers. They work just like regular ones. For vegan or dairy-free options, swap cream cheese with a plant-based cream. Use a dairy-free chocolate hazelnut spread too. These changes keep the joy of cheesecake alive!
Storage Info
Best Practices for Refrigeration
To keep your cheesecake bars fresh, store them in the fridge. Place the bars in an airtight container. If you do not have one, cover them tightly with plastic wrap. This helps prevent drying and keeps flavors strong. Make sure to chill them for at least four hours before serving. This gives the bars time to set properly.
Freezing Tips
If you want to freeze the cheesecake bars, start by cutting them into squares. Wrap each square in plastic wrap. Then place the wrapped bars in a freezer bag. Remove as much air as you can to avoid freezer burn. When you want to enjoy them, take the bars out of the freezer. Let them thaw in the fridge overnight for best results.
Shelf Life
In the fridge, the cheesecake bars last about five days. If you freeze them, they can last up to three months. Just remember that the texture may change slightly after thawing. Always check for any off smells or changes in appearance before eating. This ensures you enjoy only the best flavors!
FAQs
Can I make these cheesecake bars ahead of time?
Yes, you can make these cheesecake bars ahead of time. They keep well in the fridge. I suggest making them the day before you plan to serve. This allows the flavors to blend nicely.
When storing, wrap the dish tightly with plastic wrap. You can also use foil. This helps keep them fresh. If you want to store them longer, freeze the bars. Just be sure to wrap each bar in plastic wrap. Place them in an airtight container. They can last in the freezer for up to three months.
What’s the best way to cut cheesecake bars?
To cut cheesecake bars, use a sharp knife. First, dip the knife in hot water. This helps the knife glide through the bars easily. Wipe the knife with a paper towel after each cut. This keeps the edges clean.
Cut the bars into equal squares for the best look. Start by cutting the bars in half, then into smaller pieces. This method helps keep the cheesecake from cracking.
Can I use a different type of chocolate spread?
Yes, you can use different chocolate spreads. Almond butter or peanut butter are great options. They give a nutty twist to the bars. You could also try a dark chocolate spread. This will add a rich flavor.
Keep in mind that each spread has a unique taste. This can change the final flavor. Experiment to find what you like best!
These cheesecake bars are simple and fun to make. We covered the ingredients, step-by-step instructions, tips, variations, storage, and even answered your FAQs. You can customize your bars to fit your tastes. Remember to keep ingredients at room temperature for the best texture. With easy variations and storage tips, you can enjoy these treats for days. Now, gather your ingredients and start baking! Enjoy every creamy, chocolatey bite.