
Are you ready to impress your friends and family with a dessert that looks fancy but is super easy to make? The Chocolate Strawberry Icebox Cake is just that! With layers of rich chocolate, fresh strawberries, and fluffy whipped cream, this no-bake delight will steal the spotlight at any gathering. I’ll guide you through every step, from choosing the right ingredients to serving ideas. Let’s dive into this simple, delightful treat!
Why I Love This Recipe
- Indulgent Flavor: This cake combines rich chocolate and fresh strawberries, creating an irresistible dessert that pleases everyone.
- No-Bake Convenience: With no baking required, this icebox cake is perfect for hot days or when you want a quick and easy dessert.
- Make-Ahead Friendly: Prepare this cake a day in advance, allowing the flavors to meld beautifully while saving you time on the day of serving.
- Customizable Layers: Feel free to experiment with different fruits or toppings, tailoring the cake to your taste preferences.
Ingredients
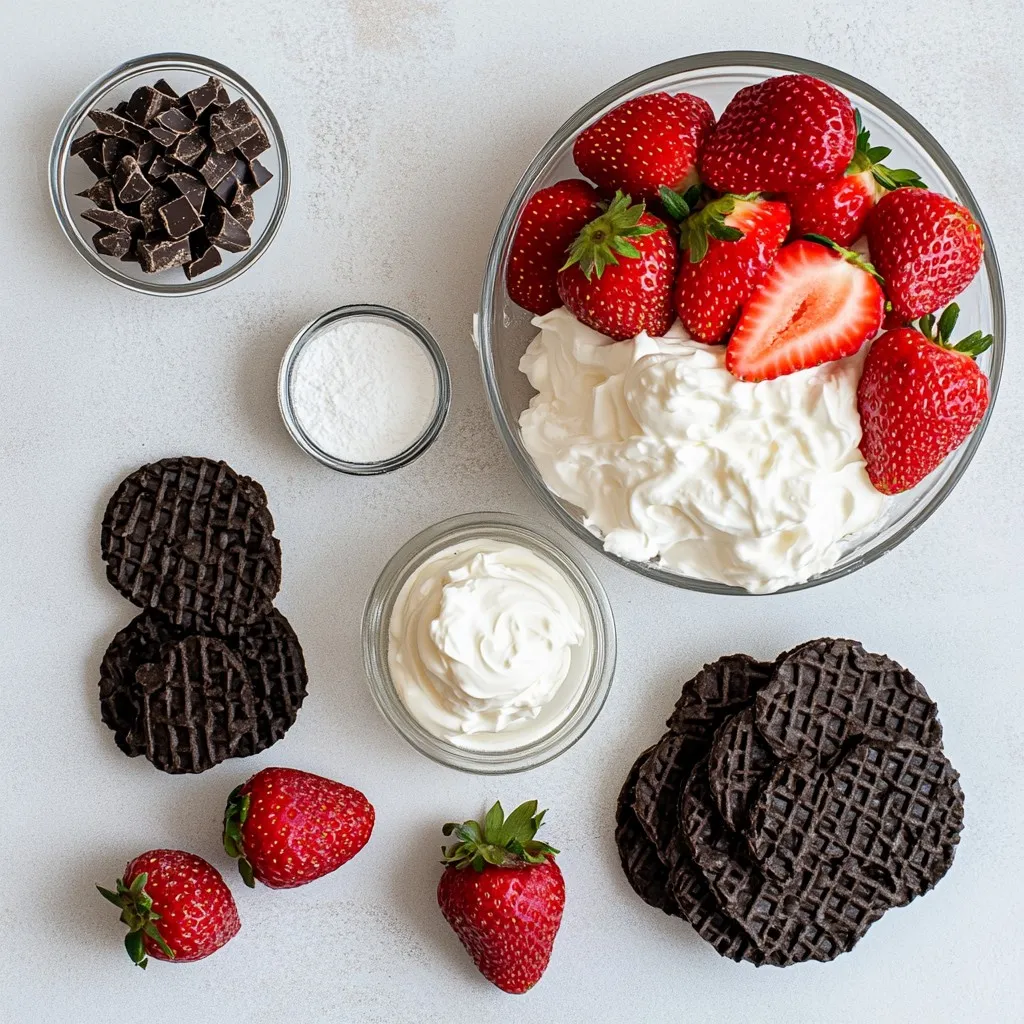
List of Ingredients
To make a Chocolate Strawberry Icebox Cake, you will need:
– 1 package (14-16 oz) chocolate wafer cookies
– 2 cups heavy whipping cream
– 1/2 cup powdered sugar
– 1 teaspoon vanilla extract
– 2 cups fresh strawberries, hulled and sliced
– 1/4 cup dark chocolate shavings (optional for garnish)
Measurements and Substitutions
Make sure to measure your ingredients accurately for best results. If you cannot find chocolate wafer cookies, you can use chocolate graham crackers instead. For a lighter cake, consider using light whipping cream instead of heavy cream. You can also swap powdered sugar with granulated sugar, but it may change the texture a bit.
Optional Garnishes
Garnishes can enhance the look and taste of your cake. I love using dark chocolate shavings for a rich touch. You can also add extra strawberry slices on top for a pop of color. Fresh mint leaves are another great option for a fresh look. These garnishes make your cake even more appealing when serving.
Step-by-Step Instructions
Preparation of Whipped Cream
To start, take a large mixing bowl. Pour in 2 cups of heavy whipping cream. Use an electric mixer on medium speed. Whip the cream until it thickens. This should take a few minutes. Next, slowly add in 1/2 cup of powdered sugar. Then, pour in 1 teaspoon of vanilla extract. Continue to whip until you see soft peaks form. Be careful! If you whip too much, it can turn to butter.
Assembling the Cake
Grab a rectangular dish or a 9×13 inch baking pan. Spread a thin layer of whipped cream at the bottom. This will be your base. Now, take your chocolate wafer cookies. Place a layer of cookies over the whipped cream. Cover the bottom completely. Then, spread another layer of whipped cream on top of the cookies. After that, add a generous layer of sliced strawberries. Repeat this layering process until you run out of ingredients. End with a layer of whipped cream on top.
Refrigeration and Serving Tips
Cover the cake with plastic wrap. Place it in the refrigerator for at least 4 hours. It’s best to let it chill overnight. This helps the cookies soften and the flavors mix well. When you are ready to serve, take it out. For a special touch, top with dark chocolate shavings. You can also add extra sliced strawberries on top for a pretty finish. Enjoy your delightful creation!
Tips & Tricks
How to Achieve the Perfect Whipped Cream
Start with cold heavy cream. Cold cream whips better and faster. Use a clean bowl and beaters. This helps the cream to whip up nicely. Whip at medium speed until soft peaks form. Be careful not to over-whip. Over-whipped cream becomes grainy. The right texture is smooth and fluffy.
Layering Techniques for Best Results
Layering is key to a great cake. Start with a thin layer of whipped cream. This helps the cookies stick to the pan. Place the chocolate wafer cookies flat on the cream. Make sure they are close together. Spread whipped cream over the cookies, then add sliced strawberries. Repeat this process until you run out of ingredients. Finish with a layer of whipped cream on top. This gives the cake a nice look.
Presentation Ideas for Serving
When it’s time to serve, make it pretty! Use a sharp knife to cut clean slices. Garnish with dark chocolate shavings for a fancy touch. Add extra strawberry slices on top. This makes the cake look fresh and inviting. You can also serve it in individual cups for a fun twist.
Pro Tips
- Use Cold Cream: Ensure your heavy whipping cream is chilled for optimal volume and stability when whipping.
- Layering Technique: For a neater presentation, let each layer set slightly before adding the next to prevent them from mixing.
- Cookie Soaking Time: The longer you refrigerate the cake, the softer the cookies will become, enhancing the overall texture.
- Fresh Strawberries: Use ripe, in-season strawberries for the best flavor and sweetness in your icebox cake.
Variations
Flavor Swap Ideas (e.g., Vanilla, Mint)
You can switch up the flavor of your Chocolate Strawberry Icebox Cake easily. For a vanilla twist, replace the chocolate wafers with vanilla wafers. This change will brighten the taste and pair well with strawberries. You can also try mint. Simply add a few drops of mint extract to the whipped cream. This gives a fresh touch to each bite.
Other Fruit Combinations
Strawberries are great, but many other fruits work well too. Ripe bananas add a sweet, creamy layer. Just slice them thin and layer them like strawberries. Blueberries or raspberries can also add a fun pop of color and flavor. Mix and match your favorite fruits for a unique taste. Don’t be afraid to be creative!
Gluten-Free or Dairy-Free Options
If you need a gluten-free option, look for gluten-free chocolate wafers. They taste just as good! For a dairy-free version, you can use coconut cream in place of heavy whipping cream. Chill the coconut cream first for best results. This will still give you a rich and creamy texture. Enjoy making this dessert fit your needs!
Storage Info
How to Store Leftovers
To store any leftovers, cover the cake tightly with plastic wrap. Place it in the fridge. This will help keep the flavors fresh. Make sure to consume it within three days for the best taste.
Freezing the Icebox Cake
You can freeze the icebox cake if you have extra. First, let it chill in the fridge for at least four hours. Once chilled, wrap it in plastic wrap and then foil. This will help keep it fresh. You can freeze it for up to a month. When you are ready to eat it, thaw it in the fridge overnight.
Best Practices for Maintaining Freshness
To keep your cake fresh, avoid cutting it until you are ready to serve. Each slice will expose more surface area. This can dry out the cake. Always use a sharp knife for clean cuts. For extra freshness, add more whipped cream or strawberries on top just before serving.
FAQs
How long can I refrigerate a Chocolate Strawberry Icebox Cake?
You can refrigerate your Chocolate Strawberry Icebox Cake for up to four days. For the best flavor, I suggest letting it chill overnight. This time allows the cookies to soften. It also helps the flavors mix well. Just keep it covered with plastic wrap to keep it fresh.
Can I use other types of cookies?
Yes, you can use other types of cookies! If you want a twist, try using graham crackers. They add a different taste and texture. You can also use chocolate chip cookies or vanilla cookies. Just make sure they are sturdy enough to hold the layers.
What can I substitute for heavy whipping cream?
If you need a substitute for heavy whipping cream, try coconut cream. It whips up nicely and adds a rich flavor. You can also use a vegan whipping cream found in stores. Another option is to blend silken tofu until smooth for a dairy-free choice.
This blog covered all you need to make a delicious Chocolate Strawberry Icebox Cake. You learned about the key ingredients and their measurements, plus nice garnishes. I shared step-by-step tips for whipped cream and cake assembly. You also got great advice on storage and variations to try.
Remember, small tweaks can make a big difference. Enjoy making this tasty treat, and don’t hesitate to get creativ


