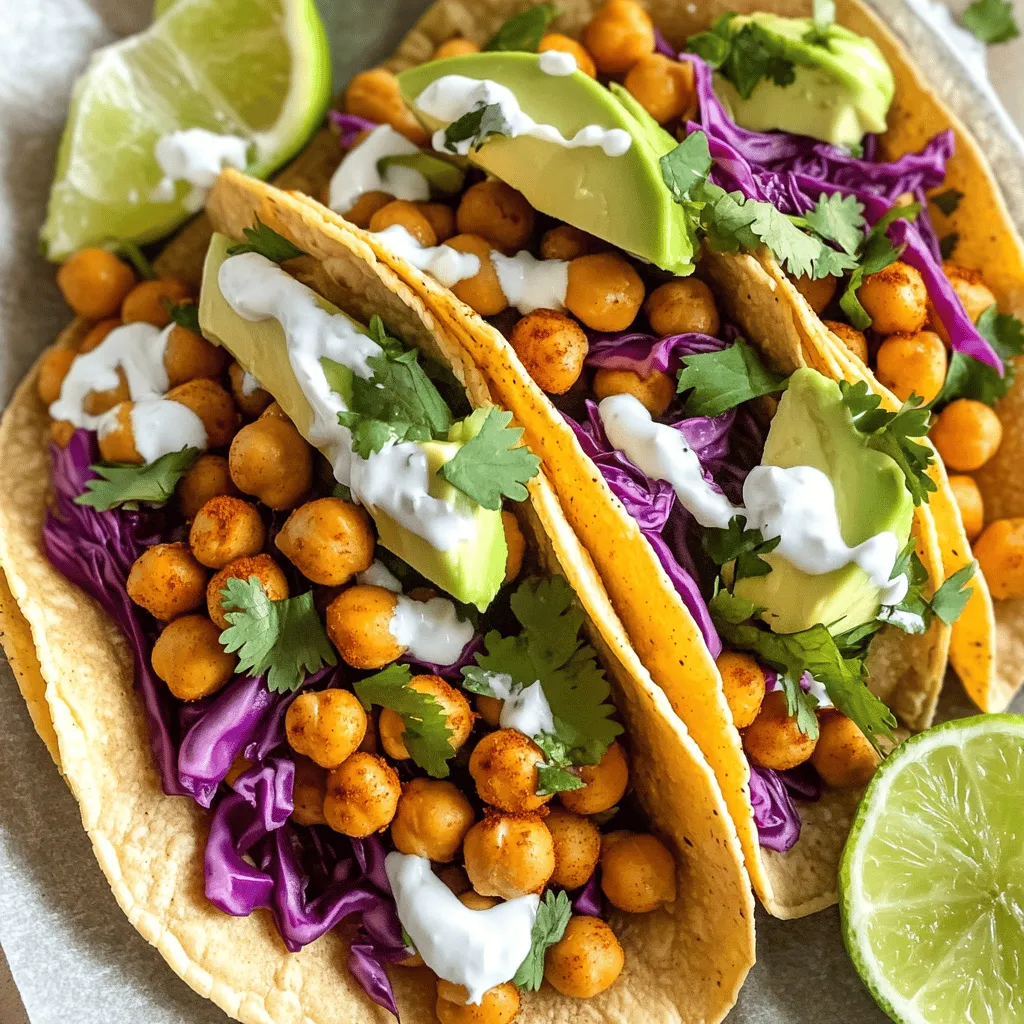
If you’re looking for a tasty and easy meal, you’ve found it! Crispy Chickpea Tacos are fun to make and bursting with flavor. In this post, I’ll share a simple recipe with easy steps. You’ll learn how to prep, cook, and assemble these delicious tacos. Plus, I’ll include tips on toppings and variations to suit your taste. Get your ingredients ready and let’s dive into this crunchy treat!
Ingredients
Main Ingredients for Crispy Chickpea Tacos
To make crispy chickpea tacos, you need simple ingredients. Here is what you will need:
– 1 can (15 oz) chickpeas, drained and rinsed
– 2 tablespoons olive oil
– 1 teaspoon smoked paprika
– 1 teaspoon ground cumin
– 1 teaspoon garlic powder
– 1/2 teaspoon cayenne pepper (adjust to taste)
– Salt and black pepper to taste
– 8 small corn tortillas
– 1 cup shredded red cabbage
– 1 avocado, sliced
– 1/4 cup fresh cilantro, chopped
– 1 lime, cut into wedges
– 1/2 cup Greek yogurt (or dairy-free alternative)
These ingredients come together to create a tasty and crunchy taco. The chickpeas provide protein and fiber. The spices add warmth and depth. Fresh toppings make each bite bright and fresh.
Optional Toppings and Garnishes
You can customize your tacos with different toppings. Here are some ideas:
– Sliced jalapeños for heat
– Diced tomatoes for freshness
– Crumbled feta or cheese
– Hot sauce for extra spice
These toppings can change the flavor and texture. Use what you like best.
Dietary Considerations
This recipe is great for many diets. Chickpeas are plant-based, making them vegan-friendly. You can use dairy-free yogurt for a fully vegan dish. If you want gluten-free, use corn tortillas. It’s simple to adapt this dish to fit your needs.
Step-by-Step Instructions
Prepping the Chickpeas
Start by opening your can of chickpeas. Drain them well and rinse under cool water. This step removes extra sodium and makes them cleaner. Spread the chickpeas on a kitchen towel. Pat them dry gently. This helps them become crispier later.
Cooking the Chickpeas
Preheat your oven to 400°F (200°C). Lay the dried chickpeas on a baking sheet. Drizzle with olive oil. Next, sprinkle smoked paprika, ground cumin, garlic powder, cayenne pepper, salt, and black pepper on top. Toss the chickpeas until they are coated well. Bake for 20-25 minutes. Shake the pan halfway through cooking. This helps them turn golden and crispy.
Assembling the Tacos
While the chickpeas bake, warm your corn tortillas in a skillet. Heat them for about 30 seconds on each side. Once the chickpeas are crispy, it’s time to assemble your tacos. Place a generous amount of chickpeas on each tortilla. Top with shredded red cabbage, avocado slices, and chopped cilantro. Drizzle Greek yogurt over everything. Squeeze fresh lime juice on top. Serve with lime wedges for extra flavor. Enjoy your crispy chickpea tacos!
Tips & Tricks
Perfectly Crispy Chickpeas
To get your chickpeas crispy, start with dry ones. Drain and rinse them well. Pat them dry using a clean towel. This step helps remove extra moisture. The drier your chickpeas, the crispier they will be. Next, toss them with olive oil and spices. Be sure every chickpea gets coated. Bake them at 400°F for 20-25 minutes. Shake the pan halfway through for even cooking. You want them golden brown and crunchy.
Tortilla Heating Techniques
To warm your tortillas, use a skillet or pan. Heat the pan over medium heat. Place a tortilla in the pan for about 30 seconds. Flip it over and heat the other side. This makes the tortilla soft and pliable. You can also wrap them in foil and warm them in the oven. This method keeps them warm longer. Either way, warm tortillas make a big difference. They hold fillings better and taste great.
Flavor Enhancements
Add more flavor to your tacos with toppings. Shredded red cabbage adds crunch and color. Sliced avocado brings creaminess. Fresh cilantro adds a burst of flavor. For a zesty kick, squeeze lime juice on top. Greek yogurt gives a nice tang. You can also mix in hot sauce for extra heat. Feel free to experiment with spices too! Adding a pinch of chili powder or fresh herbs can elevate your dish. These small changes can turn your tacos into a flavor explosion.
Variations
Different Protein Alternatives
You can switch chickpeas for other proteins. Black beans work well for a hearty bite. Lentils are another great choice. They add nice flavor and texture too. If you prefer meat, try ground turkey or shredded chicken. Just cook them with the same spices for tasty results.
Vegan and Gluten-Free Modifications
To keep these tacos vegan, skip the Greek yogurt. Use a dairy-free yogurt instead. For gluten-free options, make sure to choose corn tortillas. They are naturally gluten-free and perfect for this dish. You can also try lettuce wraps for a fresh twist.
Suggested Side Dishes
Pair your tacos with a side of rice or quinoa. They add a nice balance to the meal. A simple salad with lime dressing also complements the tacos well. You might enjoy black bean salad or grilled corn on the side. Each adds color and flavor to your dinner.
Storage Info
Storing Leftovers
To store leftovers, let the tacos cool first. Place the crispy chickpeas in an airtight container. Keep them separate from the tortillas and toppings. Store everything in the fridge for up to three days. This way, the chickpeas stay crispy, and the tortillas won’t get soggy.
Reheating Instructions
When reheating, I suggest using the oven. Preheat it to 350°F (175°C). Spread the chickpeas on a baking sheet and heat for about 10 minutes. This helps regain their crunch. For the tortillas, warm them in a skillet for 30 seconds on each side. You can also use a microwave, but the oven keeps them crispy.
Freezing Options
You can freeze the chickpeas if you have extra. Spread them on a baking sheet in a single layer. Freeze until solid, then transfer to a freezer bag. They will stay good for up to two months. When ready to use, bake them straight from the freezer for a quick meal. Just remember, the tortillas are best fresh, so freeze them separately.
FAQs
What is the best way to season chickpeas?
The best way to season chickpeas is simple and quick. Use smoked paprika, cumin, garlic powder, and cayenne pepper. These spices add depth and warmth. You can also add salt and black pepper for taste. Toss the chickpeas well to coat them evenly. This helps each chickpea get a burst of flavor.
Can I use dried chickpeas for this recipe?
Yes, you can use dried chickpeas. However, you need to soak and cook them first. Soak them overnight in water. This helps them soften. After soaking, boil them until tender. This process takes longer but can give you a fresher taste.
What can I substitute for Greek yogurt?
If you want a substitute for Greek yogurt, you have options. You can use sour cream or a plant-based yogurt. Both give a nice creaminess. Another great option is avocado. Sliced or mashed avocado adds richness without dairy.
How do I make my tacos spicier?
To spice up your tacos, add more cayenne pepper. You can also use hot sauce or fresh jalapeños. Chopped fresh chili peppers work well, too. Don’t forget to taste your chickpeas as you season. Adjust spice levels based on your liking.
Can I make these tacos ahead of time?
You can prepare some parts ahead of time. Cook the chickpeas and store them in the fridge. Warm them up before serving. You can also prep the toppings like cabbage and avocado. Just keep them fresh until you assemble your tacos. For the best taste, it’s good to eat them soon after making.
This blog post covered how to make tasty crispy chickpea tacos. We looked at the main ingredients, cooking steps, and helpful tips. I also shared ways to switch up the recipe for everyone’s needs. Storing leftovers and reheating them is easy too.
Chickpea tacos are simple, fun, and yummy. You can enjoy them your way. Try new toppings and flavors, and share them with family and friends. Happy cooking!