
If you crave a sweet treat that’s both rich and refreshing, you’re in for a delight! This Decadent Red Velvet Strawberry Cheesecake will wow your taste buds and impress your guests. Picture a smooth cheesecake filling sitting on a velvety crust, topped with fresh strawberries. In this post, I’ll walk you through each step to create this stunning dessert. Grab your ingredients, and let’s dive into the world of red velvet goodness!
Ingredients
For the crust
– 1 ½ cups crushed chocolate cookies
– ½ cup unsalted butter, melted
– 2 tablespoons granulated sugar
For the cheesecake filling
– 16 oz cream cheese, softened
– 1 cup granulated sugar
– 3 large eggs
– 1 teaspoon vanilla extract
– 1 tablespoon all-purpose flour
– 2 tablespoons cocoa powder
– 1 tablespoon red food coloring
For the strawberry topping
– 2 cups fresh strawberries, hulled and sliced
– ¼ cup granulated sugar
– 1 tablespoon lemon juice
For garnish
– Whipped cream (optional)
– Fresh mint leaves (optional)
When I create a decadent red velvet strawberry cheesecake, I focus on quality ingredients. Each layer contributes to that rich taste. The crust starts with crushed chocolate cookies, which provide a sweet and crunchy base. The melted butter binds everything together, while sugar adds extra sweetness.
The cheesecake filling shines with cream cheese as the star. It’s so creamy and smooth. Adding sugar makes it sweet, while eggs help it set. Vanilla extract gives a warm flavor. Cocoa powder adds depth, and red food coloring gives it that classic red hue.
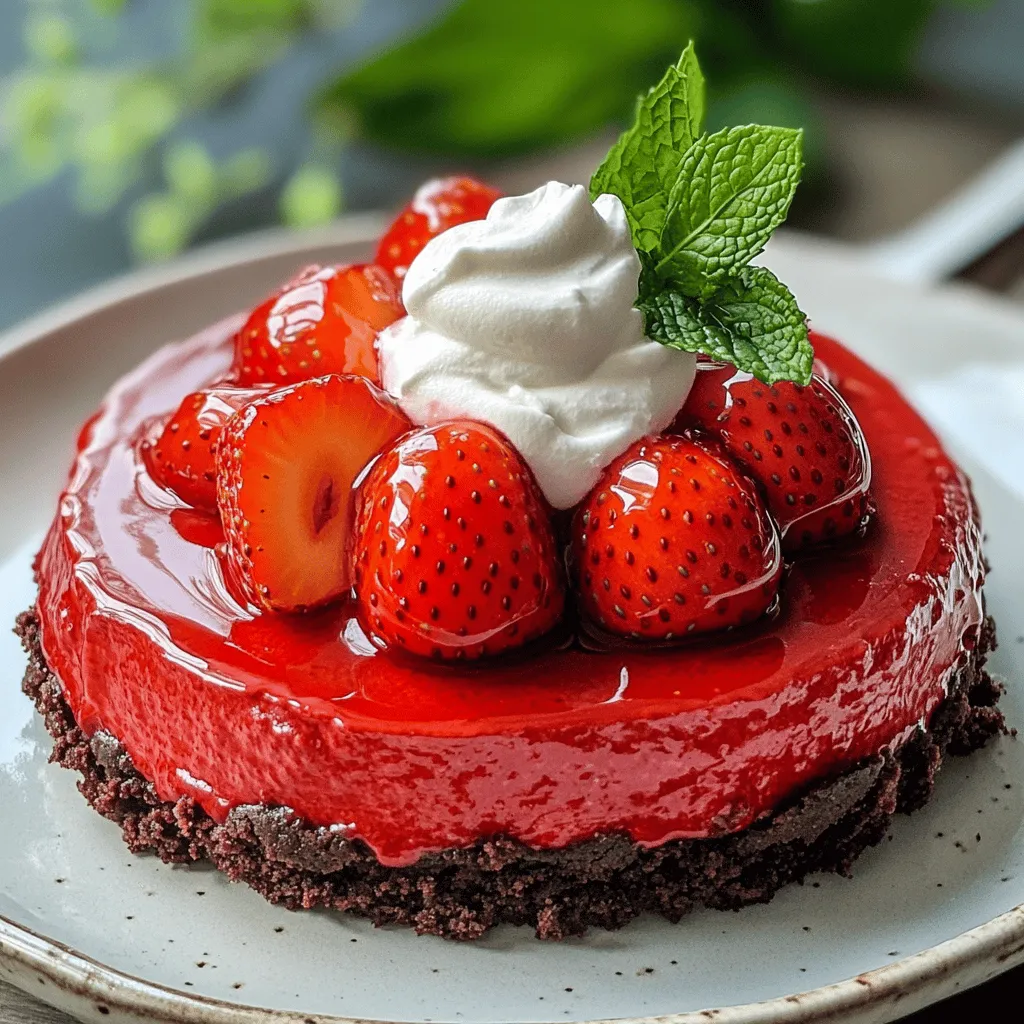
Fresh strawberries make the topping bright and refreshing. They mix beautifully with sugar and lemon juice, creating a sweet syrup. This topping balances the rich cheesecake perfectly.
For garnish, I suggest whipped cream and fresh mint leaves. They add a nice touch and look beautiful on the plate.
Step-by-Step Instructions
Prepare the Crust
1. Preheat your oven to 350°F (175°C).
2. In a bowl, mix together:
– 1 ½ cups crushed chocolate cookies
– ½ cup unsalted butter, melted
– 2 tablespoons granulated sugar
3. Press this mixture into the bottom of a 9-inch springform pan. Make sure it is even.
4. Bake for 10-12 minutes, then let it cool.
Make the Cheesecake Filling
1. In a large bowl, beat together:
– 16 oz cream cheese, softened
– 1 cup granulated sugar
2. Add eggs one at a time, mixing well.
3. Mix in:
– 1 teaspoon vanilla extract
– 1 tablespoon all-purpose flour
– 2 tablespoons cocoa powder
– 1 tablespoon red food coloring
4. Ensure the mixture is smooth and well combined.
Bake the Cheesecake
1. Pour the cheesecake filling over the cooled crust.
2. Bake for 55-65 minutes. The edges should be set, but the center will jiggle a bit.
3. Turn off the oven and crack the door open. Let the cheesecake cool inside for 1 hour.
Prepare the Strawberry Topping
1. In a medium bowl, combine:
– 2 cups fresh strawberries, hulled and sliced
– ¼ cup granulated sugar
– 1 tablespoon lemon juice
2. Toss gently and let this sit for 15-20 minutes. This creates a nice syrup.
Assemble the Cheesecake
1. Once cooled, remove the cheesecake from the springform pan carefully.
2. Top it with the macerated strawberries, spreading them evenly.
Chill and Serve
1. Refrigerate the cheesecake for at least 4 hours or overnight for better flavor.
2. When ready, cut into slices. You can top with whipped cream and fresh mint leaves if you like.
Tips & Tricks
Perfecting the cheesecake texture
To get a smooth cheesecake, start with room-temperature cream cheese. It blends better. Use an electric mixer for a creamy texture. Mix the filling on low speed to avoid air bubbles. Air bubbles can cause cracks. Bake the cheesecake until the edges set but the center is a bit jiggly. This ensures it stays creamy. After baking, let it cool in the oven for a gentle finish.
Presentation ideas for serving
Presentation makes a cheesecake special. Pour the fresh strawberry topping evenly over the cheesecake. Use whole strawberries for extra flair. Add a dollop of whipped cream on each slice. A sprig of mint can brighten the plate. For extra color, sprinkle some cocoa powder or chocolate shavings on top. These small details make a big impact.
Common baking pitfalls to avoid
Many people struggle with cracks on the cheesecake. Avoid this by cooling the cheesecake slowly. Don’t open the oven door while baking. Also, make sure your oven temperature is accurate. Too hot can dry out your cheesecake. If you want a firmer cheesecake, add a bit more flour to the filling. Lastly, let the cheesecake chill overnight for the best flavor and texture.Enjoy baking!
Variations
Alternate crust options
You can switch up the crust for fun. Try using graham crackers or vanilla cookies. For a nutty twist, crushed almonds or walnuts work great too. A cookie crust adds flavor and texture. Each option brings its own charm to the cheesecake.
Different fruit toppings
While strawberries shine on this cheesecake, other fruits can be just as delightful. Blueberries or raspberries add a nice pop of color and taste. You could even mix fruits for a vibrant topping. Consider using peaches or cherries for a seasonal touch. Each fruit brings a unique flavor that enhances the cheesecake.
Flavor modifications in cheesecake
Want to try something new? You can change the flavor of the cheesecake itself. Add lemon zest for a bright touch. A hint of almond extract gives a lovely depth. For a rich taste, try adding white chocolate. Each change opens a new world of flavors. Explore these variations to find your favorite twist on this decadent treat.
Storage Info
How to store leftovers
To keep your cheesecake fresh, wrap it tightly. Use plastic wrap or aluminum foil. Place it in an airtight container for extra protection. This keeps the flavors bright and the texture smooth. Always store it in the fridge.
Freezing instructions
You can freeze your cheesecake for later enjoyment. First, let it cool completely. Then, wrap it in plastic wrap. Next, place it in a freezer-safe container or bag. It can stay frozen for up to three months. When you’re ready, thaw it in the fridge overnight.
Shelf life for best taste
For the best flavor, eat your cheesecake within four to five days when stored in the fridge. After that, the taste and texture may change. If frozen, use it within three months for top quality. Enjoy the rich flavors of your decadent red velvet strawberry cheesecake at their best!
FAQs
How long should I bake the cheesecake?
You should bake the cheesecake for 55 to 65 minutes. The edges must set, but the center should still jiggle a bit. This jiggle means the cheesecake is creamy. After baking, let it cool slowly in the oven for one hour to prevent cracks.
Can I use frozen strawberries?
Yes, you can use frozen strawberries! Just thaw them first. Drain any excess juice to avoid a watery topping. This way, you still get that fruity flavor without fresh strawberries.
What can I substitute for cream cheese?
If you need a substitute for cream cheese, try mascarpone cheese. It has a similar texture. You can also use Greek yogurt for a lighter option. Just remember, each substitute will change the flavor slightly.
How do I know when the cheesecake is done?
To check if the cheesecake is done, look for the edges to be set. The center should still jiggle gently when you shake the pan. If it looks too soft, give it a few more minutes. Just be careful not to overbake it.
You learned how to make a delicious cheesecake, from the crust to the topping. I shared tips for great texture and presentation. Variations let you change flavors or toppings based on your taste. Proper storage ensures every slice stays fresh and tasty. Remember, baking is about practice. Try new things, and don’t fear mistakes. Enjoy your cheesecake journey and share it with friends!


