Introduction
There’s something undeniably comforting about the aroma of freshly baked breadsticks wafting through your home. Imagine pulling a pan of warm, cheesy Italian breadsticks from the oven, their golden-brown crust glistening, and a cheesy pull that tempts you to take the first bite. Homemade breadsticks are not just a side dish; they can transform any meal into a special occasion. Whether served alongside a hearty pasta dish, enjoyed as a delightful snack, or presented as an appetizer for your guests, these cheesy delights are sure to impress.
What makes these breadsticks truly special is their Italian influence, marrying a rich culinary tradition with the beloved comfort of cheese. With each bite, you will experience a satisfying crunch followed by a soft, chewy texture enhanced by the gooey, melted cheese. The simplicity of the ingredients belies the explosion of flavors you will enjoy, making them perfect for any occasion.
Understanding the Ingredients
To create these deliciously cheesy Italian breadsticks, you will need a handful of essential ingredients that work together to achieve the perfect texture and flavor. Each component plays a crucial role in the final product, ensuring that every bite is as heavenly as the last.
All-Purpose Flour
The foundation of any bread is the flour, and for our breadsticks, all-purpose flour is the star. It provides the necessary gluten structure, allowing the breadsticks to rise and maintain their shape. When working with flour, the quality matters; using a good brand will yield better results, giving your breadsticks a light and airy texture while still being sturdy enough to hold the cheesy goodness.
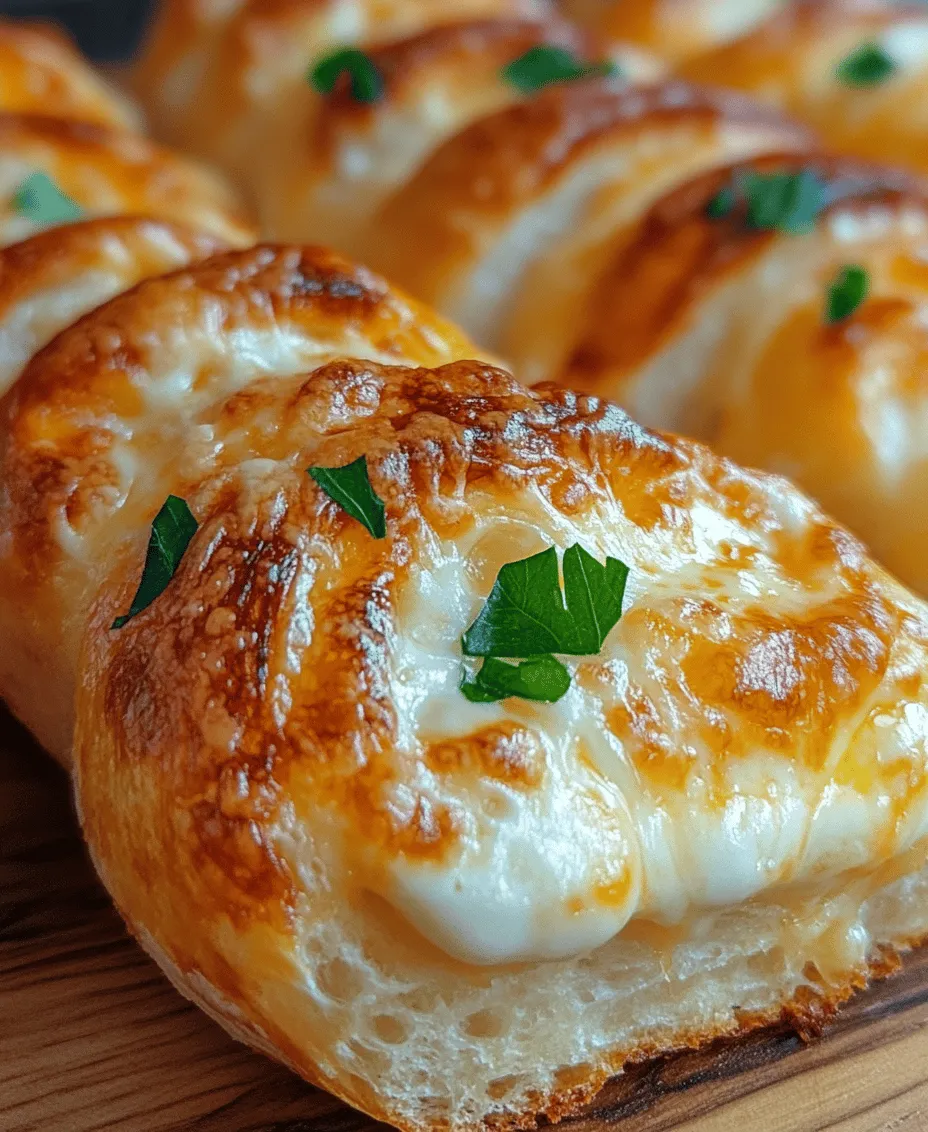
Mozzarella Cheese
No cheesy breadstick would be complete without mozzarella cheese. Known for its exceptional melting properties, mozzarella adds a creamy texture and mild flavor profile that complements the breadsticks beautifully. As it melts, it creates those iconic stretchy cheese strands that make every bite a delight. For the best results, opt for fresh mozzarella or part-skim mozzarella cheese for a balance of flavor and meltability.
Parmesan Cheese
To elevate the flavor, Parmesan cheese is a must. This aged cheese adds a rich, nutty taste that balances the mild mozzarella. Sprinkling grated Parmesan on top of the dough before baking gives the breadsticks an additional layer of flavor and a delightful, slightly crispy crust. Parmesan also contributes to the overall richness of the breadsticks, making them even more indulgent.
Garlic Powder and Dried Oregano
The combination of garlic powder and dried oregano is essential for enhancing the flavor of your breadsticks. Garlic powder provides a subtle yet aromatic kick, while oregano brings a touch of Italian herbiness that is synonymous with Italian cuisine. These spices not only make the breadsticks taste incredible but also add a lovely fragrance that will fill your kitchen as they bake.
Yeast
Yeast is the magic ingredient that brings your dough to life. It ferments the sugars in the flour, producing carbon dioxide gas that causes the dough to rise, resulting in light and airy breadsticks. Using fresh yeast or active dry yeast will ensure that your dough rises properly. It’s crucial to activate the yeast correctly, as this step will determine the success of your breadsticks.
Olive Oil
A drizzle of good quality olive oil adds moisture to the dough and enhances the flavor profile. It contributes to the tenderness of the breadsticks while also giving them a beautiful sheen when baked. Olive oil is a staple in Italian cooking, and its fruity notes will elevate your cheesy breadsticks to new heights.
Optional Garnishes and Variations
To make your breadsticks even more appealing, consider adding garnishes or customizing them to suit your taste. Fresh parsley can be chopped and sprinkled on top for a burst of color and freshness. You can also experiment with different herbs or spices, such as crushed red pepper flakes for heat or a mix of Italian seasoning to deepen the flavor.
Step-by-Step Guide to Making Cheesy Italian Breadsticks
Now that we’ve covered the delightful ingredients that make these breadsticks so irresistible, let’s dive into the step-by-step process of making them. Follow these instructions carefully for the best results.
Preparing the Yeast Mixture
The first step in making your cheesy Italian breadsticks is to prepare the yeast mixture. Start by measuring out warm water (between 100°F and 110°F) and adding a teaspoon of sugar. The sugar acts as food for the yeast, helping it to activate and grow. Sprinkle the yeast over the warm water and let it sit for about 5 to 10 minutes until it becomes frothy. This bubbling is a sign that your yeast is alive and ready to work its magic in the dough.
Combining Dry Ingredients
While the yeast is activating, take a large mixing bowl and combine your dry ingredients. Measure out the all-purpose flour, garlic powder, dried oregano, and a pinch of salt. Sifting the flour is recommended, as it helps to aerate it and remove any lumps, resulting in a smoother dough. Mix the dry ingredients together until they are evenly distributed. This step is crucial because it ensures that every bite of your breadsticks is packed with flavor.
Kneading the Dough
Once your yeast is activated, it’s time to combine the wet and dry ingredients. Create a well in the center of your flour mixture and pour in the activated yeast mixture along with a splash of olive oil. Using a wooden spoon or your hands, mix until a shaggy dough forms.
Now the fun begins! Turn the dough out onto a lightly floured surface and begin kneading it. Kneading is essential for developing gluten, which gives bread its structure. You want to knead the dough for about 8 to 10 minutes, or until it becomes smooth and elastic. If the dough is too sticky, sprinkle a little more flour as needed, but be careful not to add too much, as this can lead to tough breadsticks.
Incorporating the Cheeses
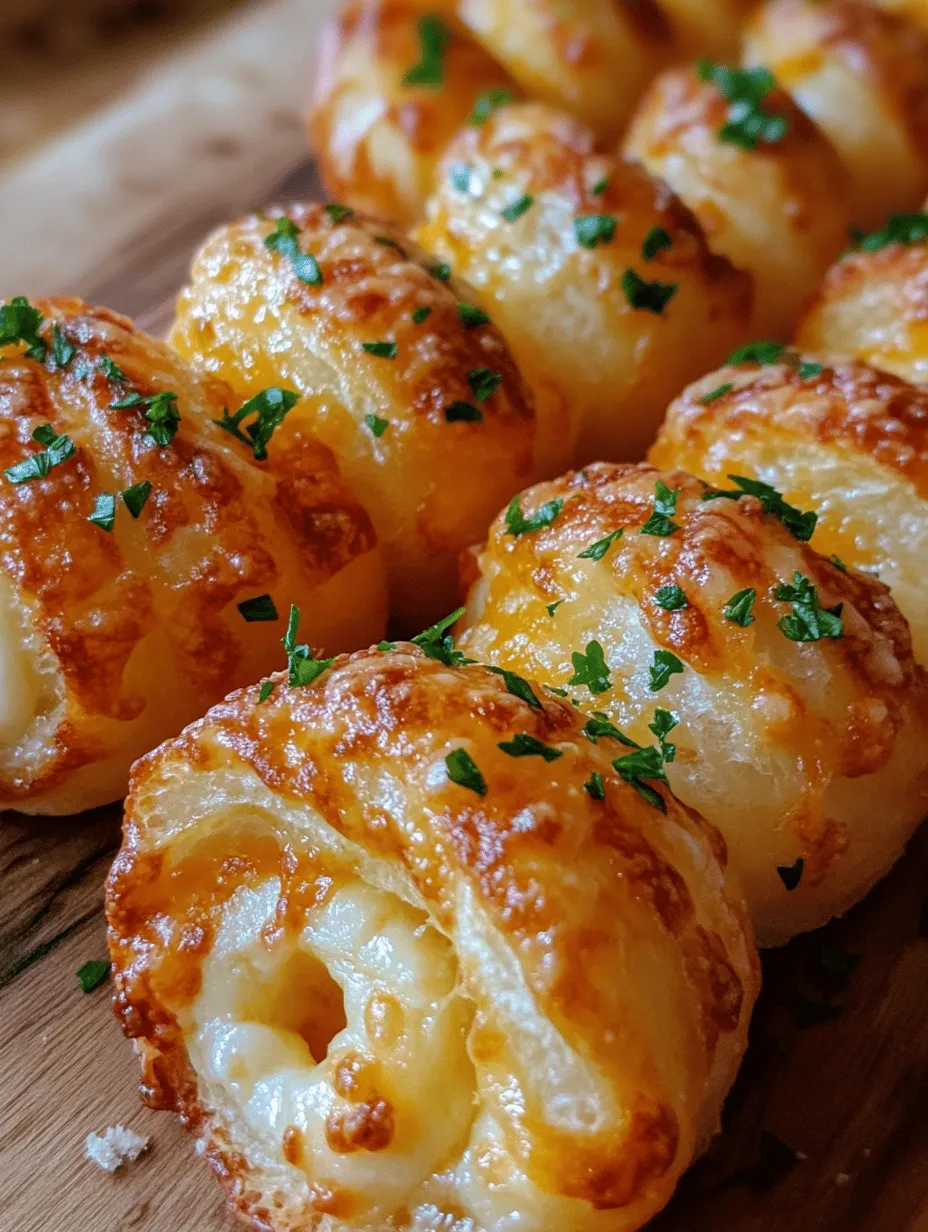
Once you have achieved the perfect dough consistency, it’s time to add the star ingredients: the cheeses. Grate your mozzarella and Parmesan cheeses and fold them into the dough. Ensure the cheese is evenly distributed throughout the mixture, as this will create a cheesy flavor in every bite. You can also reserve some cheese to sprinkle on top before baking, enhancing the appearance and flavor of your breadsticks.
Allowing the Dough to Rise
After incorporating the cheeses, it’s time to let the dough rise. Place the dough into a greased bowl, cover it with a clean kitchen towel or plastic wrap, and set it in a warm, draft-free area for about 1 to 1.5 hours, or until it has doubled in size. Creating an ideal environment is vital for proper rising; you can place the bowl in an oven that has been preheated for a minute and turned off, or near a warm stove.
This rising period allows the yeast to work, creating the airy texture we love in breadsticks. Once the dough has risen, you will be ready to shape it into delicious cheesy breadsticks that will surely become a favorite in your household.
Stay tuned for the next part, where we will cover the shaping, baking, and serving of these delightful Italian breadsticks!
Shaping and Baking the Breadsticks
Rolling Out the Dough
Once your dough has risen beautifully, it’s time to roll it out into perfect breadsticks. Start by flouring your work surface lightly to prevent sticking. Gently punch down the dough to release any excess air, then divide it into two equal portions. Using a rolling pin, roll each portion into a rectangle about 1/2 inch thick. The key to achieving the right thickness is to apply gentle, even pressure while rolling. If the dough begins to spring back, let it rest for a few minutes before continuing. This will help relax the gluten and make it easier to shape.
Cutting and Twisting the Dough
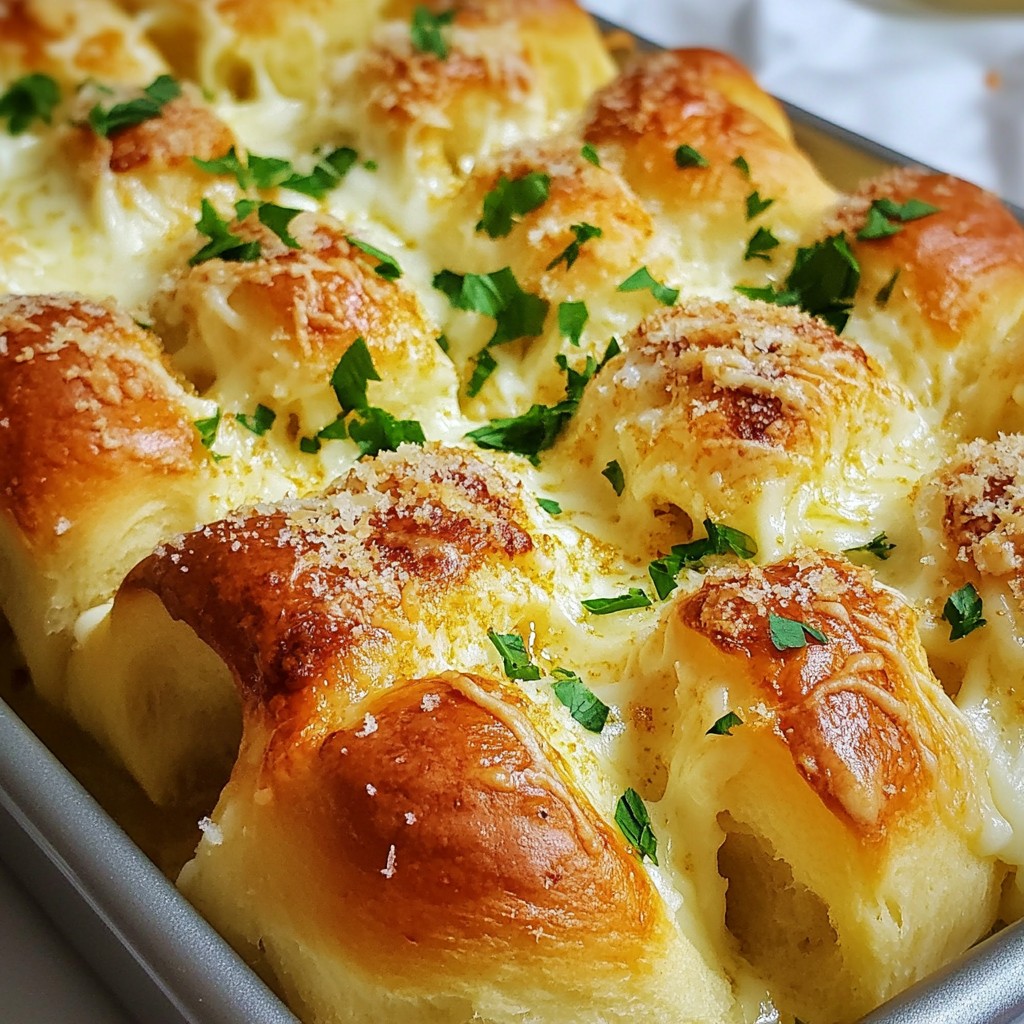
With your dough rolled out, it’s time to cut and twist the breadsticks. Using a sharp knife or a pizza cutter, slice the dough into strips about 1 inch wide. For a fun twist on traditional breadsticks, you can take each strip and give it a gentle twist before placing it on a baking tray lined with parchment paper. This not only enhances the texture but also adds visual appeal. If you’re feeling creative, consider shaping the breadsticks into knots or spirals for an impressive presentation. Feel free to sprinkle some extra cheese or herbs on top before baking to elevate the flavor.
Egg Wash for a Golden Finish
Applying an egg wash is crucial for achieving a beautiful golden color and shiny finish on your breadsticks. To make an egg wash, beat one egg with a tablespoon of water until well combined. Using a pastry brush, generously coat each breadstick with the egg wash right before baking. This simple step will ensure your breadsticks develop a mouthwatering sheen that makes them irresistible.
Baking Tips for Perfect Breadsticks
For perfectly baked breadsticks, preheat your oven to 375°F (190°C). Place the baking tray with the breadsticks in the center of the oven for even heat distribution. Bake for about 15-20 minutes, or until they are golden brown and puffed. Keep an eye on them, as baking times may vary depending on your oven. A good indicator that your breadsticks are done is a slight firmness when gently pressed and a delicious aroma wafting through your kitchen.
Serving Suggestions
Pairing Ideas
These cheesy Italian breadsticks are versatile and can complement a variety of dishes. Serve them alongside a hearty marinara sauce for dipping or a warm garlic butter sauce for a rich accompaniment. They also pair beautifully with soups, salads, and pasta dishes, making them a fantastic side for any Italian meal.
For a complete meal experience, consider serving them with spaghetti marinara, creamy fettuccine Alfredo, or a fresh garden salad. The breadsticks can also be enjoyed on their own as a tasty appetizer or snack.
Presentation Tips
Presentation is key when it comes to serving your delicious cheesy breadsticks. Consider arranging them in a tall mason jar or a rustic basket, garnished with fresh herbs like parsley or basil for a pop of color. You can also sprinkle some freshly grated Parmesan cheese on top just before serving for an extra touch of elegance. Adding a small bowl of marinara or garlic butter for dipping will enhance the visual appeal and make the dish more inviting.
Nutritional Information
Understanding the nutritional benefits of your ingredients can help you enjoy these cheesy breadsticks guilt-free. The primary ingredients include flour, yeast, cheese, and butter, all of which provide essential nutrients.
– Flour: A source of carbohydrates, which provide energy.
– Yeast: Offers B vitamins and helps in metabolism.
– Cheese: Packed with protein and calcium, making it beneficial for bone health.
– Butter: Provides fats that are essential for energy and absorption of vitamins.
A serving of these breadsticks (approximately two sticks) contains around 200 calories, depending on the amount of cheese and butter used. For a healthier option, consider using whole wheat flour or reducing the amount of cheese while still maintaining flavor.
Common Questions and Troubleshooting
What to Do If the Dough Doesn’t Rise
If you find that your dough hasn’t risen as expected, it could be due to several factors. Firstly, ensure that your yeast is fresh and active by checking the expiration date. If your kitchen is too cold, try placing the dough in a warm, draft-free area or near a warm oven. If all else fails, you can always start again with fresh ingredients.
Solutions for Overcooked or Undercooked Breadsticks
If your breadsticks come out overcooked, consider reducing the baking time next time and keep a close watch on them during the last few minutes. On the flip side, if they are undercooked, simply return them to the oven for a few more minutes until they are golden and firm to the touch.
Frequently Asked Questions Regarding Ingredient Substitutions or Dietary Preferences
– Can I use whole wheat flour instead of all-purpose flour? Yes, whole wheat flour can be substituted, but you may need to adjust the liquid content as it absorbs more moisture.
– Is there a dairy-free option for the cheese? Absolutely! You can use dairy-free cheese alternatives that melt well to maintain the cheesy flavor.
– Can I prepare the dough in advance? Yes, the dough can be prepared and stored in the refrigerator for up to 24 hours before shaping and baking.
Conclusion
Making cheesy Italian breadsticks is an enjoyable culinary experience that results in a delicious treat perfect for any occasion. With simple ingredients and straightforward steps, you can create a batch of warm, cheesy goodness that will impress your family and friends. Whether enjoyed as an appetizer, side dish, or snack, these breadsticks are bound to be a hit.
We encourage you to try this recipe and make it your own by experimenting with different herbs, cheeses, and dipping sauces. The possibilities are endless, and with each batch, you’ll discover new favorite variations. Happy baking!