Introduction
There’s something truly enchanting about the aroma of freshly baked bread wafting through your kitchen, especially when that bread is warm, fluffy, and infused with the irresistible flavors of garlic and butter. Homemade garlic butter dinner rolls are not just a side dish; they are a comforting addition to any meal, capable of transforming even the simplest dinner into a memorable feast. The appeal of these rolls lies in their perfect balance of tenderness and flavor, making them irresistible to anyone who encounters them.
When you choose to make garlic butter dinner rolls from scratch, you’re not just baking; you’re creating a warm, inviting experience that brings family and friends together. The joy of pulling a tray of golden-brown rolls from the oven, the sound of a soft tear as you break one open to reveal a steamy center, and the taste of buttery, garlicky goodness melting in your mouth is a culinary delight unlike any other.
Utilizing fresh ingredients is crucial to achieving the best results. Each component plays a vital role in building flavor and texture, ensuring that your rolls are not just good, but exceptional. The unique flavor profile of these dinner rolls comes from the combination of roasted garlic and fresh herbs, which elevates the humble roll into a gourmet experience. Whether served alongside a hearty soup, a succulent roast, or simply enjoyed on their own, these garlic butter dinner rolls are sure to impress.
Understanding the Ingredients
To craft the perfect garlic butter dinner rolls, understanding your ingredients and their roles is key. Let’s take a closer look at each component that contributes to this delightful recipe:
All-Purpose Flour
All-purpose flour is the foundation of our rolls. It provides the structure and body necessary for a fluffy texture. The protein content in all-purpose flour helps develop gluten, which is essential for the rolls to rise and maintain their shape. When measuring flour, it’s important to use the spoon-and-level method to ensure accuracy; too much flour can lead to dense rolls.
Active Dry Yeast
Yeast is the magic ingredient that transforms simple dough into airy, light rolls. Active dry yeast requires activation before mixing it into the dough, which encourages fermentation and dough rising. This step is crucial; without properly activated yeast, your rolls may not rise adequately, resulting in a dense texture. Always check the expiration date on your yeast to ensure it’s still active.
Whole Milk
Whole milk adds richness and moisture to the dough, contributing to a tender crumb. The fat in whole milk enhances flavor and tenderness, leading to a more indulgent roll. For best results, warm the milk slightly before adding it to the mixture, as this will help activate the yeast more effectively.
Unsalted Butter
Unsalted butter is a key ingredient that enhances both flavor and texture. Using unsalted butter allows for better control over the salt content in the recipe. The melted butter will be mixed into the dough and used later in the garlic butter, ensuring that every bite is infused with rich, buttery flavor.
Garlic
Garlic is the star of this recipe, providing a robust flavor that pairs beautifully with the butter. Fresh garlic can be minced or roasted, depending on your preference. Roasting garlic mellows its flavor, adding a sweet, caramelized note that will elevate the overall taste of the rolls. If you’re a garlic lover, feel free to adjust the quantity to suit your taste.
Fresh Parsley
Fresh parsley adds a pop of color and a hint of freshness to the rolls. It complements the garlic beautifully and gives the rolls a more vibrant appearance. Be sure to chop the parsley finely to distribute it evenly throughout the dough and the garlic butter.
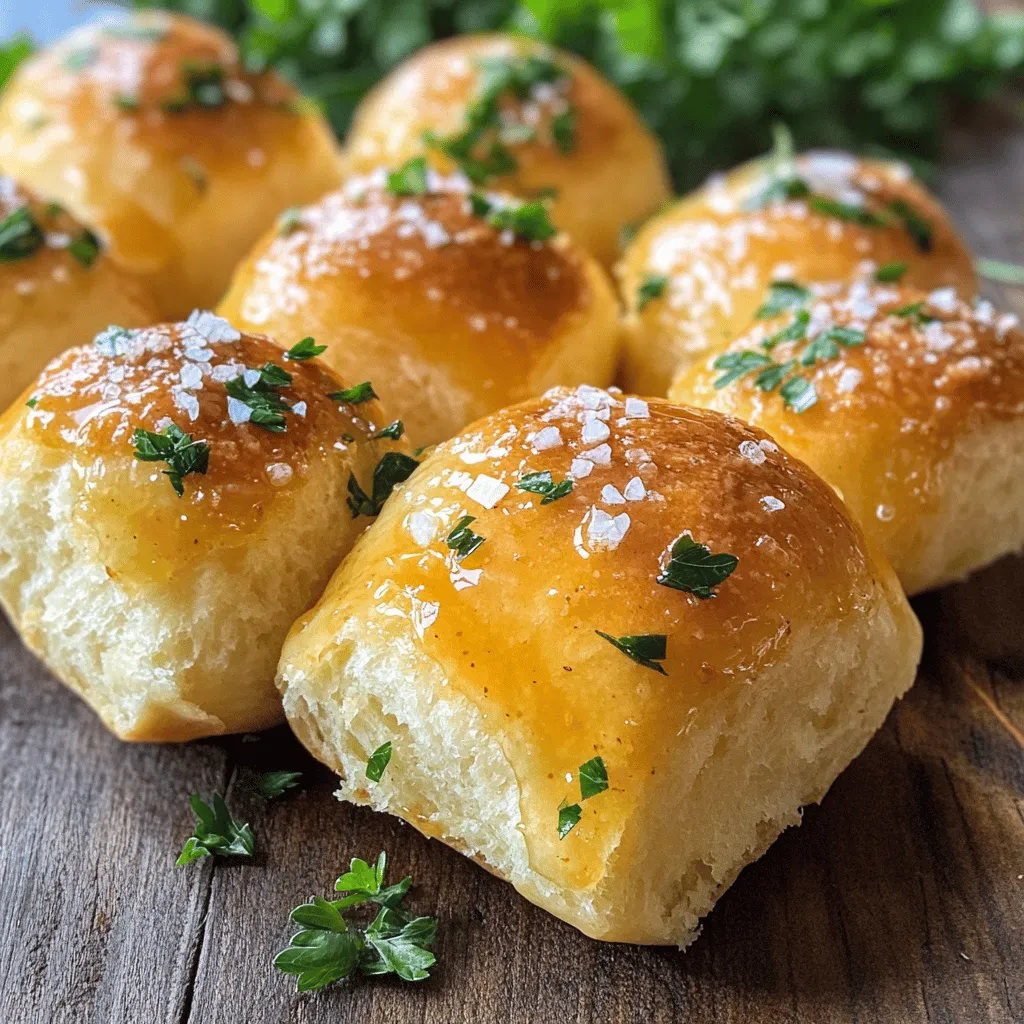
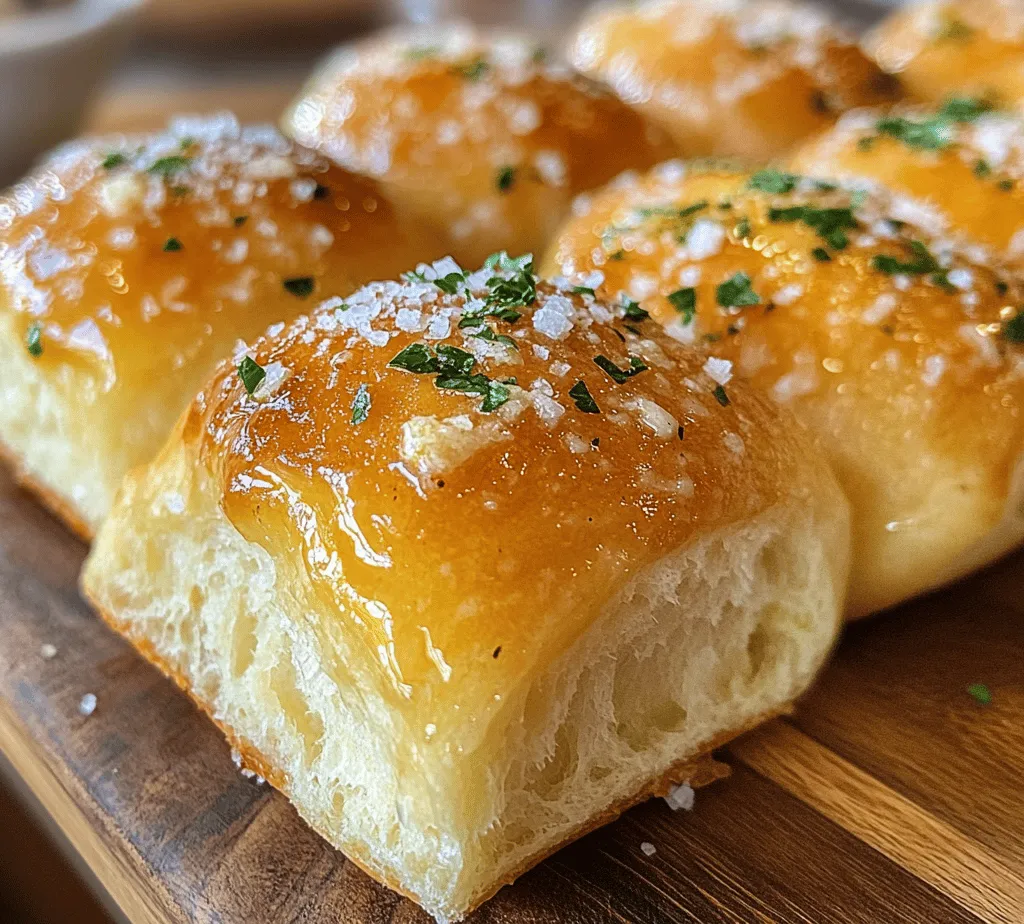
Flaky Sea Salt
Flaky sea salt is the finishing touch that elevates the flavor of the rolls. Sprinkling a few flakes on top just before serving enhances the overall taste experience, providing a satisfying contrast to the buttery interior. Use high-quality flaky sea salt for the best results, as it will dissolve quickly and distribute evenly over the rolls.
Preparation Process
Now that we’ve covered the essential ingredients, let’s dive into the preparation process. Making garlic butter dinner rolls is straightforward, but following these steps carefully will ensure that your rolls turn out perfectly every time.
Step 1: Activating the Yeast
Begin by activating your yeast. In a small bowl, combine warm water (about 110°F or 43°C) with a teaspoon of sugar and the active dry yeast. Stir gently to combine and let it sit for about 5-10 minutes until frothy. This indicates that the yeast is alive and well, ready to work its magic. If your mixture doesn’t foam, your yeast may be inactive, and you’ll need to start over with fresh yeast.
Step 2: Mixing the Dough
In a large mixing bowl, combine the all-purpose flour and flaky sea salt. Make a well in the center and pour in the activated yeast mixture, followed by the warm whole milk and melted unsalted butter. If you’re using roasted garlic, add it at this stage as well. Using a wooden spoon or a spatula, mix until a shaggy dough forms. At this point, you might find the dough a bit sticky, which is perfectly normal.
Step 3: Kneading the Dough
Transfer the dough to a lightly floured surface. Kneading is crucial for developing gluten, which will give your rolls structure. Knead the dough for about 8-10 minutes, adding small amounts of flour as needed to prevent sticking. The dough should become smooth and elastic. If you press your finger into the dough, it should spring back slightly. This indicates that the gluten has developed adequately.
Step 4: First Rise
Once kneaded, shape the dough into a ball and place it in a lightly greased bowl. Cover the bowl with a clean kitchen towel or plastic wrap, and let it rise in a warm, draft-free area until it doubles in size, typically about 1-2 hours. This fermentation stage is essential, as it allows the flavors to develop and the texture to improve.
Creating the Flavored Garlic Butter
While the dough is rising, you can prepare the garlic butter that will be brushed onto the rolls. In a small saucepan over low heat, melt unsalted butter and add minced garlic. Allow the garlic to cook gently, infusing the butter with flavor without letting it brown. Once the garlic is fragrant, remove the saucepan from the heat and stir in finely chopped fresh parsley. Set this mixture aside to cool slightly before using it on the rolls.
—
This introduction and the first steps of the preparation process provide a solid foundation for your garlic butter dinner rolls. By understanding the ingredients and the importance of each step, you can create a batch of rolls that are truly delightful, making any meal feel special. Stay tuned for the continuation of this recipe, where we will cover the second rise, baking instructions, and serving suggestions to complete your culinary journey.
Importance of Low Heat for Infusing Flavor
When it comes to garlic butter dinner rolls, the infusion of flavor is paramount. Cooking on low heat allows the garlic to release its essential oils slowly, resulting in a rich and aromatic butter that permeates the dough. This method ensures that the garlic is neither burnt nor too raw, maintaining its sweet, savory character. By taking the time to melt the butter gently, you allow the flavors to meld beautifully, creating a depth that enhances the overall taste of the rolls. Remember, patience is key in achieving that perfect balance of flavors that will have your guests asking for seconds.
Variations with Optional Ingredients
While the classic garlic butter dinner roll is a delight on its own, there are numerous ways to customize this recipe to suit your palate. For an extra kick, consider adding garlic powder alongside fresh minced garlic. This addition can intensify the garlic flavor, making it even more irresistible. You might also experiment with herbs such as rosemary or thyme, which pair wonderfully with garlic. For a touch of heat, a pinch of red pepper flakes can be incorporated into the butter mixture. If you’re feeling adventurous, try adding grated cheese, such as Parmesan or cheddar, into the dough for a cheesy variant. The beauty of this recipe lies in its versatility, allowing you to adapt it to your tastes.
Shaping the Rolls
Creating the perfect roll shape is an essential step that contributes not only to the aesthetic appeal but also to the baking consistency of your garlic butter dinner rolls. Here are some techniques to help you achieve that perfect shape:
1. Divide Evenly: After your dough has risen, turn it out onto a lightly floured surface. Use a bench scraper or knife to cut the dough into equal portions. Aim for 12-16 pieces, depending on your desired roll size.
2. Shape the Rolls: To shape each piece into a roll, take a portion of dough and gently stretch it into a small rectangle. Fold the edges inward to create a smooth ball. Roll it gently against the surface with your palm to create a taut top.
3. Uniform Size: For even sizing, use a kitchen scale to weigh each piece of dough. This ensures that all rolls will bake uniformly, resulting in a consistent texture and appearance.
4. Second Rise: The second rise is crucial for achieving fluffiness. After shaping the rolls, place them in a greased baking dish, allowing them to rise again for about 30-45 minutes. This step creates air pockets, ensuring that the rolls turn out light and airy once baked.
Baking the Rolls
Baking your garlic butter dinner rolls is where the magic happens. Proper preparation and attention to detail are vital to achieving the perfect bake.
Preheating the Oven
Preheat your oven to 375°F (190°C). This step is essential for ensuring that your rolls start baking at the right temperature, which promotes proper rising and browning. An adequately preheated oven will create a warm environment for the rolls, allowing them to expand beautifully.
Brushing with Garlic Butter
Before baking, brush the tops of the rolls with the prepared garlic butter mixture. This not only adds flavor but also contributes to a beautiful golden crust. If you desire an extra touch of garlic flavor, drizzle a little more melted garlic butter on top of the rolls just before they go into the oven.
Signs of Doneness
Knowing when your rolls are perfectly baked is crucial. Look for the following signs:
– Golden Brown: The tops should be a lovely golden brown color.
– Sound: Gently tap the bottom of a roll; it should sound hollow.
– Internal Temperature: If you have a kitchen thermometer, check that the internal temperature of the rolls reaches about 190°F (88°C).
Once baked, remove them from the oven and let them cool in the pan for a few minutes before transferring them to a wire rack. This helps to maintain their soft texture.
Serving Suggestions
Garlic butter dinner rolls are incredibly versatile and can complement a wide array of meals. Here are some delightful serving suggestions:
Pairing with Meals
These rolls are a fantastic accompaniment to soups and stews. Their soft, buttery texture is perfect for soaking up delicious broths, making them a favorite alongside hearty dishes like minestrone or chicken noodle soup. They also pair well with salads, offering a satisfying contrast to crisp greens.
For a more substantial meal, serve garlic butter dinner rolls with roasted meats or vegetarian dishes. They are perfect for mopping up sauces from entrees like garlic herb chicken or creamy mushroom pasta.
Using Leftover Rolls
If you find yourself with leftover rolls (though we doubt they’ll last long), consider repurposing them. Slice them in half, toast them, and turn them into delicious garlic bread. You can also use them to make a savory bread pudding or a stuffing for a holiday meal. Their flavor will enhance any dish they are added to, ensuring nothing goes to waste.
Nutritional Information
Understanding the nutritional content of garlic butter dinner rolls can help you make informed choices about portion sizes. Here’s a quick overview:
Nutritional Aspects
On average, a single garlic butter dinner roll contains approximately 150-200 calories, depending on the size and the amount of butter used. They are rich in carbohydrates, which provide energy, but they also contain fats from the butter.
Portion Sizes
To maintain a balanced diet, consider enjoying one or two rolls alongside a meal. Pairing them with nutrient-dense foods such as vegetables and lean proteins can help create a more balanced plate.
Homemade vs. Store-Bought
Making garlic butter dinner rolls at home not only allows you to control the ingredients but also ensures that you are using fresh, high-quality components. Store-bought rolls often contain preservatives and additives that can detract from the flavor and nutritional value. Additionally, the joy of baking your own bread brings satisfaction that cannot be matched by pre-packaged options.
Conclusion
There’s something truly special about making garlic butter dinner rolls from scratch. The process of mixing, kneading, and shaping the dough is an experience that connects you with the art of baking. The aroma of warm bread wafting through your kitchen is enough to bring everyone to the table, eager to share in the delicious results.
As you embark on this culinary adventure, remember to savor the experience. Baking is not just about the end product; it’s about the joy of creating something with your own hands. So, whether you’re preparing these rolls for a family gathering or just a cozy dinner at home, take the time to enjoy every step of the process.
We encourage you to try this garlic butter dinner roll recipe and share it with loved ones. The delight of warm, homemade bread filling your kitchen is a memory worth creating. So gather your ingredients, roll up your sleeves, and let the baking begin!