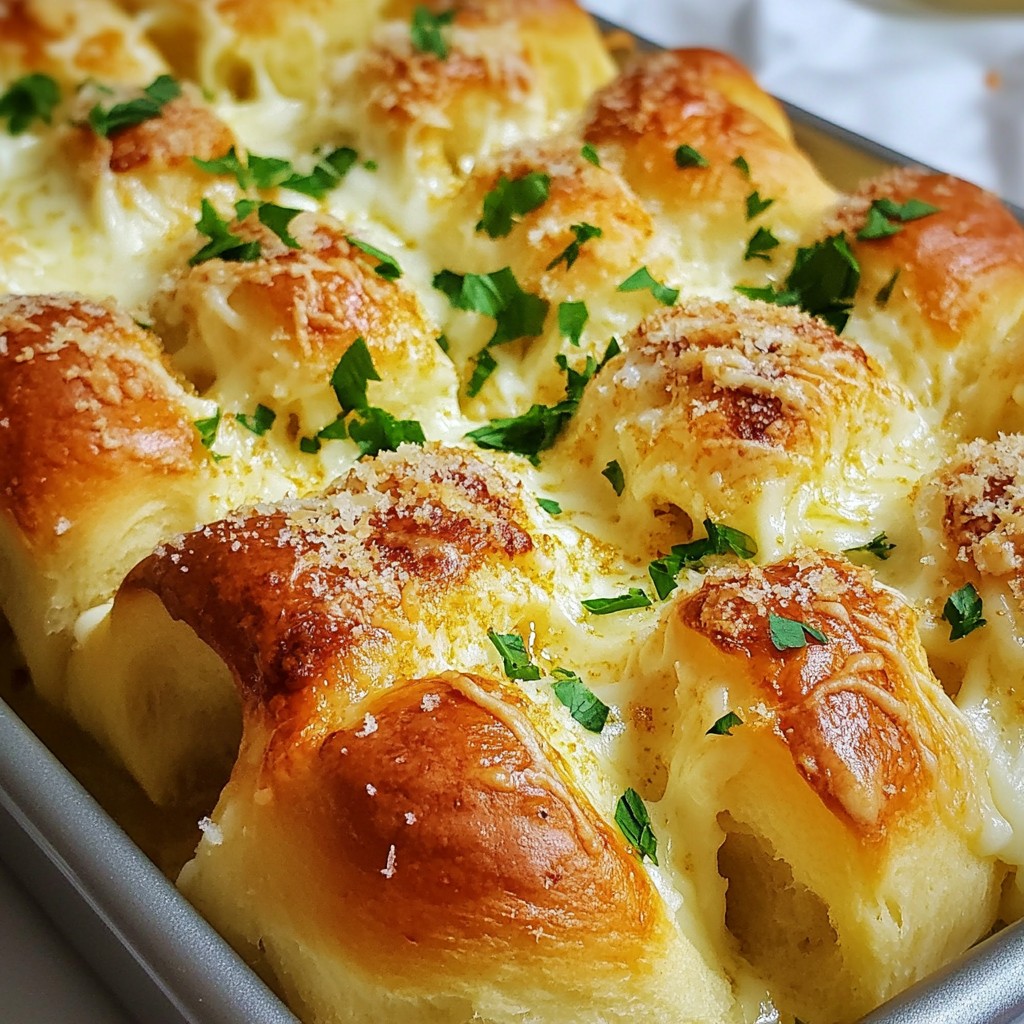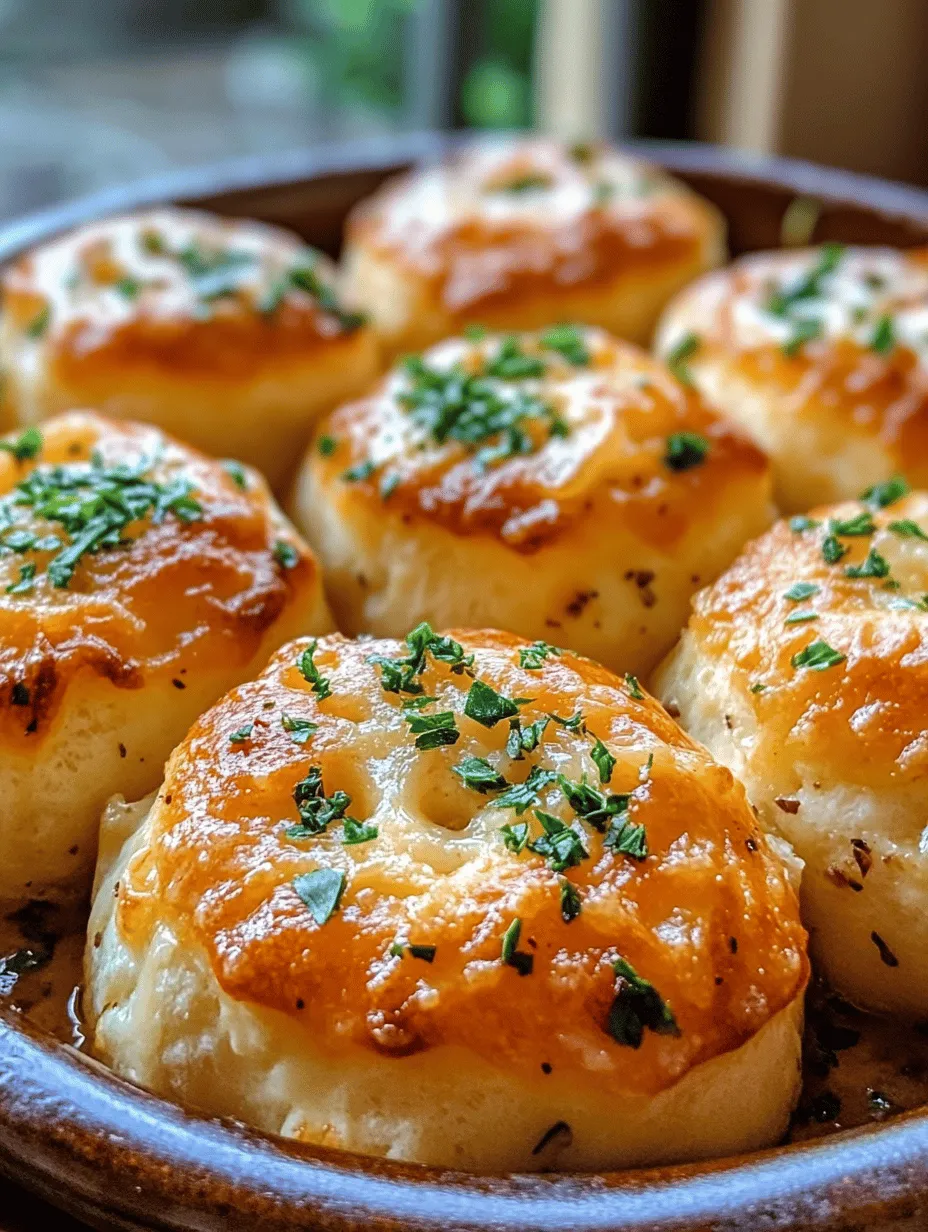
Homemade bread has a unique charm that can transform any meal into a special occasion. Among the myriad of bread recipes, Garlic Herb Butter Rolls stand out as an exceptional choice. These rolls not only provide a comforting, warm bite but also infuse your kitchen with an aromatic blend of garlic and herbs that beckons everyone to the dinner table. Whether served alongside a hearty soup, as an accompaniment to a sumptuous roast, or simply enjoyed with a pat of butter, these rolls are incredibly versatile. The joy of sharing homemade bread with family and friends creates unforgettable moments, and Garlic Herb Butter Rolls are the perfect vehicle for this experience.
This recipe invites you to explore the delightful world of baking, emphasizing the simple yet profound pleasure of creating something delicious from scratch. With each roll, you’ll enjoy the rich, buttery flavor enhanced by fragrant garlic and fresh herbs, making them a beloved staple in your household. As you embark on this culinary journey, you’ll discover that the combination of warm, fluffy rolls with the savory notes of garlic and herbs is not just a treat for the taste buds, but also a feast for the senses.
Understanding the Ingredients
Every great recipe begins with understanding its ingredients. In this case, each component of Garlic Herb Butter Rolls serves a vital role in achieving the perfect texture, flavor, and overall experience. Here’s a closer look at what you’ll need:
All-Purpose Flour
At the heart of any bread recipe is flour, and all-purpose flour is the ideal choice for these rolls. It provides the necessary structure and texture, allowing the rolls to rise beautifully while still maintaining a soft, tender crumb. The protein content of all-purpose flour strikes a balance between strength and tenderness, making it versatile for various baking needs. When kneaded, the gluten develops, contributing to the rolls’ airy quality.
Instant Yeast
Using instant yeast is a game-changer for home bakers. This type of yeast allows for quick and reliable rising, which means you can enjoy fresh rolls in less time than with traditional active dry yeast. Instant yeast doesn’t require proofing, which simplifies the process significantly. It works quickly to leaven the dough, ensuring your rolls come out light and fluffy every time.
Sugar
While sugar is often associated with sweetness, in bread making, its role extends beyond taste. Sugar acts as food for the yeast, promoting faster fermentation and rise. It contributes to the overall flavor profile of the rolls, adding a subtle sweetness that complements the garlic and herbs beautifully. Additionally, sugar helps to create a golden-brown crust during baking, enhancing the visual appeal of your rolls.
Salt
Salt is an essential ingredient in any baking recipe, and its importance cannot be overstated. In the context of Garlic Herb Butter Rolls, salt enhances the overall flavor, balancing the sweetness from the sugar and highlighting the savory notes of garlic and herbs. Moreover, salt strengthens the dough, contributing to gluten development and improving the bread’s texture. It’s crucial to use the right amount; too little can result in bland bread, while too much can inhibit yeast activity.
Warm Water
Water is the medium through which all the ingredients come together. The ideal temperature for activating yeast is warm, around 100°F to 110°F (37°C to 43°C). This warmth helps to wake the yeast from its dormant state, allowing it to produce carbon dioxide that makes the dough rise. Proper water temperature is key; too hot can kill the yeast, while too cold will slow down its activity. The warm water also helps to dissolve the sugar and salt, ensuring an even distribution of flavors throughout the dough.
Unsalted Butter
Butter adds richness and flavor to Garlic Herb Butter Rolls, making them taste indulgent. Using unsalted butter allows you to control the salt content of the recipe, ensuring a balanced flavor. When melted and incorporated into the dough, butter contributes to a tender crumb and a delightful texture. It also enhances the rolls’ ability to stay fresh longer, making them a perfect make-ahead option.
Garlic and Herbs
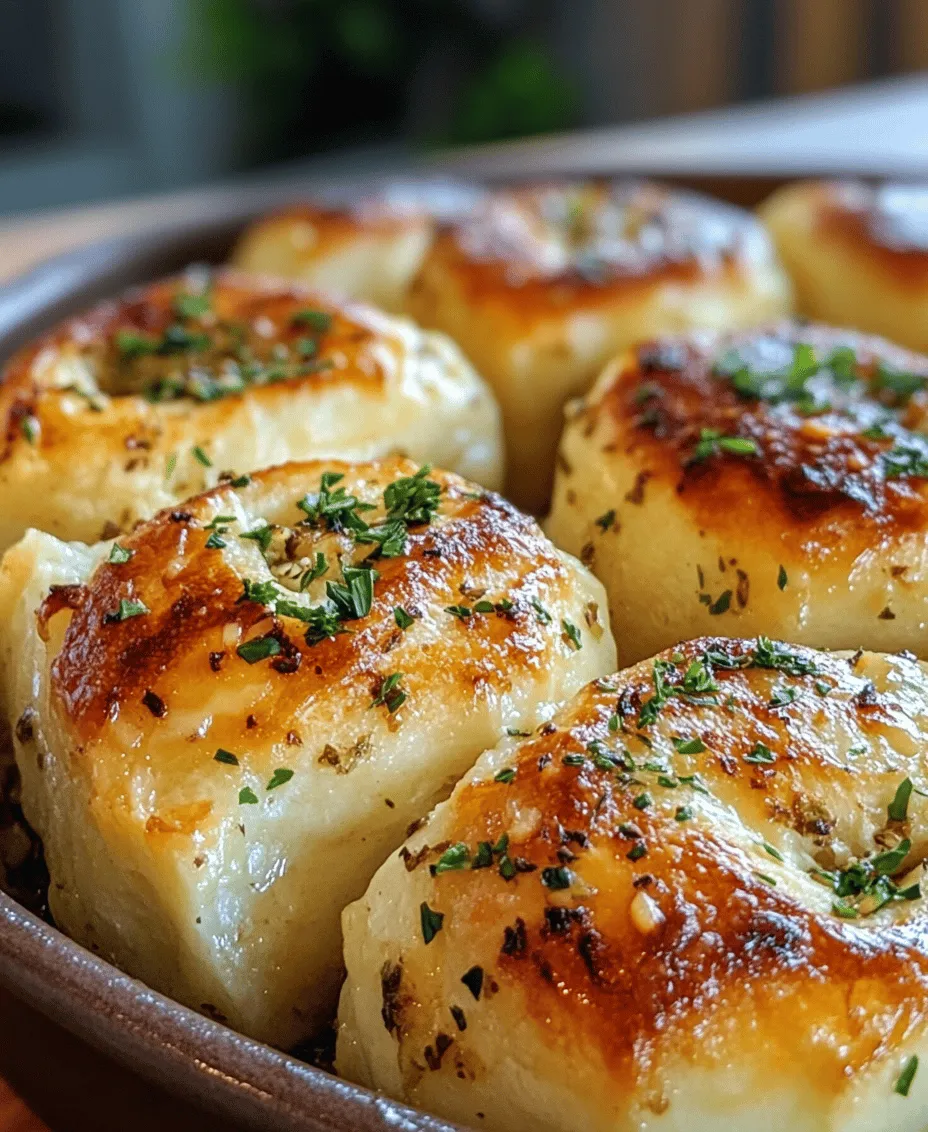
No Garlic Herb Butter Rolls would be complete without the star ingredients: garlic and herbs. Fresh garlic infuses the rolls with a robust flavor that pairs beautifully with the richness of the butter. Additionally, herbs such as parsley, oregano, and Italian seasoning add aromatic notes that elevate the overall taste experience. The combination of these ingredients creates a flavor profile that is savory, fragrant, and utterly irresistible.
Preparation Steps for Perfect Rolls
Now that you understand the essential ingredients, it’s time to dive into the preparation steps for making these delightful Garlic Herb Butter Rolls. With clear instructions, you’ll be able to create rolls that are not only delicious but also visually appealing.
Mixing the Dry Ingredients
Begin by gathering your dry ingredients: all-purpose flour, instant yeast, sugar, and salt. In a large mixing bowl, combine the flour, sugar, and salt, making sure to mix them thoroughly. Create a small well in the center of the dry ingredients where you will add the instant yeast. This step is important because it keeps the salt and yeast separated until you are ready to combine everything. Salt can inhibit the yeast’s growth if it comes into direct contact too soon, so this method helps ensure a successful rise.
Creating the Dough
Next, it’s time to incorporate the wet ingredients. Measure out the warm water and unsalted butter, melting the butter if necessary. Slowly pour the warm water into the well you created in the dry mixture, followed by the melted butter. Using a wooden spoon or your hands, mix the ingredients together until a cohesive dough forms. You may find that the dough is slightly sticky at this point, which is perfectly normal.
Kneading Techniques
Kneading is a critical step in developing the gluten structure of your rolls. Transfer the dough onto a lightly floured surface and begin kneading by folding the dough over itself and pushing it down with the heels of your hands. Turn the dough a quarter turn and repeat. Continue this process for about 8-10 minutes until the dough becomes smooth and elastic. A well-kneaded dough should spring back when gently pressed and have a slightly tacky but not overly sticky texture. If you find the dough is too sticky, sprinkle a small amount of flour as needed, but be cautious not to add too much, as this can lead to dense rolls.
Crafting the Garlic Herb Butter Filling
While the dough is resting, prepare the garlic herb butter filling. In a small bowl, combine softened unsalted butter with minced garlic and your choice of fresh or dried herbs. Mix until well combined, creating a fragrant paste that will be spread inside the rolls. This filling is what makes these rolls so special, adding an extra layer of flavor that is simply irresistible. Set the garlic herb butter aside while the dough rises.
Rising and Shaping the Dough
The rising process is vital for achieving the perfect texture in your rolls. The yeast needs time to ferment and produce carbon dioxide, which causes the dough to expand and become airy.
First Rise
Once you have kneaded your dough, place it in a lightly greased bowl, covering it with a clean kitchen towel or plastic wrap. Allow the dough to rise in a warm, draft-free area for about 1 to 1.5 hours, or until it has doubled in size. An ideal spot for rising could be near a warm oven or a sunny window. To check if the dough has risen enough, gently poke it with your finger; if the indentation remains, it’s ready for the next step. The first rise is crucial for developing flavor and texture, so be patient and let the dough do its magic.
As your dough rises, the aromas of garlic and herbs will begin to fill your kitchen, creating an anticipation that is hard to resist. The next steps will take you closer to enjoying these delicious rolls, and soon, you’ll be sharing them with your loved ones!
Dividing and Shaping
Now that your dough has risen beautifully, it’s time to shape those Garlic Herb Butter Rolls. This step is crucial for ensuring that each roll bakes evenly and has a consistent texture.
1. Portioning the Dough: Start by gently deflating the dough on a clean, floured work surface. Using a sharp knife or a dough scraper, divide the dough into equal portions. For standard-sized rolls, aim for about 12 equal pieces, each weighing approximately 2-3 ounces. If you prefer larger rolls, you can adjust this number accordingly.
2. Shaping the Rolls: Take one piece of dough and flatten it slightly with your hands. Here comes the fun part: use your fingers to stretch the dough into a small circle. Place a teaspoon of the garlic herb butter mixture in the center of each circle. Carefully fold the dough over the filling, pinching the edges to seal in the buttery goodness. Gently roll the filled piece between your palms to create a smooth ball. Repeat this process for the remaining pieces of dough.
3. Arranging the Rolls: Once all the rolls are shaped, arrange them in a greased baking dish or on a parchment-lined baking sheet. Make sure to leave enough space between each roll to allow for expansion during the second rise. This will help them develop a nice, fluffy texture.
Second Rise and Baking
The anticipation builds as we prepare for the second rise and finally get to bake these delicious rolls.
Preparing for the Second Rise
After arranging your rolls, cover them with a clean kitchen towel or plastic wrap. This helps to keep the moisture in, allowing the rolls to rise properly. Let them sit in a warm, draft-free area for about 30-45 minutes, or until they have doubled in size. Patience is key during this stage; the longer they rise, the fluffier they will be.
Oven Preparation
While the rolls are rising, preheat your oven to 375°F (190°C). Preheating is essential for achieving that perfect golden-brown crust. Before placing the rolls in the oven, gently brush the tops with melted butter. This not only enhances flavor but also helps to achieve a beautiful, shiny finish.
Baking Time
Once preheated, place the rolls in the oven and bake for 20-25 minutes. Keep an eye on them as they bake; they should puff up and turn a lovely golden brown. To test for doneness, gently tap the top of a roll; it should sound hollow. If the rolls are not quite there yet, give them a few more minutes, but be careful not to overbake.
Serving Suggestions and Pairings
Now that your Garlic Herb Butter Rolls are baked to perfection, it’s time to enjoy them! Here are some ideas for serving:
Ideal Accompaniments
These rolls are incredibly versatile and can complement a wide range of dishes. Here are some ideal pairings:
– Soups: Serve alongside hearty soups like minestrone, creamy tomato, or chicken noodle. The rolls are perfect for dipping and soaking up all that delicious broth.
– Salads: Pair with a fresh garden salad or a warm spinach salad. The contrast of warm rolls with a chilled salad creates a delightful culinary experience.
– Main Courses: These rolls make an excellent side for roasted meats, grilled chicken, or vegetarian dishes. Their buttery flavor enhances the entire meal.
Serving Temperature
For optimal flavor, serve your Garlic Herb Butter Rolls warm. If they cool down, simply pop them in the oven for a few minutes at 350°F (175°C) to reheat before serving. You can also serve them with additional garlic herb butter on the side for an extra indulgent touch.
Storing and Reheating Garlic Herb Butter Rolls
If you have leftover rolls (which is a rare occurrence!), here’s how to store and reheat them to maintain their deliciousness.
Storage Techniques
To keep your Garlic Herb Butter Rolls fresh, allow them to cool completely, then store them in an airtight container at room temperature for up to 2 days. If you want to extend their shelf life, you can freeze them. Wrap each roll tightly in plastic wrap and then place them in a freezer-safe bag. They can last in the freezer for up to 3 months.
Reheating Methods
To enjoy your rolls at their best after freezing, thaw them overnight in the refrigerator. Then, reheat them in a preheated oven at 350°F (175°C) for about 10-15 minutes until warmed through. This method ensures that the rolls regain their soft texture and melt-in-your-mouth quality.
Nutritional Information
These Garlic Herb Butter Rolls are not just a treat for your taste buds; they also offer some nutritional benefits worth noting.
Caloric Content
On average, each roll contains approximately 120-150 calories, depending on the size and amount of butter used. This makes them a delightful addition to your meal without being overly indulgent.
Nutritional Benefits
The key ingredients in these rolls provide some nutritional benefits:
– Garlic: Known for its immune-boosting properties, garlic also adds flavor without extra calories. It’s rich in antioxidants and may have heart health benefits.
– Herbs: Fresh herbs like parsley and rosemary not only enhance the flavor but also provide vitamins and minerals. They are low in calories and add a burst of freshness to the rolls.
Conclusion: The Joy of Homemade Garlic Herb Butter Rolls
Creating Garlic Herb Butter Rolls at home is a rewarding experience that brings a sense of warmth and comfort to any meal. The delightful transformation of simple ingredients into these soft, buttery rolls highlights the beauty of homemade cooking.
As you gather around the table with family and friends, sharing these flavorful rolls, you’ll find that they not only enhance the meal but also foster connections and create lasting memories. The aroma of freshly baked bread is an invitation to linger, savor, and enjoy each other’s company. So, roll up your sleeves, embrace the process, and indulge in the joy of baking these delicious Garlic Herb Butter Rolls. They’re sure to become a beloved staple in your kitchen!