Introduction
Homemade syrups have become a delightful staple in kitchens across the globe, offering a burst of flavor that can elevate any dish. From pancakes to cocktails, a well-crafted syrup can transform the ordinary into the extraordinary. Among the plethora of options available, green apple syrup stands out for its uniquely tart and refreshing flavor profile. Unlike the sweetness of common syrups, this vibrant concoction brings a zing that can invigorate your palate and add an exciting twist to traditional recipes.
The star of this syrup is undoubtedly the green apple, a fruit celebrated for its crisp texture and tartness. When transformed into syrup, green apples impart a refreshing taste that is both sweet and tangy, making it an exceptional addition to various culinary creations. Whether drizzled over waffles, incorporated into salad dressings, or used as a mixer in beverages, green apple syrup offers versatility that is hard to match.
What makes this recipe particularly appealing is its simplicity. With just a few straightforward ingredients and minimal steps, you can create a homemade syrup that rivals any store-bought option. This article will guide you through the process of making your own green apple syrup, highlighting the essential ingredients and the benefits they bring to the table.
Understanding the Ingredients
To create a delicious green apple syrup, it’s crucial to understand the role of each ingredient in the recipe. Here’s a breakdown of the key components:
Green Apples
The primary ingredient, green apples, not only provide the syrup’s distinct flavor but also bring a host of health benefits. Varieties like Granny Smith are particularly popular for their tangy taste and crisp texture. These apples are rich in vitamins A and C, dietary fiber, and antioxidants, making them a nutritious choice. When choosing your apples, freshness is key; select firm apples with vibrant skin for the best flavor and syrup quality.
Granulated Sugar
Sugar plays a vital role in syrup-making, acting as the primary sweetener while also helping to preserve the syrup. Granulated sugar dissolves easily into the apple mixture, creating a thick, sweet syrup that balances the tartness of the green apples. It’s important to use the right amount of sugar, as it not only sweetens but also enhances the overall flavor profile.
Water
Water serves as the foundation of the syrup, helping to dissolve the sugar and extract flavors from the apples. The quantity of water you use can affect the syrup’s consistency, so it’s essential to measure accurately. Too much water can lead to a thin syrup, while too little can result in a sticky, overly concentrated mixture.
Lemon Juice
Adding fresh lemon juice is crucial for balancing the flavors in your syrup. The acidity of the lemon juice not only enhances the freshness of the green apples but also prevents the syrup from becoming overly sweet. Additionally, the vitamin C in lemon juice acts as a natural preservative, extending the shelf life of your syrup.
Vanilla Extract
Vanilla extract adds depth to the flavor profile of the syrup, bringing a warm and aromatic note that complements the tartness of the green apples. The quality of vanilla extract matters; opting for pure vanilla extract over imitation can significantly enhance the final product.
Ground Cinnamon
Ground cinnamon introduces a warm spice that pairs beautifully with the apple flavor. This spice is not only flavorful but also offers health benefits, such as anti-inflammatory properties and the potential to regulate blood sugar levels. A pinch of cinnamon can elevate the overall taste, making your syrup even more delightful.
Quality of Ingredients
The quality of your ingredients can greatly impact the final product. Whenever possible, opt for organic or locally sourced apples and avoid generic brands of sugar and extracts that may contain additives. Fresh, high-quality ingredients will yield a syrup with richer flavors and better texture, ensuring that your homemade green apple syrup is a standout addition to your culinary repertoire.
Preparation Process
Now that you have a better understanding of the ingredients, let’s dive into the preparation process. Making green apple syrup is straightforward, and this step-by-step guide will ensure you achieve the perfect balance of flavors.
Step 1: Preparing the Apples
Start by peeling and chopping your green apples. Peeling the apples is essential, as the skin can add unwanted bitterness to the syrup. Slice the apples into quarters and remove the cores before cutting them into smaller pieces. The more finely you chop the apples, the easier it will be to extract their juices during cooking.
Step 2: Combining Ingredients
In a medium saucepan, combine the chopped green apples, granulated sugar, water, lemon juice, vanilla extract, and ground cinnamon. Stir the mixture gently to ensure that the sugar is evenly distributed among the apples. This initial mixing is crucial for even flavor distribution and helps to prevent the sugar from clumping.
Step 3: Cooking the Mixture
Place the saucepan over medium heat and bring the mixture to a gentle boil. Once boiling, reduce the heat to a simmer. This simmering process allows the apples to soften and release their natural juices, which will infuse the syrup with flavor. Keep an eye on the mixture; you want to maintain a steady simmer without allowing it to boil over.
Simmer the mixture for about 20 to 30 minutes, stirring occasionally. You’ll notice the apples breaking down, and the syrup will begin to thicken as the sugar dissolves and the water evaporates. The goal is to achieve a syrupy consistency that coats the back of a spoon.
Step 4: Straining the Syrup
Once the apples have softened and the syrup has thickened, it’s time to strain the mixture. Using a fine-mesh strainer or cheesecloth, pour the apple mixture into the strainer placed over a bowl or pot. Allow the syrup to drain, pressing down gently on the solids to extract as much liquid as possible. This step is vital for creating a smooth syrup without any apple pulp.
Step 5: Final Flavor Adjustments
Taste your syrup as it drains to ensure the flavors are balanced. Depending on your preference, you may want to adjust the acidity or sweetness by adding a touch more lemon juice or sugar. If you prefer a stronger cinnamon flavor, you can also add a pinch more ground cinnamon at this stage. Remember that the syrup will continue to thicken as it cools, so keep that in mind when making adjustments.
The Cooking Method Explained
The method of cooking the green apple syrup is designed to maximize flavor extraction while creating a beautifully textured syrup. By simmering the apples with sugar, water, and spices, you allow the natural sugars and flavors to meld together, resulting in a harmonious blend that captures the essence of green apples. The straining process ensures that your syrup is smooth and free of any solids, making it easy to drizzle over your favorite dishes.
With the first part of this recipe detailed, you are now equipped with the knowledge to create a vibrant, tangy syrup that can enhance a variety of culinary applications. The following sections will cover the final steps, storage options, and serving suggestions to help you make the most of your homemade green apple syrup.
Creating a delicious green apple syrup is not just about following a recipe; it involves understanding the cooking techniques that enhance flavor and texture. Each step in the process contributes to the final product, and knowing how to control temperature and simmer effectively can elevate your syrup to new heights.
Cooking Techniques Used in Green Apple Syrup
Temperature Control
Temperature control is crucial when making green apple syrup. The process of cooking the apples and sugar mixture requires careful monitoring to ensure that the syrup develops the right consistency without caramelizing too much. Cooking over low to medium heat allows the sugars to dissolve gradually, ensuring a balanced flavor profile. If the heat is too high, you risk burning the sugar, leading to an undesirable bitter taste.
Simmering for Flavor Development
Simmering is a technique that involves cooking just below boiling point, allowing ingredients to meld together without losing moisture. When making green apple syrup, simmering helps to extract the natural flavors from the apples while the sugar dissolves and forms a syrupy base. This slow cooking method intensifies the fruit’s sweetness while balancing it with acidity, creating a complex flavor that elevates any dish it accompanies.
As the syrup simmers, you may notice the apples breaking down and infusing their essence into the liquid. This process is critical for achieving a rich, flavorful syrup. The longer you allow it to simmer (within reason), the more concentrated the flavor will become, resulting in a robust syrup that captures the essence of fresh green apples.
The Science Behind Syrup Thickening
Understanding the science of syrup thickening is fundamental. Syrups thicken primarily due to the reduction of water content through evaporation. As you simmer the apple mixture, the heat causes water to evaporate, concentrating the sugars and flavors. The more you reduce the mixture, the thicker it becomes.
Another factor influencing syrup thickness is the natural pectin present in apples. Pectin is a gelling agent that contributes to the syrup’s viscosity. Green apples, in particular, are high in pectin, which aids in achieving the desired consistency without the need for additional thickeners. This natural thickening process is advantageous, as it maintains the health benefits of the fruit while providing a syrup that’s both delicious and rich in flavor.
Usage and Serving Suggestions
Once you’ve created your green apple syrup, the possibilities for using it are vast. Here are some creative ideas to incorporate this delightful syrup into your meals:
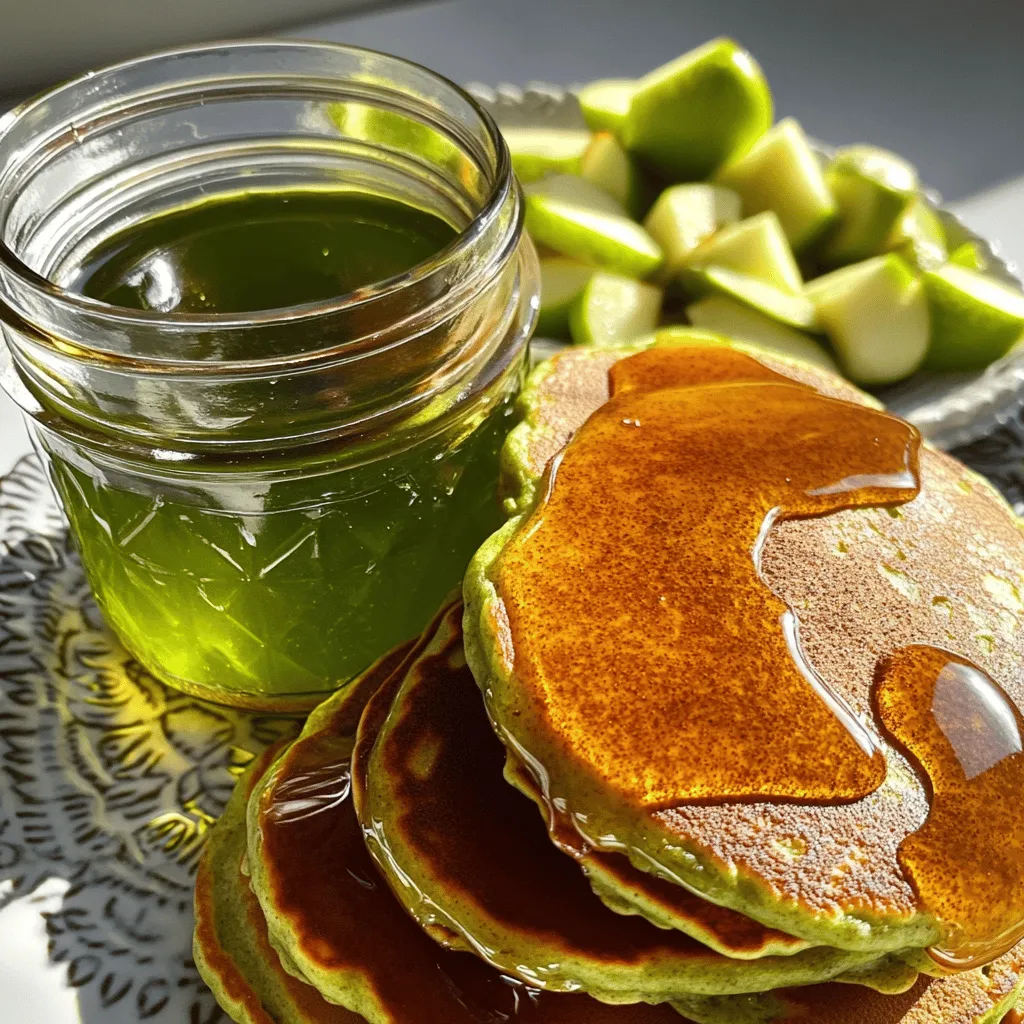
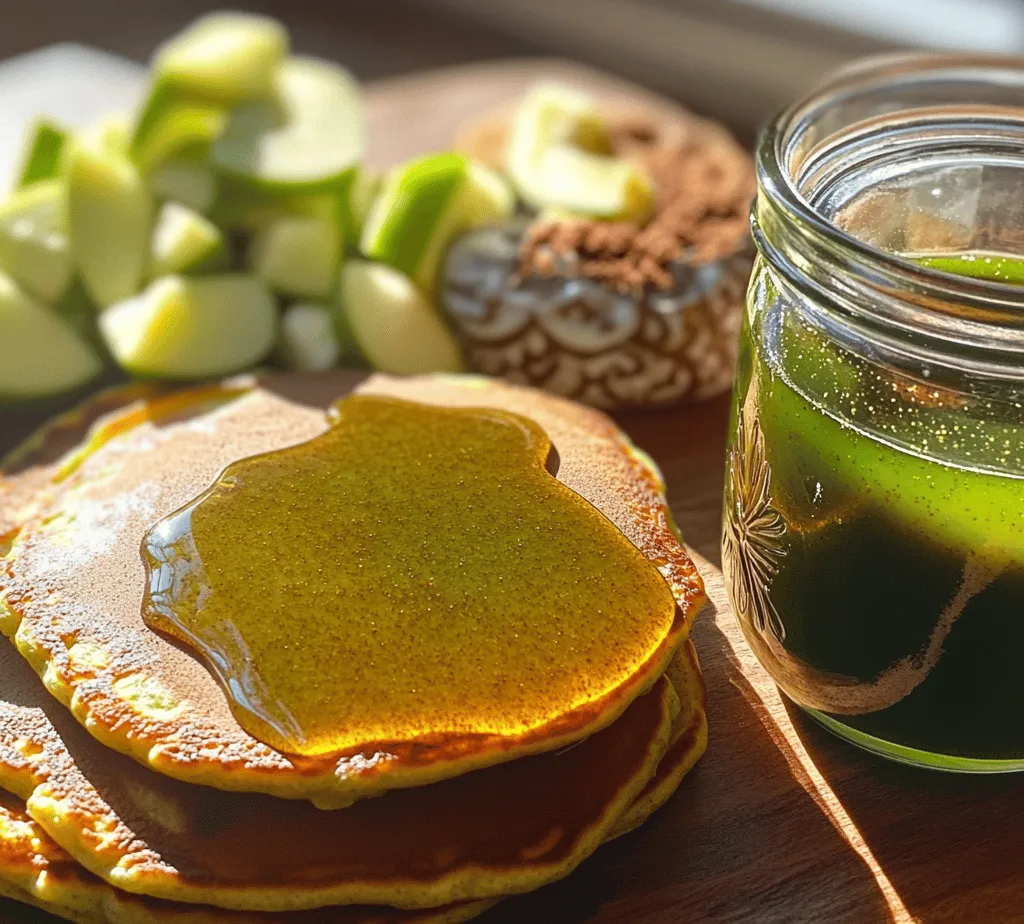
1. Breakfast Delights: Drizzle green apple syrup over pancakes or waffles for a refreshing twist on your morning routine. The tartness of the syrup pairs beautifully with the fluffy goodness of these breakfast staples.
2. Beverage Sweetener: Use green apple syrup as a sweetener in cocktails, iced teas, or lemonades. Its unique flavor profile can elevate any drink, making it a perfect addition to your bar cart or summer gatherings.
3. Salad Dressing: Incorporate the syrup into vinaigrettes for salads. Mixing it with olive oil, vinegar, and a dash of mustard can create a delightful dressing that enhances the freshness of your greens.
4. Dessert Pairings: Green apple syrup can be a fantastic topping for desserts. Pour it over vanilla ice cream or yogurt for a sweet and tangy finish. The syrup can also complement baked goods like cakes or tarts, adding a layer of flavor that enhances the overall experience.
5. Presentation Ideas: Serve your syrup in decorative glass jars or small bottles for a charming presentation. Pair it with a cheese platter featuring sharp cheeses that contrast the sweetness of the syrup. This makes for an inviting appetizer at gatherings.
Storage and Shelf Life
To preserve your homemade green apple syrup, it’s essential to follow best practices for storage. Here’s how to ensure its longevity:
– Use Airtight Containers: Storing syrup in airtight containers is crucial to prevent air exposure, which can lead to spoilage. Glass jars or bottles with tight-fitting lids are ideal for maintaining freshness.
– Ideal Storage Conditions: Keep your green apple syrup in a cool, dark place, such as a pantry or cupboard, away from direct sunlight. Excess light and heat can degrade the quality of the syrup, affecting both flavor and texture.
– Shelf Life Expectations: When properly stored, homemade green apple syrup can last for up to six months. However, always check for signs of spoilage before using. Look for changes in color, texture, or smell, which may indicate the syrup has gone bad.
Health Benefits of Green Apples
In addition to being delicious, green apples offer a range of nutritional benefits. Here’s a brief overview:
– Nutritional Overview: Green apples are low in calories but high in dietary fiber, Vitamin C, and various antioxidants. They provide essential nutrients that contribute to overall health while being a guilt-free addition to your diet.
– Potential Health Benefits: Using fresh fruit in recipes like green apple syrup can provide numerous health benefits. The antioxidants in apples help combat oxidative stress, while the fiber aids digestion and promotes a healthy gut.
– Balance of Sugar and Natural Fruit Benefits: While syrup can be high in sugar, using green apples minimizes the impact of added sugar by incorporating the natural sweetness and health benefits of the fruit. This balance makes green apple syrup a healthier alternative to many store-bought options laden with preservatives and artificial ingredients.
Conclusion
In summary, homemade green apple syrup is not only simple to make but also incredibly versatile. From drizzling it over breakfast items to using it as a sweetener in beverages and salads, the possibilities are endless. By understanding the cooking techniques involved, the importance of temperature control, and the science behind syrup thickening, you can create a syrup that captures the delightful essence of green apples.
Moreover, the health benefits of using fresh fruit in recipes make this syrup a guilt-free indulgence that can elevate your culinary creations. We encourage you to explore the world of homemade syrups and enjoy the satisfaction of creating unique flavors in your kitchen.
So, gather your ingredients, embrace the process, and revel in the joy of making your own green apple syrup. It’s a small step towards healthier eating and a fantastic way to impress family and friends with your culinary skills.