
Do you crave a sweet, creamy dessert that’s easy to make? Homemade vanilla pudding is a classic treat you can whip up with just a few ingredients. I’ll guide you through each step, ensuring you achieve the perfect, lump-free texture every time. Whether you want a simple snack or a fancy dessert topped with whipped cream and berries, this foolproof recipe is for you. Let’s get started on your delicious journey!
Ingredients
List of Ingredients
– 2 cups whole milk
– 1/2 cup granulated sugar
– 1/4 cup cornstarch
– 1/4 teaspoon salt
– 2 large egg yolks
– 2 tablespoons unsalted butter
– 1 tablespoon pure vanilla extract
– Whipped cream, for serving
– Fresh berries, for garnish
Gathering your ingredients is the first step to making this homemade vanilla pudding. The simple list above helps you create a rich and creamy dessert. Whole milk gives the pudding its smooth texture. Granulated sugar adds sweetness, while cornstarch thickens the mix. Salt enhances all the flavors. The egg yolks add richness and creaminess. Butter and vanilla extract bring a deep, lovely flavor to the dish. Don’t forget the whipped cream and fresh berries to top it off!
Ingredient Substitutions
– Dairy-free alternatives: You can use almond milk or coconut milk instead of whole milk.
– Sweetener options: If you want a healthier choice, try honey or maple syrup.
– Gluten-free cornstarch substitutes: Arrowroot powder works well if you need a gluten-free option.
These substitutions help you adjust the recipe to fit different diets or tastes. You can still enjoy a creamy vanilla pudding no matter your preferences!
Step-by-Step Instructions
Preparation Steps
To make homemade vanilla pudding, start by gathering your ingredients. In a medium saucepan, whisk together the following:
– 2 cups whole milk
– 1/2 cup granulated sugar
– 1/4 cup cornstarch
– 1/4 teaspoon salt
Whisk until there are no lumps. This step is key for a smooth pudding. Next, heat this mixture over medium heat. Stir it often with a wooden spoon or spatula. Keep cooking until it thickens and bubbles, which takes about 5 to 7 minutes. You want to see a nice, creamy texture.
Integrating Egg Yolks
Now, let’s talk about the egg yolks. In a small bowl, whisk 2 large egg yolks until smooth. This step is very important! To avoid scrambling the yolks, you must temper them. Take about half a cup of the hot milk mixture. Slowly drizzle it into the egg yolks, whisking all the while. This helps warm the yolks gently.
After that, return the egg mixture to the saucepan with the rest of the milk mixture. Stir constantly for another 2 to 3 minutes. You will notice the pudding thickening even more.
Finalizing the Pudding
Once thick and creamy, remove the saucepan from the heat. Stir in 2 tablespoons of unsalted butter and 1 tablespoon of pure vanilla extract. Mix until everything melts and blends well.
Now, pour the pudding into individual serving bowls or a larger dish. To prevent a skin from forming, cover it with plastic wrap. Make sure the wrap touches the surface of the pudding. Refrigerate for at least 2 hours before serving.
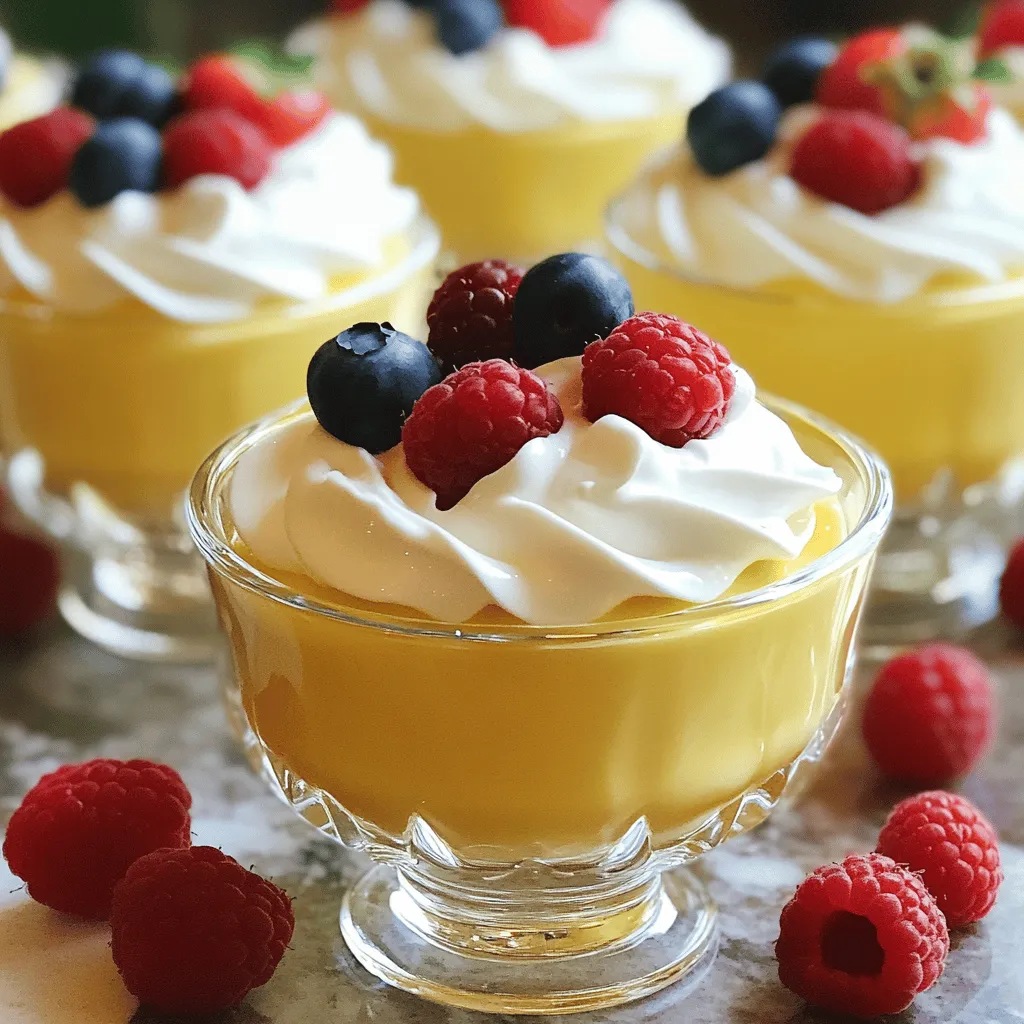
When it’s time to enjoy, top with whipped cream and fresh berries for a delightful touch.
Tips & Tricks
Achieving the Perfect Consistency
To make smooth pudding, avoid lumps. When you mix the dry and wet ingredients, whisk them well. This helps blend the cornstarch and sugar without clumping. If your pudding turns out too runny, you can add more cornstarch. Mix a little cornstarch with cold milk first, then stir it in while cooking. This will thicken the pudding nicely.
Enhancing Flavor
Using high-quality vanilla extract makes a big difference. The better the vanilla, the richer the taste. You can also try adding other flavors. A pinch of cinnamon or a splash of almond extract can give your pudding a fun twist. Feel free to get creative and find your favorite flavor combination!
Preventing Skin Formation
No one likes a skin on their pudding! To stop this, use plastic wrap. Place the wrap directly on the surface of the pudding. This will keep air from getting to it. After cooking, let the pudding cool at room temperature for a bit before putting it in the fridge. This helps it chill evenly and reduces skin formation.
Variations
Vegan Vanilla Pudding
To make vegan vanilla pudding, you can easily swap out a few ingredients. Here’s what you need:
– 2 cups almond milk (or any plant-based milk)
– 1/2 cup maple syrup (instead of granulated sugar)
– 1/4 cup cornstarch
– 1/4 teaspoon salt
– 2 tablespoons coconut oil (instead of butter)
– 1 tablespoon pure vanilla extract
Mix your plant-based milk with cornstarch and salt in a saucepan. Stir until smooth, then heat it up until it thickens. Use maple syrup to sweeten and add coconut oil for a rich texture. This way, you get a creamy treat without animal products.
Gluten-Free Vanilla Pudding
Making gluten-free vanilla pudding is simple. Just ensure you use cornstarch, as it is naturally gluten-free.
– Double-check all labels on your ingredients.
– Avoid any additives that may contain gluten.
– Ensure your cooking utensils and surfaces are clean to prevent cross-contamination.
Stick to the original recipe, and your pudding will be a safe and tasty option for everyone.
Flavor Enhancements
To spice up your vanilla pudding, try these fun variations:
– Chocolate Vanilla Pudding: Add 1/4 cup of unsweetened cocoa powder to the milk mixture before heating. This gives you a rich chocolate flavor that pairs well with vanilla.
– Matcha Vanilla Pudding: Mix in 1-2 teaspoons of matcha powder with the sugar before combining with the milk. This not only adds a beautiful green color but also a unique earthy taste.
These enhancements let you customize your pudding. Feel free to experiment and find your favorite.
Storage Info
Best Ways to Store Vanilla Pudding
To keep your homemade vanilla pudding fresh, refrigeration works best. First, let it cool down a bit. Pour the pudding into a clean container. Cover it tightly with a lid or plastic wrap. Make sure the wrap touches the pudding surface. This will stop a skin from forming. Store it in the fridge. It will stay tasty for days.
If you need to store it for longer, freezing is an option. However, the texture may change. Use an airtight container or freezer bag. Leave some space at the top for expansion. To thaw, move it to the fridge overnight. Stir well before serving to restore some creaminess.
Shelf Life
Homemade vanilla pudding lasts about 4 to 5 days in the fridge. Always check for freshness before eating. Signs of spoilage include any off smell, discoloration, or mold. If you notice any of these, it’s best to toss it. Enjoy your pudding while it’s fresh for the best taste and texture!
FAQs
How do I thicken my pudding if it’s too runny?
If your pudding is runny, it may need more cornstarch. Mix 1 tablespoon of cornstarch with 1 tablespoon of cold water. Heat your pudding again until hot. Stir in the cornstarch mix slowly. Keep stirring until it thickens. This method helps achieve a smooth, creamy texture.
Can I make homemade vanilla pudding ahead of time?
Yes, you can make homemade vanilla pudding ahead of time. It keeps well in the fridge for about three days. Just cover it with plastic wrap. Make sure the wrap touches the surface of the pudding to prevent a skin from forming. This way, you can enjoy it fresh whenever you like.
What can I use instead of egg yolks in this recipe?
You can use silken tofu or a banana as an egg yolk substitute. Blend 1/4 cup of silken tofu until smooth. For banana, use one small ripe banana and mash it well. These options keep your pudding creamy and rich without using eggs.
How do I serve vanilla pudding creatively?
You can serve vanilla pudding in many fun ways. Use small cups or jars for a cute look. Layer it with crushed cookies or fresh fruits. Top it with whipped cream and sprinkle nuts for crunch. You can even drizzle chocolate sauce for a tasty twist.This will guide you through each step with ease. Explore more recipes and tips to enhance your culinary skills!
This blog post covered all you need to make delicious vanilla pudding. We looked at the key ingredients, possible substitutions, and easy step-by-step instructions. Tips helped ensure the pudding is smooth and tasty. You also learned about fun variations and proper storage methods.
With this knowledge, you’re ready to create your own perfect dessert. Whether you’re sticking to the classic recipe or trying new flavors, enjoy every spoonful!


