Introduction
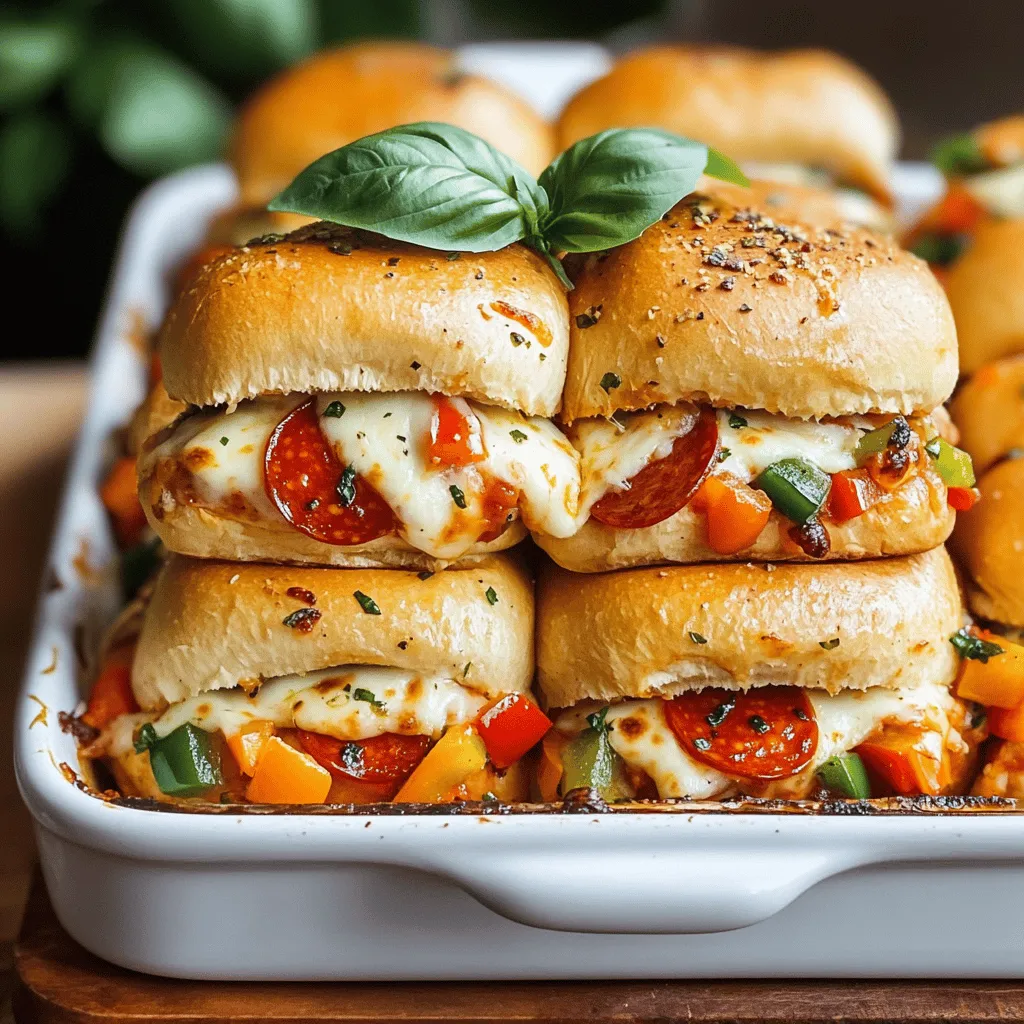
If you’re on the lookout for a fun, delicious dish that is perfect for parties, game days, or family gatherings, look no further than Mini Melty Pizza Sliders. These delightful little sandwiches pack all the bold flavors of traditional pizza into a bite-sized format that is as easy to eat as it is to prepare. Whether you’re cooking for a crowd or just need an easy weeknight meal, these sliders are sure to please even the pickiest eaters.
The appeal of sliders lies in their versatility and convenience. They can be customized to fit any taste preference, making them an excellent option for gatherings where guests might have varying dietary needs. Plus, they’re a hit with both kids and adults alike. Who can resist a cheesy, savory mini pizza layered between two soft buns? You can serve them as an appetizer, a snack, or as part of a main course spread, and they are sure to be devoured quickly.
Understanding the Charm of Mini Melty Pizza Sliders
The concept of sliders has deep roots in American cuisine, gaining popularity in the mid-20th century as a quick and easy food option. Originally, sliders referred to small hamburgers, but over time, the term has evolved to include a wide variety of mini sandwiches, including the beloved pizza slider. The charm of sliders lies not only in their size but also in their adaptability; they can be filled with virtually anything, from savory meats to fresh vegetables.
In recent years, the trend of miniaturized foods has surged in popularity, as dining experiences have shifted toward sharing plates and casual gatherings. These bite-sized delights allow for a more relaxed dining atmosphere, encouraging guests to mingle and sample a variety of flavors. Mini Melty Pizza Sliders fit perfectly into this trend, offering a nostalgic taste of pizza while being easy to share and enjoy.
Ingredients for Mini Melty Pizza Sliders
Creating the perfect Mini Melty Pizza Sliders starts with the right ingredients. Here’s a comprehensive list to get you started, along with the role each item plays in crafting these delicious sliders.
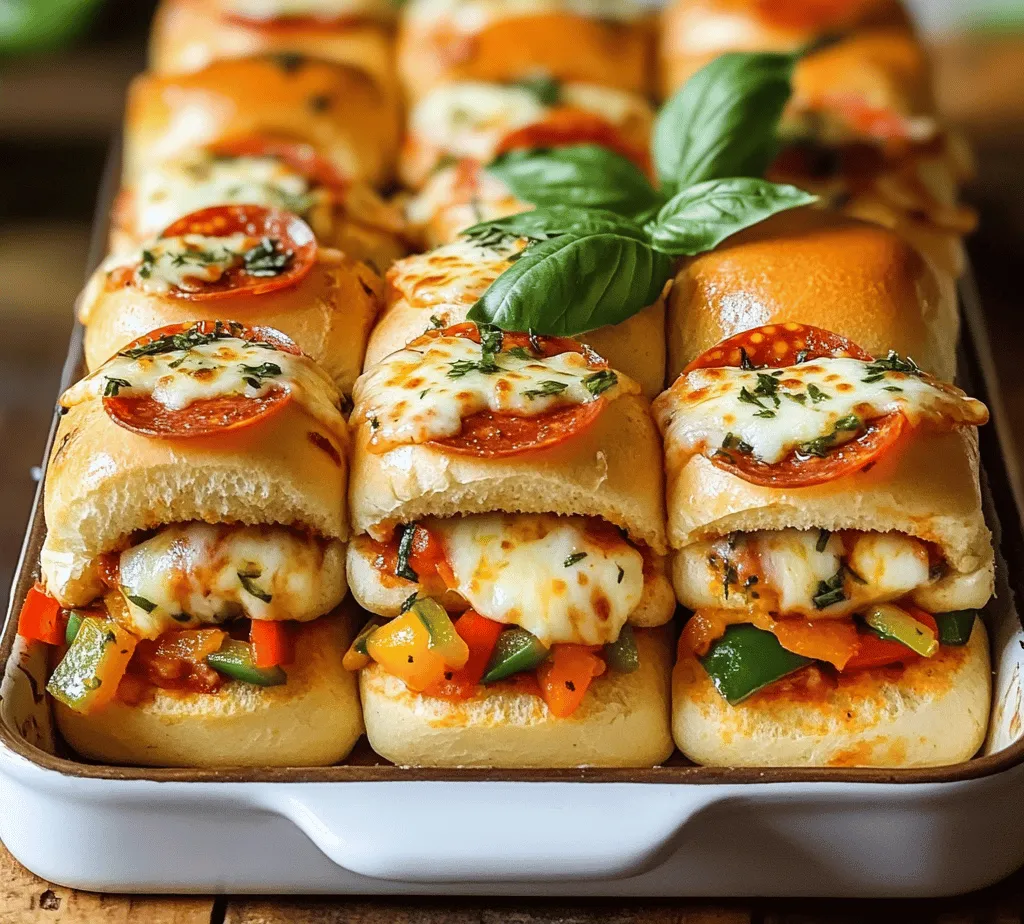
– Slider Buns: The foundation of any good slider. Opt for soft, fluffy buns that won’t overpower the fillings. Consider using Hawaiian rolls for a touch of sweetness or traditional white slider buns for a neutral flavor. The right texture is key to ensuring that the sliders hold together while providing a satisfying bite.
– Marinara Sauce: This rich, tangy sauce is essential for bringing the pizza flavor to life. When choosing marinara sauce, look for options that are made with high-quality tomatoes and minimal preservatives. A good marinara sauce adds depth and moisture to the sliders, ensuring they aren’t dry.
– Mozzarella Cheese: No pizza is complete without cheese, and for sliders, fresh mozzarella is the way to go. It melts beautifully, creating that gooey, melty texture everyone craves. You can also experiment with different types of cheese, such as provolone or a blend of Italian cheeses, to enhance the flavor profile.
– Pepperoni: This classic pizza topping is a must-have for true pizza lovers. You can use traditional pepperoni or opt for alternatives like turkey pepperoni or even vegetarian substitutes for a healthier spin. The choice of pepperoni will impact both the flavor and nutritional content of your sliders.
– Bell Peppers: Adding bell peppers not only provides a pop of color but also contributes a crunchy texture and nutritional value. You can use any color you prefer—red, green, yellow, or orange—as they all bring their unique flavors to the dish. Diced or sliced, the peppers will enhance the overall taste and presentation of your sliders.
– Italian Seasoning: A blend of herbs such as oregano, basil, and thyme will elevate the flavor of your sliders. Italian seasoning adds an aromatic touch that complements the marinara sauce and brings all the ingredients together harmoniously.
– Butter and Garlic: For the finishing touch, a simple mixture of melted butter and minced garlic will create a delectable topping for your sliders. This not only adds flavor but also helps to achieve a golden, crispy top crust when baked.
By focusing on quality and freshness for each ingredient, you’ll ensure that your Mini Melty Pizza Sliders are bursting with flavor and have the perfect texture.
Step-by-Step Instructions for Preparing Mini Melty Pizza Sliders
Now that we’ve gathered our ingredients, let’s dive into the step-by-step instructions for preparing these mouthwatering Mini Melty Pizza Sliders. The process is straightforward and quick, making it perfect for both novice cooks and seasoned chefs alike.
Step 1: Preheat the Oven
Begin by preheating your oven to 350°F (175°C). Preheating is crucial as it ensures that your sliders cook evenly and achieve that perfect melty cheese texture.
Step 2: Prepare the Slider Buns
While the oven is warming up, take your slider buns and slice them in half horizontally. Keep the tops and bottoms together to make layering the fillings easier. You can use a serrated knife for a clean cut.
Step 3: Assemble the Bottom Layer
Place the bottom halves of the slider buns on a baking sheet lined with parchment paper. This will make cleanup easier later on. Start by spreading a generous layer of marinara sauce over each bun. Be sure to cover the entire surface to ensure that every bite is full of flavor.
Step 4: Layer the Cheese
Next, sprinkle a generous amount of shredded mozzarella cheese over the sauce. Make sure to distribute it evenly across all the buns. The cheese is what will create that delightful melty texture, so don’t be shy with it!
Step 5: Add the Pepperoni and Bell Peppers
Now it’s time to layer on the pepperoni. Arrange the slices evenly over the cheese, and then add the diced bell peppers for an added crunch. If you’re using more than one color of bell pepper, you can create a beautiful, colorful display that will make the sliders even more appealing.
Step 6: Season Liberally
Sprinkle a dash of Italian seasoning over the top of the pepperoni and bell peppers. This will enhance the overall flavor of the sliders and provide that classic pizza taste.
Step 7: Finish with More Cheese
Add another layer of mozzarella cheese on top of the toppings. This final layer will create a gooey, cheesy top that binds everything together when baked.
Step 8: Prepare the Topping
In a small bowl, melt a few tablespoons of butter and mix in minced garlic. Brush this mixture generously over the tops of the slider buns. This step is essential for achieving a flavorful, golden crust that adds both flavor and an appealing look to your sliders.
Step 9: Bake
Carefully place the baking sheet in the preheated oven and bake for about 15 to 20 minutes, or until the cheese is melted and bubbly, and the tops of the buns are golden brown. Keep an eye on them to prevent over-baking, as oven temperatures can vary.
Step 10: Serve and Enjoy
Once your Mini Melty Pizza Sliders are done baking, remove them from the oven and let them cool for a few minutes. This will make them easier to cut and serve. Use a sharp knife to slice them along the seams, and serve warm. These sliders are best enjoyed fresh out of the oven, but they can also be stored in an airtight container for leftovers.
With these simple steps, you’ll have a platter of delicious Mini Melty Pizza Sliders ready to impress your guests or satisfy your cravings. Stay tuned for the next part of this article, where we’ll explore tips for achieving the best results and answer common questions about this delectable dish.
Importance of Preheating the Oven for Optimal Cooking
Preheating the oven is a crucial step when making Mini Melty Pizza Sliders. By allowing your oven to reach the desired temperature before placing the sliders inside, you ensure even cooking and optimal melting of the cheese. An adequately preheated oven helps set the buns to a perfect golden-brown while keeping the toppings warm and delicious. It’s recommended to preheat your oven to 350°F (175°C) for these sliders, giving you the best texture and flavor. This simple yet vital step can make the difference between soggy and perfectly toasted bread.
Tips on Slicing the Buns to Maintain Structural Integrity
When preparing your Mini Melty Pizza Sliders, how you slice the buns can significantly affect the final product. To maintain the structural integrity of your sliders, it’s best to slice the entire pack of slider buns horizontally without separating each bun. This method creates a sturdy base that holds all the toppings and fillings without falling apart. Use a serrated knife for a clean cut and gentle sawing motion, ensuring each slider retains its shape. After slicing, you can easily lift the top half of the buns to layer your ingredients and keep everything intact during cooking and serving.
Suggestions for Layering Ingredients for Maximum Flavor Distribution
Layering your ingredients in Mini Melty Pizza Sliders is essential for achieving maximum flavor in every bite. Start by spreading a thin layer of pizza sauce on the bottom bun; this acts as a moisture barrier and enhances the overall taste. Next, add a generous layer of your choice of cheese, followed by your desired toppings such as pepperoni, vegetables, or cooked sausage. For an extra burst of flavor, sprinkle some Italian herbs or crushed red pepper flakes between the layers. Finally, top it off with another layer of cheese before placing the top bun back on. This method ensures that each slider is packed with flavor, creating delicious melty bites that everyone will love.
Explanation of the Baking Process
The baking process for Mini Melty Pizza Sliders involves a few crucial steps that ensure they turn out perfectly. After assembling your sliders, cover the baking dish with aluminum foil. This step is essential as it traps steam, preventing the sliders from drying out while they cook. Bake them covered for about 15 minutes, allowing the cheese to melt and the buns to warm through.
After the initial baking time, carefully uncover the sliders to allow the tops to crisp up and achieve that desired golden-brown color. Bake for an additional 5-10 minutes, keeping a close eye to avoid over-browning. The contrast between the soft, warm interior and the crispy exterior is what makes these sliders irresistible.
Importance of Letting Sliders Cool Before Slicing for Best Presentation
Once your Mini Melty Pizza Sliders are out of the oven, it’s tempting to dive right in. However, letting them cool for a few minutes before slicing is essential for achieving the best presentation. Cooling allows the cheese to set slightly, preventing it from oozing out when you make your first cut. This step not only enhances the visual appeal but also makes it easier to serve without making a mess. When you are ready to slice, use a sharp knife and cut through each slider carefully to maintain their shape.
Nutritional Information and Serving Suggestions
When it comes to enjoying Mini Melty Pizza Sliders, they are not only delicious but also fairly nutritious. Each slider typically contains around 150-200 calories, depending on the toppings and portion sizes. They provide a good source of protein from cheese and meat, with a balanced amount of carbohydrates from the buns.
To complement these sliders, consider pairing them with fresh salads, crispy vegetable sticks, or a variety of dips like marinara sauce or ranch dressing. These sides add nutritional value and help balance the meal. If you are looking for variations and substitutions, you can easily adapt the recipe to cater to different dietary preferences. For gluten-free guests, use gluten-free slider buns, and for vegetarians, consider adding extra veggies or using plant-based cheese alternatives.
Exploring Variations of Mini Melty Pizza Sliders
The beauty of Mini Melty Pizza Sliders lies in their versatility. You can get creative with various flavor combinations to suit every taste. For instance, BBQ chicken sliders can be made by using shredded rotisserie chicken mixed with BBQ sauce, topped with cheddar cheese and red onion. Alternatively, for a vegetarian option, consider a mix of roasted bell peppers, mushrooms, and spinach with mozzarella cheese.
Seasonal variations can also elevate your sliders. In the summertime, add fresh basil and cherry tomatoes for a Caprese-inspired slider, or in the fall, consider incorporating roasted butternut squash and sage. For those who prefer a make-ahead option, assemble your sliders in advance and refrigerate them until you’re ready to bake. Simply add a few extra minutes to the baking time if they go into the oven cold.
The Perfect Occasion for Mini Melty Pizza Sliders
Mini Melty Pizza Sliders are ideal for a variety of occasions. They are perfect for parties, game nights, or casual family dinners, making them a crowd-pleaser that everyone can enjoy. Their bite-sized nature allows for easy serving, and they can be made in large batches to accommodate gatherings.
More than just a dish, these sliders foster community and togetherness. Sharing food brings people together, and sliders make it easy to create a relaxed atmosphere where guests can mingle, snack, and enjoy each other’s company. Whether you’re hosting a birthday party or simply having friends over for a movie night, these sliders are sure to be a hit.
Conclusion
In conclusion, Mini Melty Pizza Sliders are a delicious and versatile recipe that satisfies a variety of palates and preferences. They are simple to make yet packed with flavor, making them a go-to choice for any occasion. Whether served at a party, enjoyed during family movie night, or prepared for a casual get-together, these sliders promise to delight your guests. With endless variations and easy preparation, Mini Melty Pizza Sliders are not just a meal—they are a celebration of good food and great company. So, gather your ingredients, fire up your oven, and enjoy the delightful experience of creating and sharing these scrumptious sliders with your loved ones.