Looking for a sweet treat that’s easy to make and oh-so-delicious? Try my No Bake Chocolate Peanut Butter Bars! With just a handful of simple ingredients, you can whip up a chocolatey, nutty dessert that requires no baking. These bars are perfect for quick snacks or a tasty dessert. Join me as I break down the simple steps to create these irresistible bars that everyone will love!
Why I Love This Recipe
- Easy to Make: This recipe requires no baking, making it a quick and simple treat to whip up any time.
- Healthy Ingredients: With peanut butter, oats, and honey or maple syrup, these bars are packed with wholesome ingredients.
- Customizable: You can easily modify the recipe by adding nuts, seeds, or different types of chocolate to suit your taste.
- Deliciously Satisfying: The combination of chocolate and peanut butter creates a rich, indulgent flavor that satisfies sweet cravings.
Ingredients
Essential Ingredients
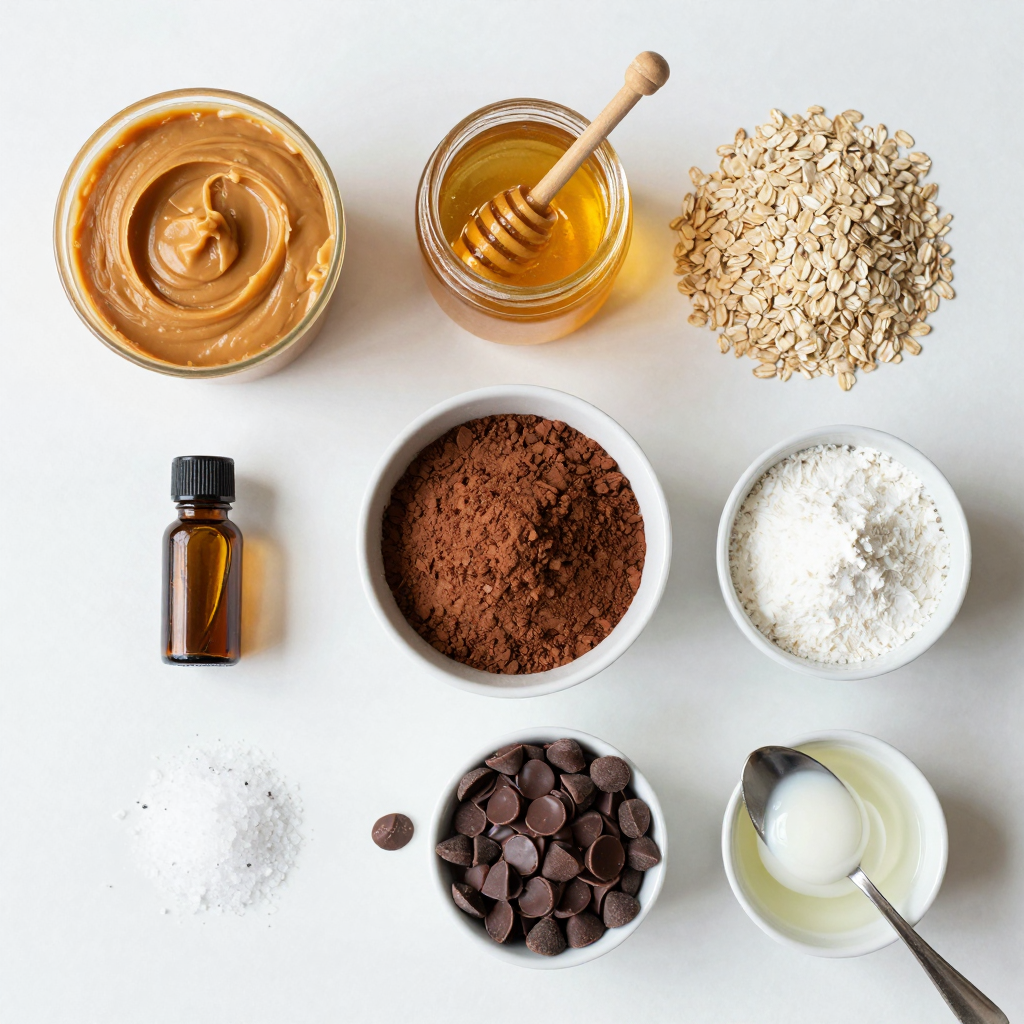
– 1 cup creamy peanut butter
– 1/2 cup honey or maple syrup
– 2 cups oats (rolled or quick oats)
These are the main ingredients you need. The creamy peanut butter gives a rich taste. Honey or maple syrup adds sweetness and helps bind everything. Oats provide texture and nutrition.
Flavor Enhancers
– 1/2 cup unsweetened cocoa powder
– 1/4 cup coconut flour
– 1 tsp vanilla extract
These ingredients boost flavor. Cocoa powder makes the bars chocolatey and rich. Coconut flour adds a hint of coconut flavor and thickens the mix. Vanilla extract gives a warm taste that balances the sweetness.
Topping Ingredients
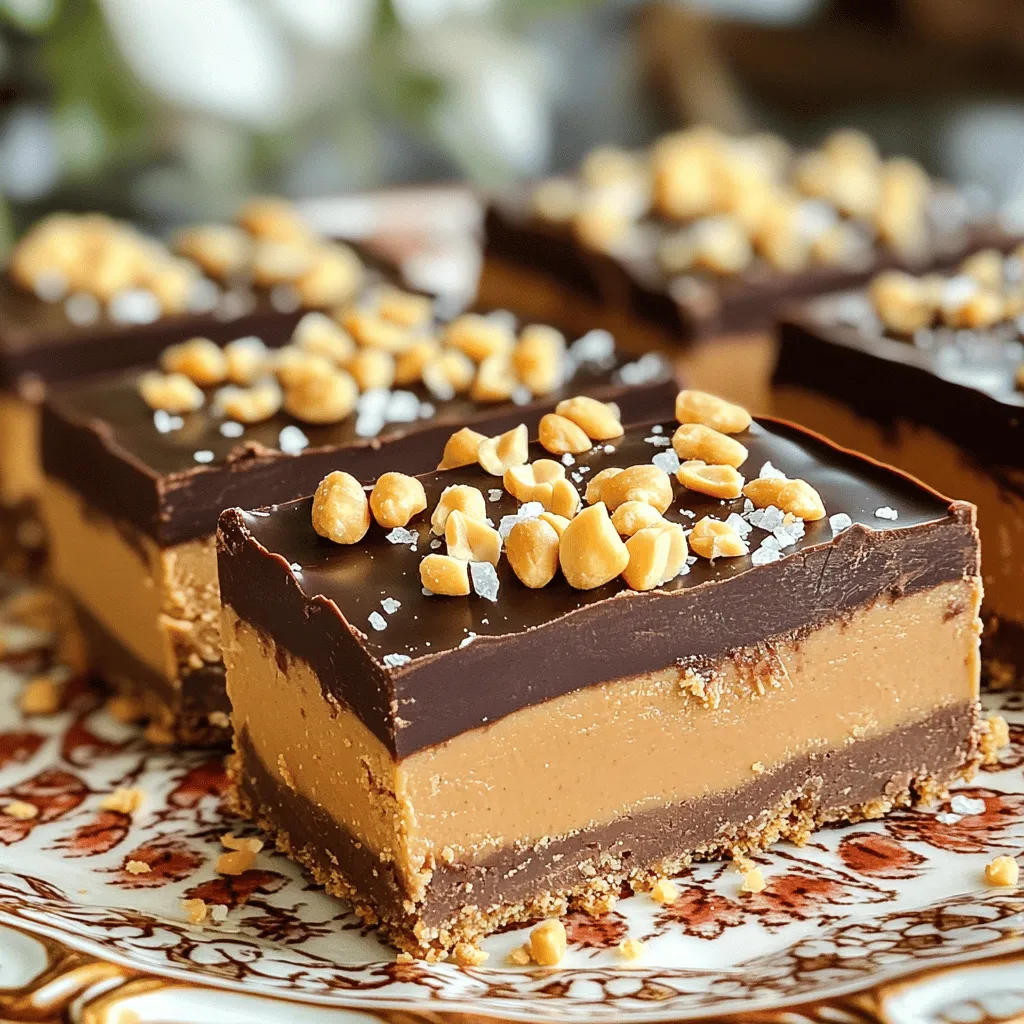
– 1/2 cup dark chocolate chips (dairy-free if preferred)
– 2 tablespoons coconut oil
– 1/4 tsp salt
The toppings make these bars special. Dark chocolate chips add a smooth layer on top. Coconut oil helps the chocolate melt nicely. A pinch of salt enhances all the sweet flavors.
Step-by-Step Instructions
Preparation Steps
1. In a large bowl, combine 1 cup of creamy peanut butter and 1/2 cup of honey or maple syrup. Mix well until smooth.
2. Now, add 2 cups of oats, 1/2 cup of unsweetened cocoa powder, 1/4 cup of coconut flour, 1 teaspoon of vanilla extract, and 1/4 teaspoon of salt. Stir until everything blends into a thick dough.
Assembling the Bars
1. Grab an 8×8 inch baking dish. Line it with parchment paper. Leave some paper hanging over the sides for easy lifting later.
2. Spread the peanut butter mixture evenly in the dish. Press it down firmly to make a solid base.
Melting and Adding Chocolate
1. In a small bowl, combine 1/2 cup of dark chocolate chips and 2 tablespoons of coconut oil. Microwave in 30-second bursts. Stir in between until smooth and melted.
2. Pour the melted chocolate over the peanut butter base. Use a spatula to spread it evenly.After two hours in the fridge, your bars will be ready for cutting and serving!
Pro Tips
- Use Natural Sweeteners: Opt for raw honey or pure maple syrup for a healthier option without refined sugars.
- Mix Consistently: Ensure all ingredients are uniformly mixed to prevent any dry spots in the bars.
- Chill Properly: Allow the bars to chill completely in the refrigerator for the best texture and easy cutting.
- Experiment with Toppings: Feel free to add toppings like chopped nuts, seeds, or shredded coconut for extra flavor and crunch.
Tips & Tricks
Achieving the Perfect Texture
To make your No Bake Chocolate Peanut Butter Bars just right, mix the ingredients well. Stir until everything is smooth and thick. If you don’t blend them enough, your bars may fall apart. Press the mixture firmly into the pan. A good press helps the bars hold their shape when cut. Use a spatula or your hands to pack it down tight.
Serving Suggestions
For a great presentation, place the bars on a nice platter. Drizzle some melted chocolate over the top for a fancy look. You can also garnish with crushed peanuts. A sprinkle of sea salt adds a nice touch too. These small details make your bars look and taste even better.
Common Mistakes to Avoid
One key mistake is not measuring ingredients accurately. This can lead to a poor texture. Always use measuring cups for the best results. Another common error is skipping the refrigeration step. This step is vital to help the bars set. If you don’t refrigerate long enough, they may not hold together.
Variations
Dietary Adaptations
You can make these bars gluten-free easily. Just choose gluten-free oats. They work great in this recipe. If you want a vegan option, swap honey with maple syrup. This change keeps the bars tasty and friendly for all diets.
Flavor Twists
Want to add a crunch? Toss in some nuts or seeds. Chopped almonds or sunflower seeds pair well with the chocolate and peanut butter. You can also try different flavored chips. Butterscotch or mint chips give a fun twist to the bars. They add new flavors and make every bite exciting.
Chocolate Alternatives
If you prefer a different taste, use white chocolate or carob chips. These options change the flavor and make the bars unique. You can also adjust the cocoa amount. Less cocoa means a milder chocolate flavor. This way, you can tailor the bars to your liking.
Storage Info
Short-Term Storage
To store your no bake chocolate peanut butter bars in the fridge, place them in an airtight container. This keeps them fresh and prevents odors from other foods. The bars stay good for about one week. For the best taste, enjoy them within the first few days.
Long-Term Storage
If you want to save some for later, you can freeze the bars. Cut them into squares and wrap each piece in plastic wrap. Then, place them in a freezer bag. They can last up to three months in the freezer. When you’re ready to eat, just take them out and let them thaw at room temperature for about 15-20 minutes. This keeps the texture nice.
Signs of Spoilage
To check if your bars have gone bad, look for any mold or strange smells. If they feel sticky or dry, it might be time to toss them. To keep the flavor and texture, store them properly and avoid leaving them out for too long. This way, you can enjoy every bite of your delicious no bake chocolate peanut butter bars.
FAQs
Can I use crunchy peanut butter instead of creamy?
Yes, you can use crunchy peanut butter. It will change the texture and taste. Crunchy peanut butter adds a nice crunch to the bars. The flavor will also be more robust. You might find it delightful. However, the bars might be less smooth than with creamy peanut butter. If you love texture, give it a try!
How long do these bars last in the fridge?
These bars last about one week in the fridge. To keep them fresh, store them in an airtight container. It’s best to eat them within this time frame for great taste. If you want them to last longer, you can freeze them. Just make sure to wrap them well to prevent freezer burn.
Can I substitute other sweeteners for honey?
Yes, you can use other sweeteners. Maple syrup works well and gives a similar taste. Agave syrup is another option. It’s sweeter, so you might need less. Keep in mind that each sweetener can change the texture slightly. Honey adds a nice stickiness that helps hold the bars together. If you switch sweeteners, check the mix to ensure it holds well.
These no-bake bars are easy to make and full of flavor. You mix creamy peanut butter, oats, and sweeteners, then top with melted chocolate. Remember to measure carefully and press firmly for the best texture. You can change the recipe too, using nuts or different chips. Store them well and enjoy their chewy delight for weeks. Follow these steps, and you’ll have a snack everyone loves!


