
If you’re craving a sweet treat but want to skip the oven, I have just the solution for you: No-Bake Peanut Butter Bars! These bars are easy to make and deliciously satisfying. With simple ingredients like peanut butter, oats, and chocolate chips, you’ll whip up a tasty snack in no time. In this post, I’ll guide you through each step to craft these delightful bars, perfect for any occasion. Let’s dive in!
Why I Love This Recipe
- Quick and Easy: This recipe takes just 15 minutes to prepare, making it perfect for a last-minute treat.
- Nutritious Ingredients: Loaded with peanut butter, oats, and optional flaxseed, these bars offer a healthy snack option.
- Customizable: You can easily swap ingredients like honey for maple syrup or add your favorite nuts or seeds for extra crunch.
- No Baking Required: Enjoy the convenience of a no-bake dessert that doesn’t heat up your kitchen!
Ingredients
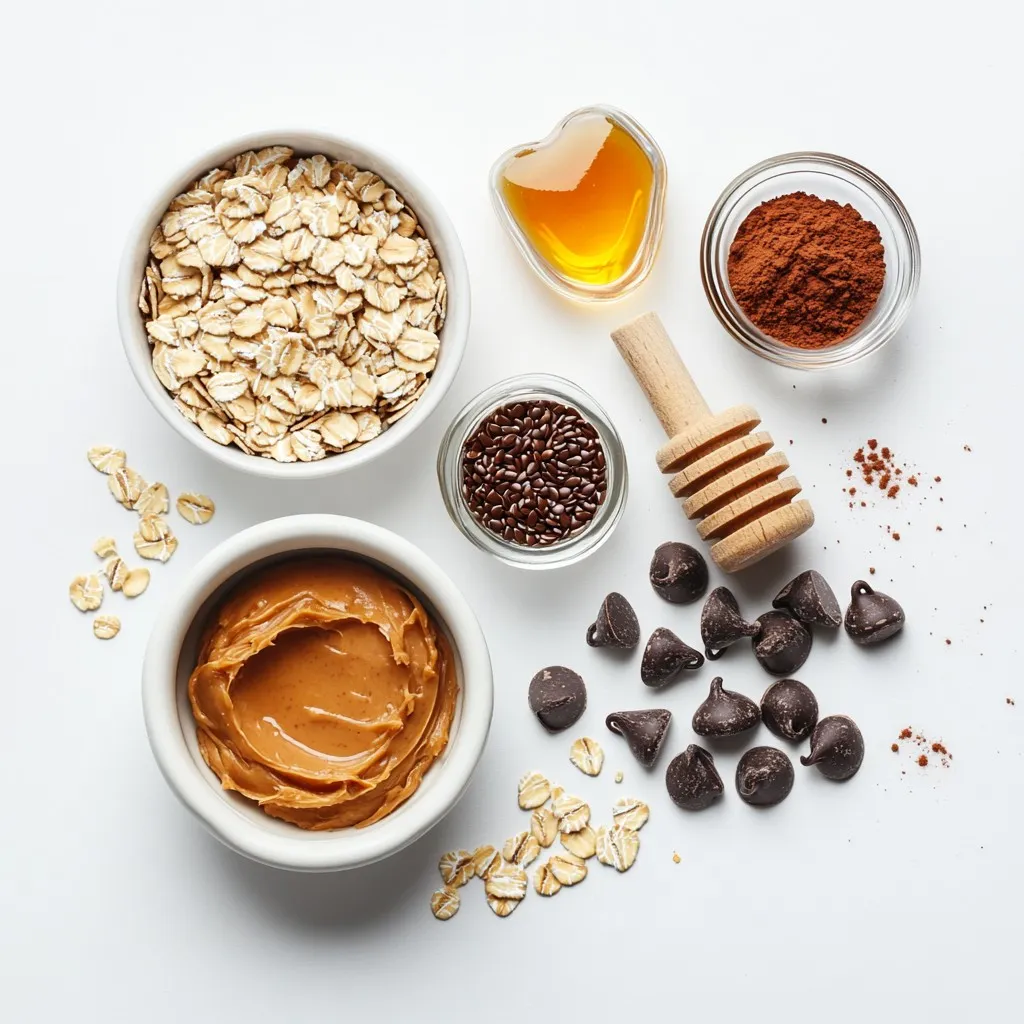
List of Ingredients
– 1 cup natural peanut butter (smooth or crunchy)
– 1/2 cup honey or maple syrup
– 1 cup rolled oats
– 1/2 cup graham cracker crumbs
– 1/2 cup chocolate chips (semi-sweet or dark)
– 1/4 cup flaxseed meal (optional)
– 1/4 teaspoon salt
– 1 teaspoon vanilla extract
To make these no-bake peanut butter bars, you need simple ingredients. Each one plays a key role in taste and texture. I love using natural peanut butter for its rich flavor. You can choose smooth or crunchy based on your taste.
Honey or maple syrup adds sweetness and binds everything together. Rolled oats give the bars a hearty feel. The graham cracker crumbs add a nice crunch and hint of sweetness.
Don’t skip the chocolate chips! They bring a touch of indulgence. If you want extra nutrition, add flaxseed meal. It’s optional but offers great health benefits. A little salt balances the sweetness, and vanilla extract makes everything taste even better.
Gather these ingredients, and you’re ready to create a delicious treat that needs no baking!
Step-by-Step Instructions
Preparation of Baking Dish
To start, you need to line your baking dish. Use an 8×8 inch dish for the best results. Take a piece of parchment paper and cut it to fit. Lay the paper in the dish, letting it hang over the sides. This helps you lift the bars out later. Make sure it covers the bottom and sides well.
Mixing the Base
Next, grab a medium mixing bowl. Add 1 cup of peanut butter to it. You can use smooth or crunchy, whichever you like. Then, pour in 1/2 cup of honey or maple syrup. Stir these two together until the mixture is smooth. This base is key for your bars.
Incorporating Dry Ingredients
Now it’s time to add the dry ingredients. To your peanut butter mix, add 1 cup of rolled oats and 1/2 cup of graham cracker crumbs. If you want extra nutrition, add 1/4 cup of flaxseed meal. Don’t forget to add 1/4 teaspoon of salt and 1 teaspoon of vanilla extract. Mix everything well until combined.
Pressing into Dish
Once your mixture is ready, pour it into the lined baking dish. Use a spatula or the back of a spoon to press it down evenly. This step is important for making sure your bars hold together. Make sure there are no gaps or air pockets.
Chilling the Bars
After pressing the mixture down, cover the dish with plastic wrap. Place it in the fridge for at least 2 hours. This chilling time helps the bars set properly. When they are firm, you can easily cut them into squares or rectangles.
Tips & Tricks
Customizing Sweetness
You can easily adjust the sweetness in these bars. If you like it sweeter, add more honey or maple syrup. If you prefer it less sweet, use less. Taste the mixture before pressing it into the dish. This way, you find the perfect balance for you.
Adding Nutritional Boosts
Adding flaxseed meal gives these bars a healthy boost. Flaxseed is rich in omega-3 fatty acids and fiber. You can also try adding chia seeds or chopped nuts for extra crunch and nutrition. These small changes can make your treat healthier without losing flavor.
Presentation Ideas
To make your bars look fancy, arrange them on a nice platter. You can dust them with cocoa powder for a touch of elegance. Drizzling melted chocolate over the top adds a fun look and extra flavor. Try cutting them into fun shapes or sizes to impress your guests!
Pro Tips
- Storage Tips: Keep your bars stored in an airtight container in the refrigerator for optimal freshness and to maintain their firmness.
- Customizing Flavors: Experiment with different nut butters, like almond or cashew, for a unique twist on flavor while keeping the same texture.
- Keep it Cool: If the bars are too soft after chilling, return them to the fridge for an additional 30 minutes to firm them up.
- Serving Suggestions: For an extra indulgent treat, serve the bars with a scoop of vanilla ice cream or a dollop of whipped cream.
Variations
Different Nut Butters
You can switch up the nut butter in this recipe. Almond butter, cashew butter, or sunflower seed butter all work well. Each nut butter adds its own unique flavor and texture. For example, almond butter gives a lighter taste, while cashew butter is creamier. Sunflower seed butter is perfect for those with nut allergies, and it still tastes great. Just make sure to keep the same measurement.
Dietary Adaptations
This recipe is easy to modify for different diets. To make it gluten-free, use gluten-free graham cracker crumbs or oats. To make it vegan, replace honey with maple syrup. This way, everyone can enjoy these bars. Always check labels to ensure all ingredients meet dietary needs.
Flavor Enhancements
You can add fun flavors to your bars. Try mixing in shredded coconut, dried fruit, or even spices like cinnamon or nutmeg. Each addition brings a new taste. Dried cranberries or raisins add sweetness. Coconut gives a tropical vibe, while spices can warm up the flavor. Be creative and make these bars your own!
Storage Info
Best Storage Methods
To keep your no-bake peanut butter bars fresh, store them in the fridge. Place the bars in an airtight container to prevent them from drying out. If you want to keep them longer, you can freeze them. Wrap each bar in plastic wrap, then place them in a freezer-safe bag. This way, they stay tasty for later.
Shelf Life
When stored properly, these bars last about one week in the fridge. If you freeze them, they can last up to three months. Just remember to label the bags with the date. This ensures you enjoy them at their best.
Serving Suggestions
These bars pair well with many snacks and drinks. Enjoy them with a glass of cold milk for a classic treat. You can also serve them with coffee for a sweet pick-me-up. For a fun twist, try them with sliced bananas or strawberries. These combinations make for a tasty snack any time!
FAQs
Can I use natural sweeteners instead of honey?
Yes, you can use natural sweeteners like maple syrup or agave nectar. These sweeteners will change the flavor slightly. Maple syrup adds a hint of caramel, while agave is milder. Both work well, so pick what you like!
How do I know when the bars are fully chilled?
The bars are ready when they feel firm to the touch. You can also check the edges; they should pull away from the pan slightly. If they seem soft or mushy, they need more chill time. Aim for at least two hours in the fridge.
Can I freeze No-Bake Peanut Butter Bars?
Yes, you can freeze these bars! Cut them into squares first. Wrap each piece tightly in plastic wrap. Place the wrapped bars in an airtight container. When ready to eat, just thaw them in the fridge for a few hours. Enjoy them cold or at room temperature!
This blog post outlined how to make tasty no-bake peanut butter bars from basic ingredients. You learned how to prepare the dish, mix in the ingredients, and chill the bars. We also shared tips for customization, variations, and storage.
These bars are not just simple but also fun to make. Enjoy experimenting with flavors and sharing them with friends. Now, you have the tools to create a delicious treat anytim


