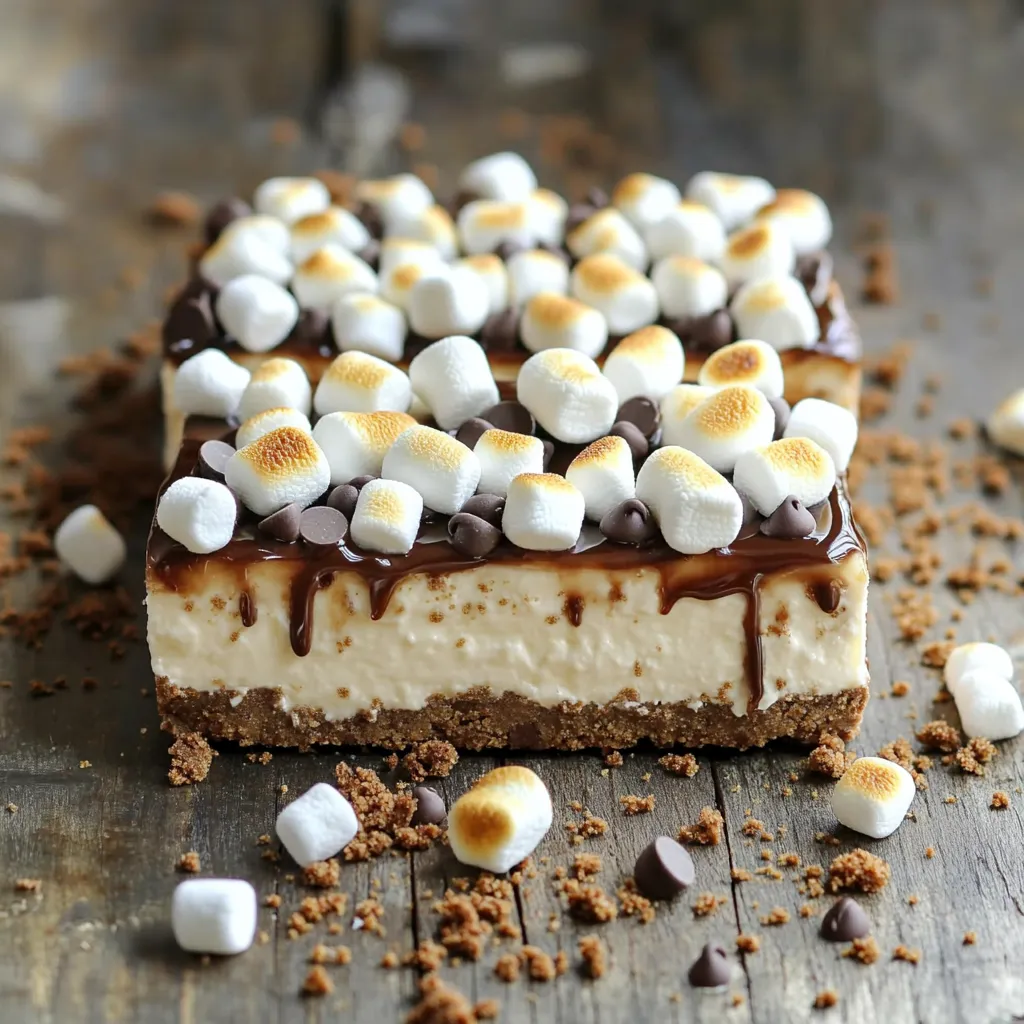
Looking for a sweet treat that hits all the right notes? My No-Bake S’mores Cheesecake Bars are just what you need! With a rich, creamy filling and a crunchy chocolate crust, these bars bring the campfire classic right to your kitchen. Best of all, they require no baking and easy-to-find ingredients. Join me as we whip up this delicious dessert that’s perfect for any occasion! Trust me, you’ll want to save this recipe!
Why I Love This Recipe
- Decadent Flavor: The combination of creamy cheesecake, rich chocolate, and fluffy marshmallows creates a perfectly indulgent treat that satisfies any sweet tooth.
- No-Bake Convenience: This recipe eliminates the need for baking, making it easy and quick to prepare without the hassle of an oven.
- Customizable Toppings: You can personalize your cheesecake bars with various toppings, such as extra chocolate chips or different types of nuts, to suit your taste.
- Perfect for Gatherings: These bars are not only delicious but also visually appealing, making them an excellent dessert choice for parties and gatherings.
Ingredients
List of Essential Ingredients
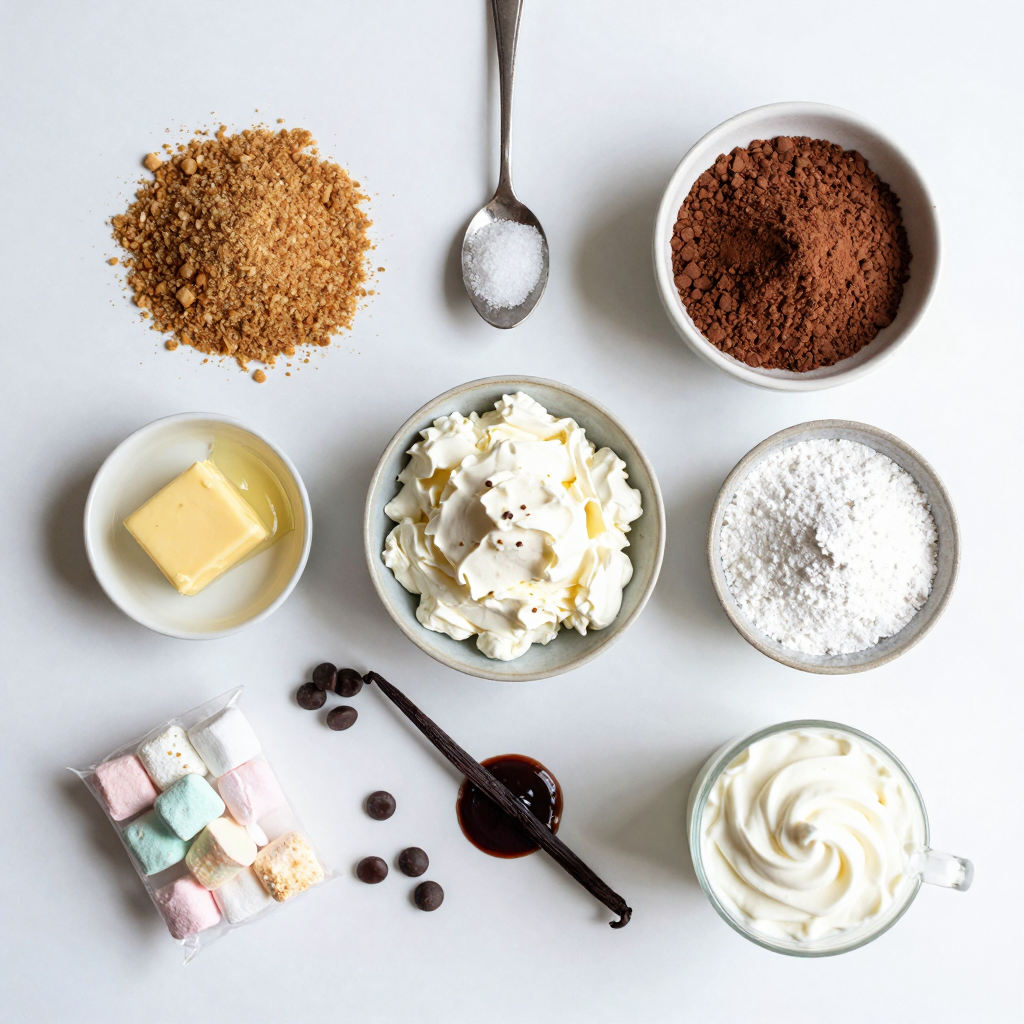
– 1 ½ cups graham cracker crumbs
– ½ cup unsweetened cocoa powder
– ½ cup unsalted butter, melted
– 2 tablespoons sugar
– 16 oz cream cheese, softened
– 1 cup powdered sugar
– 1 teaspoon vanilla extract
– 1 cup heavy whipping cream
– 1 cup mini marshmallows
– ½ cup chocolate chips
– ½ cup toasted mini marshmallows (for topping)
Recommended Tools and Equipment
– 9×9 inch square pan
– Mixing bowls
– Electric mixer or whisk
– Rubber spatula
Gathering these ingredients is key for your no-bake s’mores cheesecake bars. The graham cracker crumbs give a sweet crunch, while the cocoa powder adds rich chocolate flavor. Melting unsalted butter helps bind the crust. Cream cheese forms the base of the cheesecake, making it creamy and smooth.
Make sure your cream cheese is softened. This step helps in mixing it easily with sugar and vanilla. Heavy whipping cream is crucial for lightness. Whipping it to stiff peaks gives your bars a fluffy texture. Mini marshmallows and chocolate chips are fun additions, giving each bite a delightful surprise. Toasted mini marshmallows on top add a nice finish and a classic s’mores look.
You will also need a sturdy 9×9 inch square pan. This size is perfect for cutting bars. Mixing bowls are essential for combining ingredients. An electric mixer or whisk will help you mix the cream cheese smoothly. Finally, a rubber spatula is great for spreading the filling evenly.
With these ingredients and tools, you’re ready to create a delicious treat that will impress anyone!
Step-by-Step Instructions
Preparing the Crust
– In a large bowl, combine 1 ½ cups graham cracker crumbs, ½ cup unsweetened cocoa powder, ½ cup melted unsalted butter, and 2 tablespoons sugar.
– Mix until the crumbs look like wet sand.
– Press this mixture firmly into the bottom of a greased 9×9 inch square pan. Make sure it is even and compact.
Making the Cream Cheese Filling
– In another bowl, beat 16 oz of softened cream cheese, 1 cup powdered sugar, and 1 teaspoon vanilla extract until smooth and creamy.
– In a separate bowl, whip 1 cup of heavy whipping cream until stiff peaks form.
– Gently fold this whipped cream into the cream cheese mixture until well mixed.
Assembling the Bars
– Fold in 1 cup of mini marshmallows and ½ cup of chocolate chips into the cream cheese mixture for fun textures.
– Spread the creamy filling evenly over the prepared crust.
– Use a spatula to smooth the top.
– Sprinkle ½ cup of toasted mini marshmallows over the cheesecake layer.
Chilling the Bars
– Refrigerate the bars for at least 4 hours, or until they set firmly.
– Once set, cut into squares and serve. Enjoy the delicious taste of s’mores in every bite!
Pro Tips
- Chill for Best Results: Allow the cheesecake bars to chill overnight for a firmer texture and enhanced flavor.
- Customize Your Toppings: Feel free to add crushed nuts or different types of chocolate for a personal twist on the classic s’mores flavor.
- Use Room Temperature Ingredients: Ensure your cream cheese is at room temperature for a smoother filling that blends easily without lumps.
- Be Careful When Broiling: If toasting the marshmallows under the broiler, stay close and watch them closely to prevent burning.
Tips & Tricks
Perfecting the Texture
To get a creamy cheesecake filling, start with soft cream cheese. Let it sit at room temperature for about 30 minutes. This helps it blend well. When mixing, beat until smooth but don’t overdo it. You want it creamy, not airy.
To fold in whipped cream without losing air, use a gentle motion. Start by adding a spoonful of whipped cream into the cream cheese mix. Stir to lighten the mixture. Then, gradually add the rest of the whipped cream. Use a rubber spatula to lift and fold. This keeps the filling light and fluffy.
Serving Suggestions
For a rustic s’mores look, serve each bar on a small plate. Drizzle chocolate syrup over them. Scatter some graham cracker crumbs on top. This adds a fun touch and makes it pretty!
Pair these treats with a cold glass of milk. You can also serve them with coffee or a sweet dessert wine. They go well with ice cream, too.
Common Mistakes to Avoid
Make sure your cream cheese is at room temperature before mixing. Cold cream cheese will not blend smoothly. This can lead to lumps in your filling.
Avoid overmixing the filling once you add the whipped cream. Overmixing can make the cheesecake dense. You want it to stay light and airy for the best taste and texture.
Variations
Flavor Variations
You can switch up the flavors in these cheesecake bars. Try using peanut butter instead of chocolate. It adds a great nutty taste. You can also swap chocolate for caramel. The sweet and salty mix is delightful. For toppings, consider adding nuts or fruits. Chopped pecans or almonds give crunch. Fresh berries can add a burst of flavor. Get creative with what you like!
Healthier Substitutions
If you want a lighter version, use low-fat cream cheese. This keeps the flavor but cuts some calories. You can also use alternative sweeteners like stevia or honey. These can help reduce sugar content. For those needing gluten-free options, look for gluten-free graham crackers. Many brands offer tasty choices that work well.
Mini S’mores Cheesecake Cups
You can make individual servings by using small cups. Just follow the same steps as the bars. Press the crust into each cup. Then, fill with the cheesecake mix. Top with toasted mini marshmallows like usual. These mini cups are perfect for parties or gatherings. They make serving easy and fun!
Storage Info
Best Storage Practices
To keep your no-bake s’mores cheesecake bars fresh, store them in the refrigerator. Use an airtight container to prevent them from drying out. This method keeps the bars creamy and tasty.
– Recommended airtight containers:
– Glass containers with tight lids
– Plastic containers with secure seals
This way, your cheesecake bars stay delicious for up to a week.
Freezing Instructions
You can also freeze your s’mores cheesecake bars for longer storage. Cut the bars into squares before freezing. Wrap each square tightly in plastic wrap. Then place them in a freezer-safe container.
– Tips for freezing:
– Label the container with the date
– Consume within three months for the best flavor
When you’re ready to enjoy, thaw the bars in the fridge overnight. This helps maintain the creamy texture. If you’re in a hurry, you can let them sit at room temperature for about 30 minutes. Enjoy your treat when it’s just right!
FAQs
Can I make these bars ahead of time?
Yes, you can. I recommend making these bars a day before you serve them. This gives them enough time to set up nicely in the fridge. They get even better as they chill.
How long do leftovers last in the fridge?
Leftovers will last about 3 to 5 days in the fridge. Make sure to store them in an airtight container. This keeps them fresh and tasty. Check for any changes in texture or smell before eating.
Can I use a different type of crust?
Absolutely! You can swap the graham cracker crust for a cookie crust. Try using Oreos or digestive biscuits. Each crust adds a unique flavor, so feel free to experiment. Just remember, the taste will change with the crust you choose.
Is there a vegan option for this recipe?
Yes, you can make a vegan version! Use vegan cream cheese and coconut cream instead of heavy whipping cream. For the butter, replace it with coconut oil or vegan butter. These changes keep the taste delicious while making it dairy-free.
This blog post shared how to make delicious s’mores cheesecake bars. You learned about the key ingredients and tools needed. I walked you through each step, from making the crust to chilling the bars. Tips helped ensure a perfect texture and added fun variations. Remember to store leftovers properly and consider healthier swaps. Embrace these ideas to create mouthwatering treats that wow your friends. Enjoy your baking adventure and share your tasty results!


