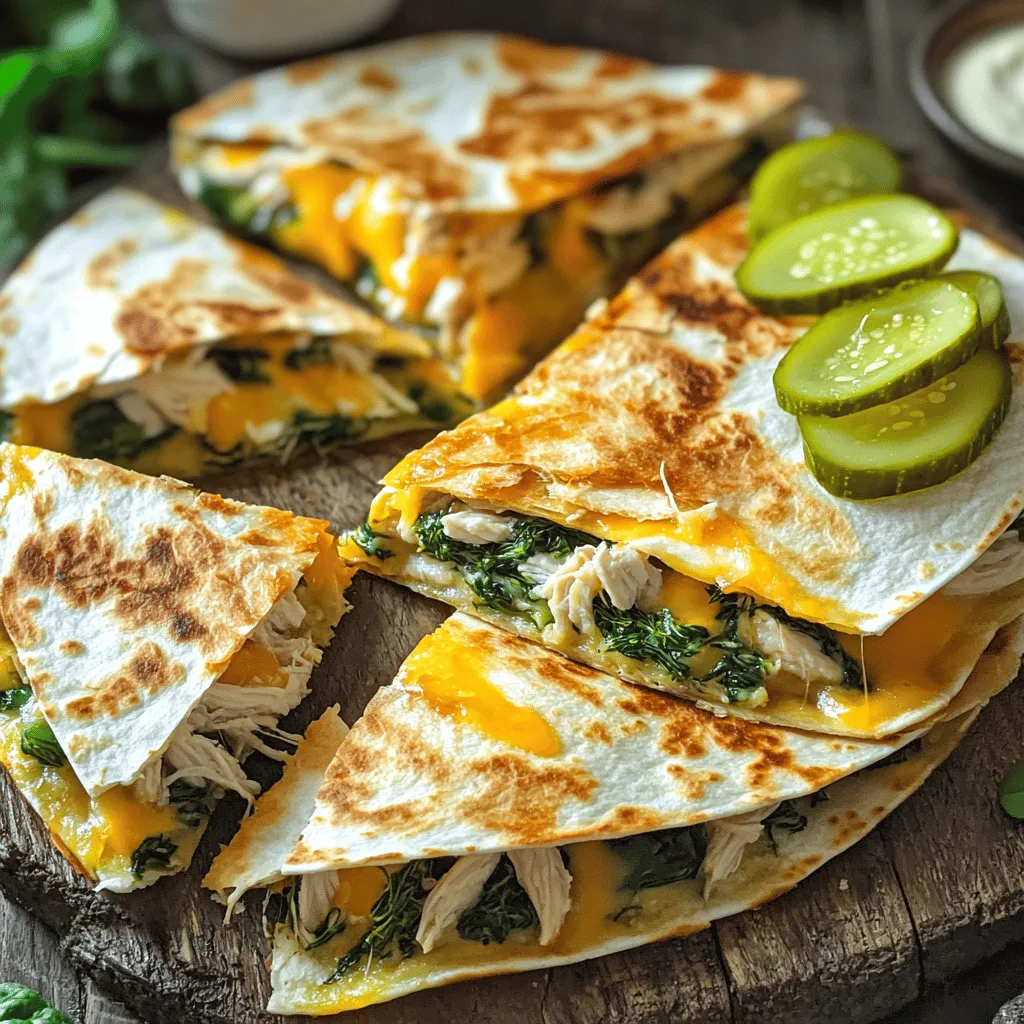
Craving a fun twist on dinner? Try my Pickle Ranch Chicken and Spinach Quesadillas! They blend tangy pickles with tender chicken and fresh spinach, creating a burst of flavor in every bite. Whether you’re cooking for family or friends, this recipe is bound to impress. I’ll guide you through the easy steps, tips, and variations. Let’s get started on making a delicious meal you’ll want to share!
Why I Love This Recipe
- Delicious Flavor Combination: The mix of shredded chicken, dill pickles, and ranch dressing creates a unique and tasty filling that is sure to impress.
- Quick and Easy to Make: This recipe comes together in just 25 minutes, making it perfect for busy weeknights or last-minute gatherings.
- Great for Meal Prep: These quesadillas can be made ahead of time and reheated, making them a convenient option for lunches or snacks.
- Customizable: Feel free to add your favorite ingredients like jalapeños or different cheeses to make this dish your own.
Ingredients
Main Ingredients for Pickle Ranch Chicken and Spinach Quesadillas
To make these tasty quesadillas, you need a few key items. Here’s what you’ll need:
– 2 cups cooked shredded chicken
– 1 cup dill pickles, chopped
– 1 cup ranch dressing
– 2 cups fresh spinach, chopped
– 2 cups shredded cheddar cheese
– 4 large flour tortillas
– 2 tablespoons olive oil
– Salt and pepper to taste
Each ingredient plays a big role. The chicken gives protein, while the pickles add a tangy crunch. Ranch dressing ties all the flavors together, making each bite creamy and rich. Fresh spinach adds a pop of color and nutrients, and cheddar cheese brings everything together with its meltiness.
Optional Add-Ins and Substitutions
You can change things up based on your taste. Here are some fun ideas:
– Swap the chicken for cooked turkey or even beans for a vegetarian option.
– Use spicy ranch dressing if you like a kick.
– Add diced onions or bell peppers for extra flavor.
– Try different cheeses like Monterey Jack or pepper jack for a twist.
Feel free to mix and match to fit your preferences!
Suggested Serving Ideas
Serving these quesadillas can be fun, too. Here are some suggestions:
– Serve them warm on a large platter.
– Garnish with extra dill pickle slices for flair.
– Drizzle ranch dressing on the side for dipping.
– Pair them with a fresh salad or chips for a complete meal.
These ideas will make your Pickle Ranch Chicken and Spinach Quesadillas look great and taste even better!

Step-by-Step Instructions
Preparation of Chicken and Pickle Mixture
Start by gathering all your ingredients. In a large mixing bowl, add the cooked shredded chicken, chopped dill pickles, ranch dressing, and chopped spinach. Mix everything well. You want the chicken and pickles to be coated in ranch. Season with salt and pepper to taste. This mixture sets the flavor for your quesadillas.
Assembling the Quesadillas
Lay out the flour tortillas on a clean surface. On one half of each tortilla, sprinkle a generous layer of shredded cheddar cheese. Next, divide the chicken and pickle mixture evenly over the cheese. Add a little more cheese on top. This helps melt everything together. Fold the tortillas in half, creating a half-moon shape.
Cooking the Quesadillas
Heat a non-stick skillet over medium heat. Add 1 tablespoon of olive oil to the skillet. Once the oil is hot, place one or two quesadillas in the skillet. Cook for about 3-4 minutes until golden brown and the cheese begins to melt. Carefully flip the quesadillas and cook for another 3-4 minutes on the other side. Repeat this with the rest of the quesadillas, adding more oil as needed. After cooking, let them cool for a minute before slicing into triangles.Enjoy your delicious quesadillas warm!
Pro Tips
- Use Leftover Chicken: This recipe is perfect for using up leftover rotisserie chicken, saving you time and enhancing flavor.
- Customize Your Fillings: Feel free to add other ingredients like onions, bell peppers, or different cheeses to suit your taste.
- Control the Heat: Adjust the cooking temperature to avoid burning the tortillas while ensuring the cheese melts perfectly.
- Serve with Sides: Pair these quesadillas with a fresh salad or veggie sticks for a balanced meal.
Tips & Tricks
How to Achieve Perfectly Crispy Quesadillas
To make your quesadillas crispy, use a non-stick skillet. Heat the pan on medium. Add olive oil, but not too much. Place the quesadilla in the pan, and don’t flip too soon. Cook until golden brown on one side, then flip it carefully. This method gives you that crunchy texture we all love.
Customization Ideas for Flavor Variations
You can easily change the taste of your quesadillas. Try adding cooked bacon or ham for a meaty twist. Want some heat? Toss in jalapeños or hot sauce. For a fresh touch, add chopped tomatoes or avocados. You can also switch the cheese. Pepper jack gives it a nice kick, while mozzarella offers a mild flavor.
Key Cooking Tools to Use
Having the right tools makes cooking easier. A non-stick skillet is a must for perfect quesadillas. Use a spatula to flip them safely. A large mixing bowl helps combine the filling easily. A sharp knife makes slicing your quesadillas quick and neat.
Variations
Vegetarian Option for Quesadillas
If you want to make a vegetarian version, swap out the chicken. Use black beans or chickpeas instead. Their texture adds a nice bite. You can blend in the same pickles and ranch dressing for that tangy flavor. Add more spinach or other veggies like bell peppers or mushrooms. This twist keeps the quesadilla delicious and full of color.
Spicy Twist with Jalapeños
For those who like heat, add jalapeños. Slice them thin and mix them in with the chicken. You can also put some on top of the cheese before folding the tortilla. This gives a nice kick and pairs well with the creamy ranch dressing. The spicy jalapeños will make your taste buds dance.
Different Cheese Choices for Flavor
Cheese is a key part of quesadillas. While cheddar is great, you can try other cheeses too. Pepper jack adds spice and creaminess. Monterey Jack melts beautifully and has a mild flavor. You can even mix cheeses for a more complex taste. Combining different cheeses makes every bite exciting and cheesy.
Storage Info
How to Store Leftover Quesadillas
To keep your leftover quesadillas fresh, let them cool first. Place them in an airtight container. This will help keep them from getting soggy. You can store them in the fridge for up to three days. If you want them to last longer, freezing is a great option.
Best Ways to Reheat Quesadillas
Reheating quesadillas can be simple. The best way is to use a skillet. Heat the skillet over medium heat. Place the quesadilla in the skillet for about three minutes on each side. This keeps them crispy and warm. You can also use the oven. Preheat it to 350°F and bake for 10 minutes.
Freezing Instructions for Meal Prep
Freezing quesadillas is easy. First, let them cool completely. Then, wrap each one in plastic wrap. After that, place them in a freezer-safe bag. This helps prevent freezer burn. You can freeze them for up to three months. When you’re ready to eat, just reheat from frozen using the skillet method. You’ll have a tasty meal ready in no time!
FAQs
Can I make Pickle Ranch Chicken and Spinach Quesadillas ahead of time?
Yes, you can prepare these quesadillas ahead. Make the filling and store it in the fridge. You can keep it for up to three days. When ready to eat, assemble the quesadillas and cook them fresh. This keeps them crispy and tasty.
What can I serve with these quesadillas?
These quesadillas shine on their own but pair well with sides. Consider serving them with:
– Fresh salsa
– Guacamole
– Sour cream
– A simple salad
– Extra dill pickles
These sides add flavor and crunch, making your meal even better.
How can I modify this recipe for dietary restrictions?
You can easily adjust this recipe. For a gluten-free version, use corn tortillas. If you’re vegan, swap chicken with chickpeas or tofu, and use vegan ranch. For dairy-free options, choose non-dairy cheese. These changes keep the dish delicious for everyone.
You learned about making delicious Pickle Ranch Chicken and Spinach Quesadillas. We covered key ingredients and handy tips to make them crisp and tasty. You can easily customize your quesadillas with add-ins and different cheeses. Plus, I shared how to store and reheat them for later.
In closing, this recipe is easy and fun to make. Enjoy trying different flavors and serving ideas. You can impress your friends and family with these tasty quesadillas. Happy cooking!