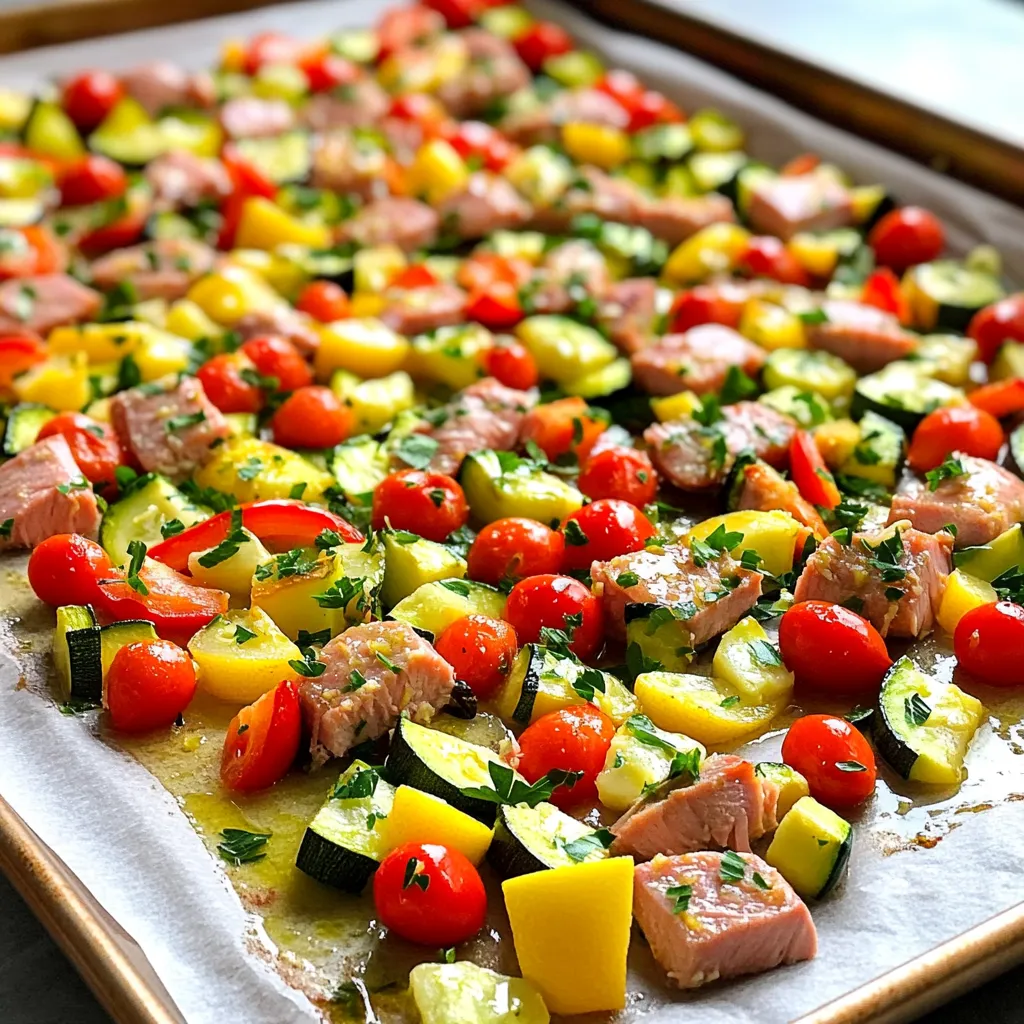
Looking for a quick, delicious dinner? You’ll love this Sheet Pan Lemon Garlic Tuna and Veggies Delight! With easy steps and fresh flavors, this meal comes together in no time. I’ll show you how to prep the tuna and veggies, mix a zesty lemon garlic dressing, and bake everything to perfection. Say goodbye to dinner stress and hello to a tasty dish that the whole family will enjoy! Let’s dive in!
Why I Love This Recipe
- Quick and Easy: This sheet pan recipe comes together in just 30 minutes, making it perfect for busy weeknights.
- Healthy and Nutritious: Packed with protein from tuna and vitamins from fresh vegetables, it’s a wholesome meal.
- One Pan Wonder: No need for multiple pots and pans; everything cooks together on one sheet, simplifying cleanup.
- Flavorful and Fresh: The combination of lemon and garlic enhances the natural flavors of the tuna and veggies beautifully.
Ingredients
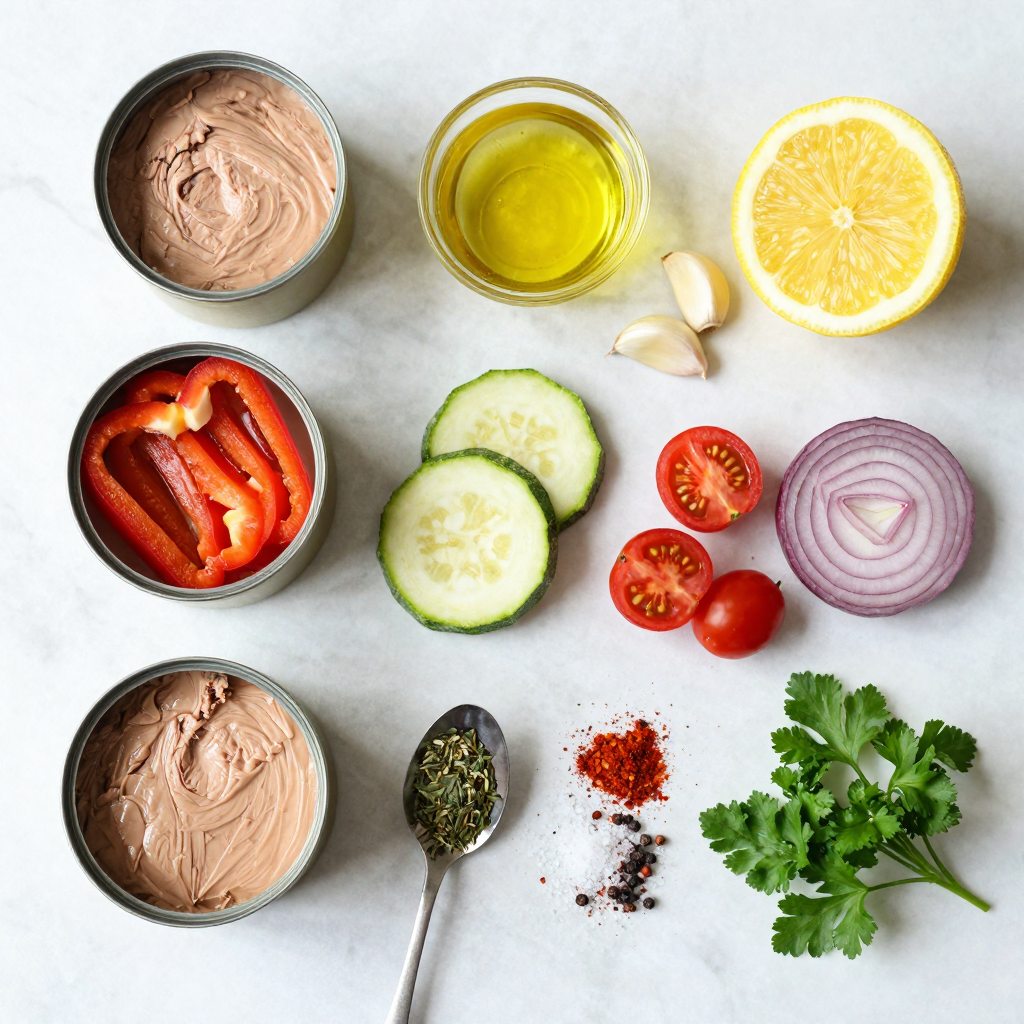
List of Main Ingredients
– Tuna and Vegetables
– 2 cans of tuna (in water), drained
– 1 red bell pepper, sliced
– 1 zucchini, sliced
– 1 cup cherry tomatoes, halved
– 1 red onion, sliced
– Aromatics and Seasoning
– 4 cloves garlic, minced
– 1 lemon (zest and juice)
– 1 teaspoon dried oregano
– 1 teaspoon smoked paprika
– Salt and pepper to taste
– Fresh parsley, chopped, for garnish
– Pantry Staples
– 3 tablespoons olive oil
Using fresh, vibrant ingredients makes this dish shine. Tuna is a great source of protein. The red bell pepper adds sweetness and color. Zucchini brings a nice crunch, while cherry tomatoes add juice and tang. The red onion gives a lovely bite, enhancing the whole dish.
For flavor, garlic is key. It adds depth and richness. Fresh lemon juice and zest brighten the dish and balance the flavors. Oregano and smoked paprika bring warmth and earthiness. Salt and pepper round out the taste perfectly.
Olive oil is a must. It helps everything cook evenly and keeps the dish moist. Using fresh parsley at the end adds a pop of color and freshness.
This combination creates a healthy, tasty meal in no time. Get ready to enjoy a colorful and delicious sheet pan dinner!
Step-by-Step Instructions
Prepping the Ingredients
Preparing the Vegetables
Start by washing your veggies well. Slice the red bell pepper and zucchini into thin pieces. Cut the cherry tomatoes in half. Slice the red onion into rings. This mix adds color and taste.
Combining the Tuna
Open the cans of tuna and drain all the water. Place the tuna in a large bowl. Add the sliced bell pepper, zucchini, cherry tomatoes, and red onion. Gently mix them together. This step blends all the flavors.
Making the Lemon Garlic Dressing
In a small bowl, whisk together minced garlic, lemon juice, and lemon zest. Add olive oil, oregano, smoked paprika, salt, and pepper. Stir this well, ensuring all the ingredients mix. This dressing brings a zesty kick to your dish.
Cooking Process
Spreading the Mixture
Once your mixture is ready, pour the lemon garlic dressing over it. Toss gently until everything is coated with the dressing. Then, spread the mixture evenly on a lined baking sheet. Make sure it is flat for even cooking.
Baking Instructions
Preheat the oven to 400°F (200°C). Once ready, place the baking sheet inside. Bake for 15 to 20 minutes. You want the veggies to be tender and the edges of the tuna to be slightly crispy. Keep an eye on it to avoid overcooking.
Achieving the Perfect Texture
To get a great texture, check the veggies after 15 minutes. They should be soft but not mushy. The tuna should have a slight crispness on the edges. This gives a nice contrast to the tender veggies.
Serving Suggestions
Garnishing Options
After baking, take out the pan and let it cool for a couple of minutes. Garnish with fresh chopped parsley. This adds a pop of color and a hint of freshness.
Pairing Ideas
Serve your lemon garlic tuna and veggies with a side of rice or quinoa. You can also pair it with a light salad. This makes a complete meal that is both healthy and tasty.
Pro Tips
- Use Fresh Ingredients: For the best flavor, use fresh vegetables and high-quality tuna. Fresh produce will enhance the overall taste of the dish.
- Customize Your Veggies: Feel free to swap in your favorite seasonal vegetables. Broccoli, asparagus, or carrots can add different flavors and textures.
- Monitor Cooking Time: Keep an eye on the oven as cooking times may vary based on your oven’s calibration. The veggies should be tender but not mushy.
- Serve with a Side: This dish pairs well with a light salad or quinoa for added nutrition and to make it a complete meal.
Tips & Tricks
How to Perfect the Flavor
To make your dish pop, you can adjust the seasoning. Try adding more salt or pepper to taste. You can also add a splash of soy sauce for a savory kick. If you want a bit more zest, add more lemon juice.
For herbs, consider using fresh basil or thyme. These herbs can bring a new twist to your dish. You can also swap out oregano for Italian seasoning. This can enhance the dish’s overall flavor and make it more unique.
Ensuring Optimal Cooking
Check your veggies for doneness by piercing them with a fork. They should be soft but not mushy. If you have thicker cuts, they may need extra time. Keep an eye on them to avoid overcooking.
When cooking the tuna, make sure to watch the time closely. Tuna cooks fast and can dry out quickly. Remove it from the oven when it’s just cooked through. This keeps it juicy and flavorful.
Cleanup and Efficiency
Prep and cleanup can be quick if you plan ahead. Use a large bowl for mixing ingredients. This reduces the number of dishes you will need to clean.
Using parchment paper on your baking sheet helps a lot. It makes cleanup a breeze. Foil can also work, but it might not be as easy to clean. Choose what works best for you to make cooking fun and stress-free.
Variations
Ingredient Substitutions
You can swap out vegetables based on what you like. Here are some ideas:
– Broccoli florets add crunch.
– Carrots bring a touch of sweetness.
– Green beans offer a nice snap.
– Asparagus gives a fresh taste.
Using fresh tuna is great, but canned works well too. Canned tuna is easy and quick. It saves time and keeps the dish simple. Fresh tuna gives a richer flavor but requires more prep. If you go fresh, sear it lightly before baking for a tender bite.
Flavor Profile Adjustments
Want some heat? Try adding red pepper flakes or diced jalapeños. This adds a spicy kick to the dish. You can also use a spicy sauce to drizzle on top before serving.
To switch to a Mediterranean style, use olives and feta cheese. Add some chopped spinach or artichokes for extra flavor. You can also use Italian herbs like basil and thyme to enhance the taste.
Dietary Adaptations
For a gluten-free option, this recipe is already safe! All the ingredients are gluten-free.
To make it low-calorie, use less olive oil. You can also skip the tuna and use chickpeas instead for a plant-based twist. This keeps the dish light and healthy while still being filling.
Storage Info
Storing Leftovers
Refrigeration Guidelines
You should store any leftovers in an airtight container. Keep the container in the fridge. The dish stays fresh for up to three days. Make sure to let it cool before sealing.
Freezing for Later
If you want to keep it longer, freezing works well. Place the leftovers in a freezer-safe container. Use plastic wrap or foil to cover it tightly. This way, it can last for up to three months. Remember to label the container with the date.
Reheating Tips
Best Methods for Reheating
The best way to reheat your dish is in the oven. Set the oven to 350°F (175°C). Bake for about 10-15 minutes until heated through. You can also use a microwave. Heat in short bursts of one minute. Stir in between for even heating.
Avoiding Soggy Vegetables
To keep your veggies crisp, avoid reheating too long. If using a microwave, cover loosely with a paper towel. This helps steam escape. For the oven, place on a baking sheet to keep the texture. Enjoy your delicious meal again without losing its charm!
FAQs
Common Questions About the Recipe
Can I use fresh tuna instead of canned?
Yes, you can use fresh tuna. Just make sure to sear it first. This gives it a nice flavor. Cut the fresh tuna into chunks. Cook it briefly to keep it tender.
How long can I store the leftovers?
You can store leftovers in the fridge for up to three days. Place them in an airtight container. When ready to eat, reheat gently to keep the veggies crisp.
What can I serve with this dish?
This dish pairs well with rice or quinoa. A simple green salad also works great. You can even serve it with crusty bread for a hearty meal.
Cooking and Preparation Queries
Can I prep the ingredients in advance?
Absolutely! You can chop the veggies and store them. Keep the tuna separate until you are ready to cook. This will save you time on busy nights.
Is there a recommended side dish for this recipe?
A light cucumber salad complements this dish well. It adds freshness and crunch. You could also serve it with a side of roasted potatoes.
How can I adjust for smaller or larger servings?
To adjust servings, simply scale the ingredients. For fewer servings, use one can of tuna and half the veggies. For more, just double everything and use a bigger pan.
This article covered important steps for making a tasty tuna dish. We explored key ingredients, how to prep, and cook everything. I shared flavor tips, storage advice, and fun variations to keep things fresh.
Remember, you can adjust the recipe to fit your taste. Enjoy the process and get creative in your kitchen! Simple meals can bring great joy. Happy cooking!