Introduction
In the ever-evolving world of snacking, the demand for healthier alternatives has surged dramatically. Consumers are increasingly seeking options that not only satisfy their cravings but also contribute positively to their health. Enter pita chips—a delightful and versatile snack that has carved its niche among health-conscious individuals. These crispy morsels are not just a tasty treat; they offer an excellent way to enjoy the crunch of chips without the guilt typically associated with traditional fried snacks.
What sets these crispy herb-infused pita chips apart is their unique combination of flavors and healthful ingredients. Infused with aromatic herbs and spices, each bite is a delightful explosion of taste that pairs perfectly with dips, spreads, or simply enjoyed on their own. This article aims to be your comprehensive guide to making crispy herb-infused pita chips at home, ensuring you can indulge in this delicious snack whenever the craving strikes.
Understanding Pita Chips
Before we delve into the recipe, it’s essential to understand what pita chips are and how they emerged as a popular snack option. Pita chips are made from pita bread, a type of flatbread that originated in the Middle East. The preparation involves cutting the pita bread into triangles or strips and baking them until they achieve a golden, crispy texture. This method contrasts sharply with traditional potato chips, which are often deep-fried and laden with unhealthy fats.
Nutritionally, pita chips boast several advantages over their potato counterparts. They are generally lower in calories and can be made from whole grain pita bread, providing additional fiber and nutrients. When you opt for homemade pita chips, you have complete control over the ingredients, allowing you to avoid preservatives and excess sodium commonly found in store-bought varieties. This makes pita chips not only a delicious choice but also a smart one for those looking to maintain a balanced diet.
Nutritional Benefits of Pita Chips
Pita chips are not just a crunchy delight; they are also packed with nutritional benefits that make them a wholesome alternative to traditional snacks. Here are some of the key advantages:
– Lower Caloric Content: Pita chips typically contain fewer calories than regular potato chips, making them a great choice for those watching their calorie intake.
– Whole Grains: When made from whole grain pita bread, they offer more fiber and essential nutrients, promoting digestive health and a feeling of fullness.
– Healthy Fats: Using olive oil in the recipe adds healthy monounsaturated fats, which are beneficial for heart health.
– Herb Benefits: The inclusion of herbs like oregano and thyme not only enhances the flavor but also provides antioxidants and anti-inflammatory properties.
Ingredients Breakdown
Now that we’ve established the appeal and benefits of pita chips, let’s take a closer look at the main ingredients used in our herb-infused recipe. Understanding the health benefits of each ingredient will help you appreciate the nutritional value of your homemade snack.
Pita Bread
Pita bread is the foundation of this recipe. Opting for whole grain pita bread is advantageous as it contains more fiber and nutrients compared to white bread. Whole grains are known to lower the risk of heart disease, improve digestion, and help maintain a healthy weight. When baked, pita bread transforms into crunchy chips that are perfect for dipping or snacking.
Olive Oil
Olive oil is a staple in Mediterranean cuisine and is celebrated for its health benefits. Rich in monounsaturated fats, it can help reduce inflammation and lower the risk of chronic diseases. Additionally, olive oil enhances the flavor of the pita chips and contributes to their crispy texture when baked. Choosing high-quality extra virgin olive oil can elevate the taste and health benefits even further.
Garlic Powder and Onion Powder
These two ingredients are essential flavor enhancers in our recipe. Garlic powder offers a robust flavor while providing several health benefits, including potential immune-boosting properties and heart health support. Onion powder adds a subtle sweetness and depth of flavor. Both ingredients are rich in antioxidants and can aid in reducing inflammation, making them a healthy addition to your pita chips.
Smoked Paprika, Oregano, and Thyme
Herbs and spices are crucial in infusing flavor into the pita chips. Smoked paprika adds a unique, smoky flavor that elevates the overall taste profile. Oregano and thyme not only contribute to the flavor but are also packed with antioxidants and have antimicrobial properties. These herbs are staples in Mediterranean diets, known for their health-promoting qualities.
Sea Salt and Black Pepper
These common seasonings play a vital role in balancing flavors. While sea salt enhances the savory notes, black pepper adds a slight kick that complements the herbs. Both ingredients should be used judiciously to avoid overpowering the delicate flavors of the chips.
Red Pepper Flakes
For those who enjoy a bit of heat, red pepper flakes are an optional ingredient that can be added to the mix. They bring a spicy element that contrasts beautifully with the other flavors. Beyond flavor, red pepper flakes contain capsaicin, which is known to boost metabolism and promote fat burning.
Preparation Steps
With a clear understanding of the ingredients and their benefits, we can now move on to the preparation steps for making crispy herb-infused pita chips. This process is simple and straightforward, making it perfect for both novice cooks and seasoned chefs alike.
Preheating the Oven
The first step in preparing your pita chips is to preheat your oven. Setting the correct temperature is crucial for achieving the perfect level of crispiness. Ideally, you should preheat your oven to 375°F (190°C). This temperature allows the chips to bake evenly while ensuring they develop a golden-brown color without burning.
Once the oven is heated, you can prepare the pita bread for cutting and seasoning. By ensuring your oven is at the right temperature, you set the stage for perfectly crispy pita chips that are sure to impress.
—
This introduction sets the stage for a detailed exploration of the crispy herb-infused pita chips recipe, covering their background, nutritional benefits, and initial preparation steps. The article will continue with further preparation steps and tips for achieving the best results in the following parts. Stay tuned for a complete guide that will empower you to create this delicious snack at home.
Cutting the Pita Bread: Techniques for Uniformity and Even Cooking
To achieve perfectly crispy pita chips, the first step is cutting the pita bread into uniform wedges. Start with good-quality pita bread, whether white or whole wheat, as it will greatly influence the final taste and texture of your chips.
1. Preparation: Place the pita bread on a cutting board. Use a sharp knife or a pizza cutter for clean cuts.
2. Cutting Technique: Stack two or three pita breads on top of each other for efficiency. This will not only save time but also ensure that all wedges are the same size, promoting even cooking. Cut each pita into six to eight triangles, depending on your desired chip size.
3. Separation: Gently separate the wedges to avoid sticking, which will allow the oil and seasonings to coat them evenly.
Making the Herb-Infused Oil: Importance of Mixing and Flavor Extraction
The next step is to create a flavorful herb-infused oil that will elevate your pita chips. This oil is what gives the chips their delicious, aromatic flavor.
1. Selecting Herbs: Fresh herbs work best, but dried herbs can also be used. Consider combinations like rosemary, thyme, and oregano for a Mediterranean touch, or try garlic and parsley for a more robust flavor.
2. Mixing: In a small bowl, combine 1/4 cup of olive oil with your chosen herbs. If using fresh herbs, roughly chop them to release their essential oils. For added depth, you can also include minced garlic or lemon zest.
3. Flavor Extraction: Allow the mixture to sit for at least 10 to 15 minutes. This resting time is essential as it helps the oil absorb the flavors from the herbs.
Coating the Pita Wedges: Tips for Even Distribution of Oil and Seasonings
Once your herb-infused oil is ready, it’s time to coat the pita wedges.
1. Tossing Technique: Place the pita wedges in a large mixing bowl. Drizzle the herb-infused oil over the wedges. Use a spatula or your hands to gently toss the wedges, ensuring that each piece is well-coated.
2. Seasoning: After coating with the oil, sprinkle salt and any additional seasonings — such as pepper or paprika — over the wedges. Toss again to ensure even distribution of the seasonings.
3. Avoiding Over-Saturation: Be careful not to overcoat the wedges, as this can lead to soggy chips. You want just enough oil to enhance flavor while keeping the chips crisp.
Arranging on the Baking Sheet: Recommended Spacing for Optimal Crispness
The arrangement of the pita wedges on the baking sheet is critical for achieving that desired crunch.
1. Baking Sheet Preparation: Line a baking sheet with parchment paper. This not only prevents sticking but also makes for easier cleanup.
2. Spacing: Lay the coated pita wedges in a single layer, ensuring they do not overlap. This spacing allows the hot air to circulate around each chip, promoting even cooking and crispness.
3. Batch Baking: If you have a large number of wedges, consider baking in batches to avoid crowding the pan.
Baking Process: Timing and Turning for Perfect Results
Now, it’s time to bake the pita chips to golden perfection.
1. Preheating: Preheat your oven to 375°F (190°C). The right temperature is essential for achieving crispness without burning.
2. Baking Time: Bake the pita chips for 10-12 minutes, or until they begin to turn golden brown.
3. Turning Chips: Halfway through the baking process, take the baking sheet out of the oven and carefully turn the wedges using tongs or a spatula. This ensures even browning.
4. Monitoring: Keep a close eye on the chips during the last few minutes of baking. They can go from perfectly crisp to burnt quickly, so don’t wander too far!
Baking Tips for Crispy Pita Chips
Achieving the ideal crispiness involves attention to detail. Here are some essential baking tips:
1. The Role of Oven Temperature: Maintaining a consistent oven temperature is crucial for crispness. If your oven tends to run hot or cold, consider using an oven thermometer to verify the accuracy.
2. Importance of Monitoring Baking Time: Always check on your chips as they bake. Begin testing for doneness after 8 minutes, particularly if your oven runs hot.
3. Signs to Look for Indicating Readiness: The chips should be golden brown and appear dry rather than greasy. A slight snap when you break one is a good sign they are done.
4. Cooling Process: After baking, let the chips cool on the baking sheet for a few minutes. This cooling period will allow them to firm up and become even crisper.
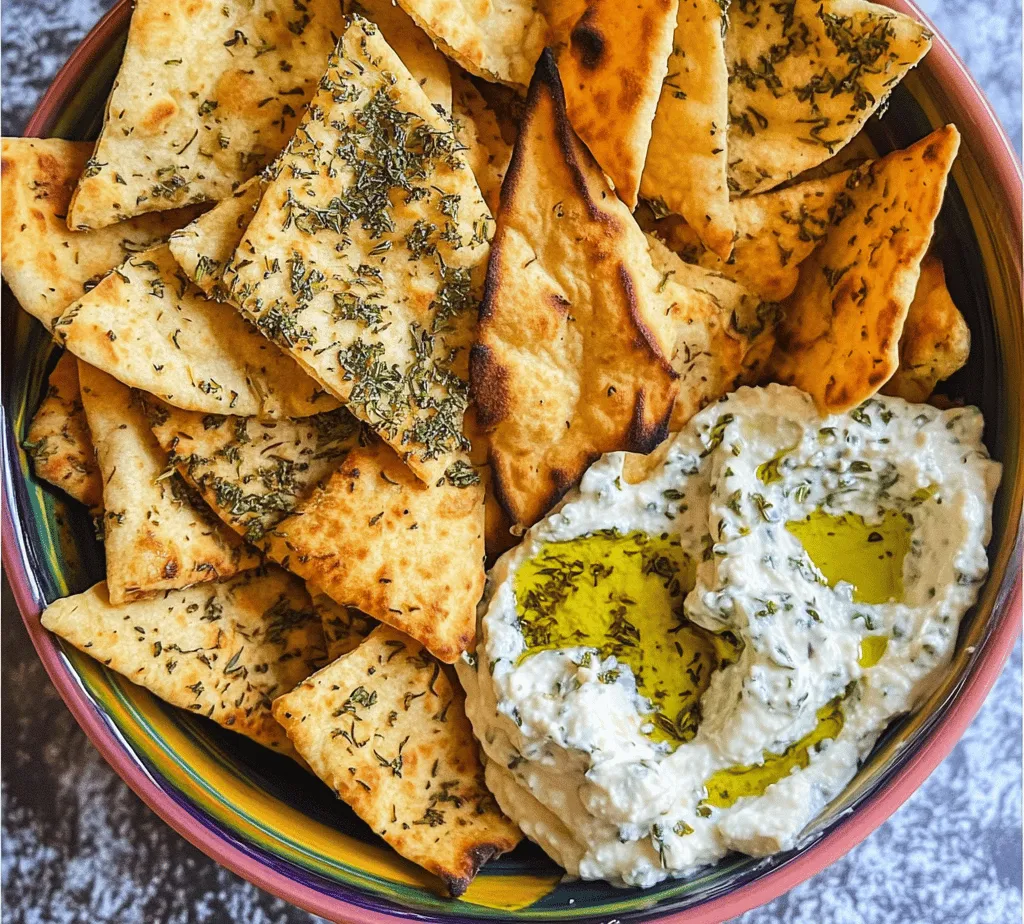
Serving Suggestions
Once your crispy herb-infused pita chips are ready, it’s time to think about serving them.
1. Creative Presentation: Serve your pita chips in a decorative bowl or on a platter. Garnish with fresh herbs for an appealing touch.
2. Dip Pairings: These chips pair excellently with a variety of dips. Classic choices include hummus, tzatziki, or a spicy salsa. Consider offering a few different dips to cater to various tastes.
3. Incorporating into Meals: Use pita chips as a crunchy topping for salads or soups. They can also be served alongside grilled meats or vegetables for added texture at gatherings.
Healthier Snack Alternatives
Homemade pita chips stand out when compared to store-bought options, especially regarding health benefits.
1. Comparison to Store-Bought Options: Often, store-bought pita chips are loaded with preservatives, unhealthy oils, and excess sodium. Making your own allows you to control the ingredients and tailor them to your health needs.
2. Controlling Ingredients for Dietary Restrictions: Whether you are gluten-sensitive or following a low-sodium diet, homemade pita chips can easily be customized to fit your dietary requirements. Use gluten-free pita bread or reduce the salt in your herb-infused oil to make them healthier.
3. Customization Options: Experiment with different oils or seasonings. For instance, you might try using avocado oil for a different flavor profile or opt for nutritional yeast to give your chips a cheesy taste without any dairy.
Conclusion
Making crispy herb-infused pita chips at home is not only simple but also incredibly satisfying. The process allows for creativity in flavor combinations and personal touches. Whether you enjoy them as a healthy snack, a crunchy addition to your meals, or as a party appetizer, these homemade chips will surely impress.
Don’t hesitate to experiment with different herbs and spices to discover your favorite combination. The joy of creating healthy snacks that cater to your personal tastes is unparalleled. So gather your ingredients, follow the steps, and indulge in the delight of your very own crispy pita chips!