Introduction
In recent years, cake balls have taken the dessert world by storm, captivating the taste buds of dessert lovers everywhere. These bite-sized delights are not only visually appealing but also pack a powerful punch of flavor in each morsel. They have become a popular choice for celebrations, parties, and even casual gatherings, providing a perfect blend of convenience and indulgence. Among the many variations of cake balls, the Velvety Red Delight Cake Balls stand out as a quintessential treat, especially during festive occasions and romantic celebrations.
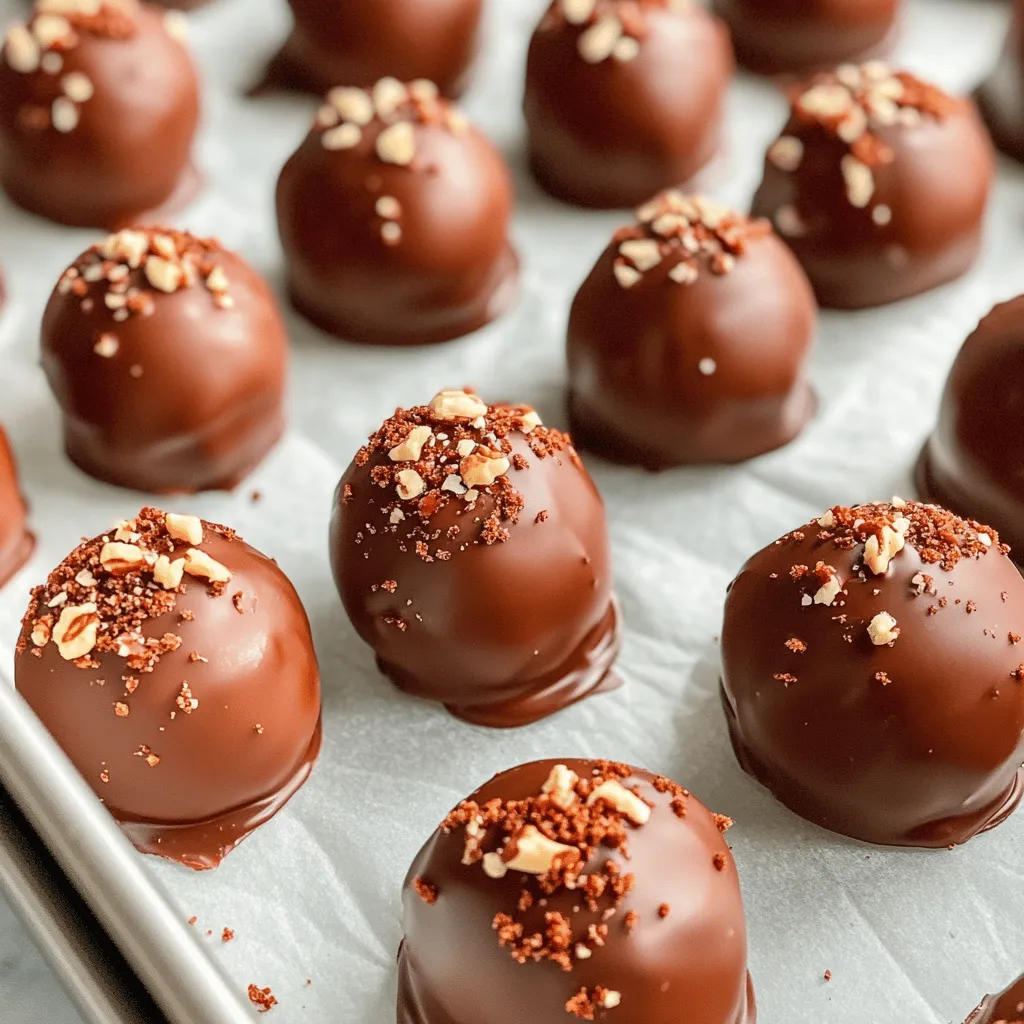
The Velvety Red Delight Cake Balls showcase the classic flavor profile of red velvet cake, renowned for its rich, cocoa-infused taste and striking crimson hue. When paired with luscious cream cheese frosting and enveloped in a smooth chocolate coating, these cake balls transform into an irresistible dessert that’s sure to impress your guests. Whether you’re planning a birthday party, a romantic dinner, or a holiday gathering, these delightful treats will undoubtedly add a touch of sweetness to the festivities.
Understanding the Ingredients
To create the perfect Velvety Red Delight Cake Balls, it’s essential to understand the key ingredients that contribute to their alluring flavor and texture. Each component plays a crucial role in achieving the desired result, making the choice of ingredients paramount.
Key Ingredients Overview
1. Red Velvet Cake Mix:
The foundation of our cake balls is the red velvet cake mix, which combines convenience with an authentic flavor that can often be difficult to replicate from scratch. Using a quality cake mix allows bakers to save time while still delivering a deliciously moist and flavorful cake. This mix typically contains cocoa powder, which gives the cake its unique taste, alongside the vibrant red coloring that makes it visually stunning.
2. Cream Cheese Frosting:
No red velvet cake is complete without its signature cream cheese frosting. This ingredient is vital in achieving the perfect texture and taste for our cake balls. The creamy, tangy goodness of the frosting not only enhances the overall flavor but also provides the necessary moisture to bind the cake crumbs together. The balance between sweetness and tanginess in cream cheese frosting complements the rich flavor of the red velvet cake beautifully.
3. Chocolate Coating:
The chocolate coating is what elevates the cake balls to a whole new level. A smooth layer of chocolate adds a delightful crunch and a rich, sweet finish that contrasts perfectly with the soft cake inside. Whether you choose to use milk chocolate, dark chocolate, or white chocolate, this outer layer is essential for creating the classic cake ball experience. Additionally, the incorporation of coconut oil helps achieve a glossy finish and ensures a smoother melting process.
4. Optional Ingredient – Crushed Nuts:
For those looking to add an extra dimension of flavor and texture, crushed nuts can be an excellent addition to the cake balls. Chopped walnuts or pecans not only enhance the taste but also contribute a satisfying crunch that contrasts with the softness of the cake and frosting. This optional ingredient can be tailored to personal preferences, making the cake balls even more unique.
Step-by-Step Guide to Making Velvety Red Delight Cake Balls
Creating Velvety Red Delight Cake Balls may seem daunting, but by breaking down the process into manageable steps, you can easily master this delightful recipe. Below, we’ll take a closer look at each stage, ensuring you have all the necessary information to achieve perfect cake balls every time.
Baking the Cake
The first step in making Velvety Red Delight Cake Balls is to bake the cake itself. Following the package instructions for the red velvet cake mix is crucial, as it ensures that the cake turns out perfectly moist and flavorful. Here’s how to do it:
1. Preheat your oven according to the instructions on the cake mix box. This typically involves setting it to around 350°F (175°C).
2. Prepare your baking pan by greasing it lightly and dusting it with flour, or use parchment paper for easy removal.
3. In a mixing bowl, combine the cake mix with the required ingredients, usually including water, eggs, and vegetable oil. Mix until smooth, ensuring there are no lumps.
4. Pour the batter into the prepared baking pan and spread it evenly. Bake for the time specified on the package, usually around 25-30 minutes, or until a toothpick inserted into the center comes out clean.
5. Once baked, remove the cake from the oven and allow it to cool in the pan for about 10 minutes. Then, transfer it to a wire rack to cool completely. Cooling the cake is essential as it allows the cake to firm up, making it easier to crumble later on.
Crumbling the Cake
Once your red velvet cake has cooled completely, it’s time to crumble it into fine pieces. This step is crucial for achieving the right consistency for the cake balls.
1. Using your hands or a fork, break the cooled cake into large chunks and place them into a large mixing bowl.
2. Begin to crumble the cake by pressing it between your fingers or using the back of a fork. Aim for fine crumbs, ensuring there are no large pieces remaining, as this will affect the binding with the frosting.
3. The consistency of the cake crumbs is essential for proper binding. They should be fine enough to hold together when mixed with the frosting but not so finely crumbled that they lose texture.
Mixing with Frosting
The next step is to combine the cake crumbs with the cream cheese frosting, which will give our cake balls their signature texture and flavor.
1. Start by adding a portion of cream cheese frosting to the crumbled cake. The amount you need will depend on your desired consistency, but a good starting point is approximately 1 cup of frosting for every 2 cups of crumbled cake.
2. Using your hands or a spatula, gently mix the frosting with the cake crumbs. The goal is to achieve a dough-like consistency that holds together when pressed. If the mixture feels too dry, add more frosting a tablespoon at a time until the desired consistency is reached.
3. Be careful not to overmix, as this can lead to a dense texture. You want to ensure that the cake crumbs are evenly coated with frosting, creating a cohesive mixture that is easy to roll into balls.
Rolling into Balls
Now that you have your cake and frosting mixture ready, it’s time to shape them into delightful cake balls.
1. Using a cookie scoop or your hands, take a small portion of the mixture and roll it into a ball about 1 inch in diameter. The size can vary depending on your preference, but uniformity is key for even baking and presentation.
2. Place the rolled cake balls onto a parchment-lined baking sheet. The parchment paper will help prevent sticking and make it easier to transfer the cake balls later.
3. Once you’ve rolled all the mixture into balls, place the baking sheet in the refrigerator for about 30 minutes. This chilling step is important as it helps the cake balls firm up, making them easier to coat in chocolate later.
By following these initial steps, you will set a solid foundation for your Velvety Red Delight Cake Balls. These cake balls are sure to become a favorite treat, and the process of making them is both rewarding and enjoyable. As you progress through the recipe, remember that patience is key, and the attention to detail will pay off in the delightful dessert you create.
Stay tuned for the next part, where we will delve into the exciting process of coating the cake balls in chocolate and adding the finishing touches to make them truly irresistible.
Chilling the Cake Balls
Chilling is a crucial step in the process of making Velvety Red Delight Cake Balls. After rolling your cake mixture into small balls, placing them in the refrigerator allows the cake to firm up. This makes handling and coating much easier, ensuring that your cake balls maintain their shape during the dipping process.
Recommended Chilling Time and Conditions
For optimal results, it is recommended to chill the cake balls for at least 30 minutes. This duration allows the balls to become firm but not frozen. Place the cake balls on a parchment-lined baking sheet, ensuring they are spaced apart to prevent sticking. Cover them loosely with plastic wrap to avoid absorbing any odors from your refrigerator. If you are in a warmer environment, consider chilling them for up to an hour to ensure they are perfectly set.
Melting the Chocolate
The next step in creating your cake balls is melting the chocolate. A smooth, well-melted chocolate coating is essential for achieving that professional look and taste.
Step-by-Step Melting Process to Avoid Burning the Chocolate
1. Choose Your Chocolate: Use high-quality chocolate, either dark, milk, or white, depending on your preference. Chocolate chips can work well, but they may contain stabilizers that affect melting.
2. Chop the Chocolate: If using a chocolate bar, chop it into small, uniform pieces to ensure even melting.
3. Double Boiler Method: Set up a double boiler by placing a heatproof bowl over a pot of simmering water. Make sure the bottom of the bowl does not touch the water. Add your chopped chocolate to the bowl.
4. Stir Continuously: As the chocolate starts to melt, stir it gently with a spatula or wooden spoon. This will help distribute heat evenly and prevent any burning.
5. Remove from Heat: Once the chocolate is almost fully melted, remove the bowl from heat. The residual heat will melt the remaining pieces.
The Role of Coconut Oil in Achieving a Smooth Chocolate Coating
To achieve a smoother and more fluid chocolate coating, consider adding a tablespoon of coconut oil for every 8 ounces of chocolate. This not only enhances the shine of the coating but also helps to create a thinner consistency, making it easier to dip the cake balls evenly.
Dipping the Cake Balls
Once your chocolate is melted and smooth, it’s time to dip the chilled cake balls.
Tips for Achieving an Even Coat of Chocolate
1. Use a Fork: Dip a cake ball into the melted chocolate using a fork. Spoon some chocolate over the top to ensure it is fully coated.
2. Tap Off Excess: Lift the ball out of the chocolate and gently tap the fork against the side of the bowl to remove excess chocolate.
3. Rotate for Coverage: Rotate the ball while it is still on the fork to help the chocolate flow evenly around it.
Techniques for Removing Excess Chocolate Without Losing Shape
After tapping off excess chocolate, carefully slide the cake ball onto the parchment paper. You can use a toothpick or a second fork to gently push the ball off the first fork, maintaining its shape and ensuring a smooth finish. If needed, quickly use your finger to smooth any imperfections.
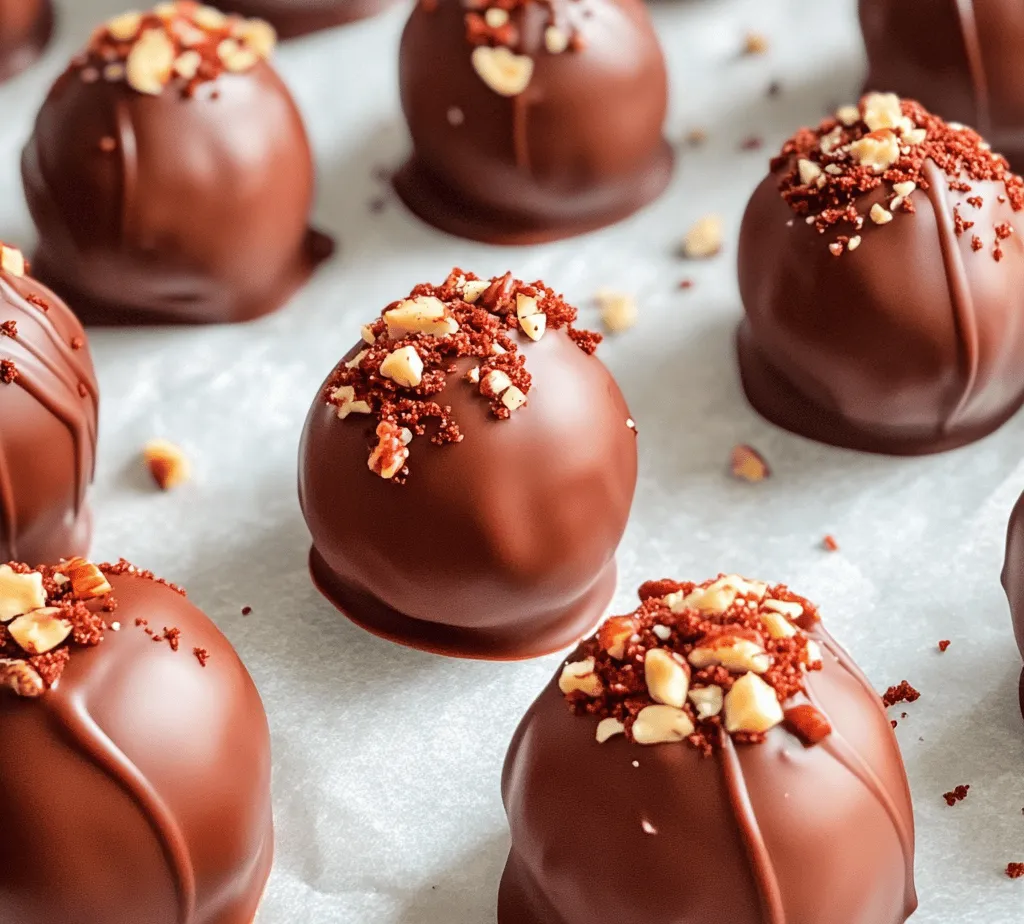
Topping with Nuts (Optional)
Adding a crunchy texture to your Velvety Red Delight Cake Balls can elevate their flavor profile.
Benefits of Adding a Crunchy Texture with Nuts
Nuts not only provide a delightful contrast to the velvety cake but also enhance the overall visual appeal. Chopped pecans, walnuts, or pistachios work wonderfully, adding a nutty flavor that complements the sweetness of the chocolate.
How to Effectively Roll the Chocolate-Coated Cake Balls in Nuts
1. Crush the Nuts: Place your chosen nuts in a zip-lock bag and crush them with a rolling pin or heavy object until they are finely chopped but still retain some texture.
2. Roll the Coated Cake Balls: While the chocolate coating is still wet, roll each cake ball in the crushed nuts. Ensure all sides are covered for maximum flavor.
Final Chill for Coating
Allowing the chocolate to set properly is crucial for achieving that perfect finish.
Importance of Allowing the Chocolate to Set Properly
Setting the chocolate ensures that it firms up and adheres securely to the cake balls. This step is essential for preventing the chocolate from smudging or easily coming off when handled or served.
Recommended Time for Chilling Again
After coating, chill the cake balls again for about 15-30 minutes. This will help the chocolate harden completely, resulting in a beautifully finished treat.
Serving Suggestions
Your Velvety Red Delight Cake Balls are now ready to be enjoyed, but how you present them can make a big difference at gatherings.
Ideas for Presenting the Cake Balls at Gatherings
Serve your cake balls in a decorative box or on a stylish platter. For a festive touch, you can place them in mini cupcake liners or arrange them in a tiered dessert stand.
Pairing Options: Beverages or Other Desserts That Complement the Cake Balls
These cake balls pair wonderfully with a variety of beverages. Consider serving them alongside a rich cup of coffee or a glass of cold milk. For a more festive option, pair them with a sweet dessert wine or dessert cocktails.
Creative Plating Ideas to Enhance Visual Appeal
To enhance the visual appeal, drizzle additional melted chocolate over the top of the cake balls before serving. You can also sprinkle them with edible glitter or a dusting of cocoa powder for an elegant touch.
Nutritional Information
Understanding the nutritional content of your Velvety Red Delight Cake Balls can help you enjoy them in moderation.
Overview of the Nutritional Content per Serving
Each cake ball typically contains around 100-150 calories, depending on the ingredients used and the size of the balls. They provide a delightful treat without being overly indulgent.
Discussion on Dietary Considerations: Making the Recipe Gluten-Free or Vegan, If Applicable
For those with dietary restrictions, this recipe can be easily adapted. To make it gluten-free, substitute all-purpose flour with almond flour or a gluten-free baking mix. For a vegan version, use plant-based yogurt and dairy-free chocolate. These adaptations ensure everyone can enjoy these delightful cake balls.
Conclusion
Making Velvety Red Delight Cake Balls is not just about crafting a dessert; it’s about creating a joyful experience. The combination of rich chocolate and moist red velvet cake makes these treats a crowd favorite for any occasion. Whether you’re celebrating a birthday, hosting a holiday gathering, or simply indulging on a weekend, these cake balls are sure to impress.
I encourage you to try this versatile recipe for your next event. The process is simple, and the reward is a delicious dessert that brings smiles to faces. With the unique combination of flavors and textures, your Velvety Red Delight Cake Balls will be a memorable addition to any dessert table. Enjoy the satisfaction that comes from creating something special, and watch as your guests savor each bite!
