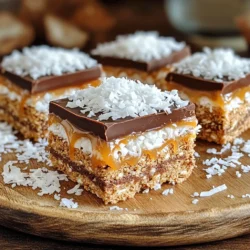
No-Bake Samoa Cookie Bars
Indulge in a delicious treat with these easy No-Bake Samoa Cookie Bars! Made with simple ingredients like graham crackers, coconut, and chocolate, this irresistible dessert comes together in just 15 minutes. Perfect for satisfying your sweet tooth without turning on the oven, these bars are a crowd-pleaser. Click through to explore the full recipe and enjoy a delightful bite of Samoa goodness today!