Cheesecake has long been a beloved dessert, cherished for its creamy texture and rich flavor. From classic New York-style cheesecake to inventive twists like chocolate or fruit-infused varieties, there’s a cheesecake to suit every palate. One popular trend that has taken the dessert world by storm is the mini cheesecake. These bite-sized treats offer all the indulgence of traditional cheesecakes but in a more manageable and shareable form. Among the many flavors that grace the cheesecake landscape, the zesty key lime stands out for its refreshing and vibrant profile, making it a perfect choice for warm-weather gatherings or anytime you crave a taste of sunshine.
Mini cheesecakes are not just visually appealing; they also come with a host of benefits that make them a favorite among dessert lovers. Their smaller size allows for portion control, making it easy to enjoy a sweet treat without overindulging. Additionally, they are incredibly easy to serve and share, making them the ideal dessert for parties, picnics, or family gatherings. With endless flavor possibilities, mini cheesecakes can cater to various tastes, ensuring there’s something for everyone.
The Delight of Mini Cheesecakes
The trend of mini desserts has gained immense popularity in recent years. Their charming size and versatility make them a hit at celebrations, from birthday parties to weddings. Mini cheesecakes, in particular, offer a delightful way to enjoy a classic dessert without the fuss of slicing and serving a full-sized cake. Guests can simply pick one up and savor the delightful flavors without worrying about leftovers or messy plates.
One of the key advantages of mini cheesecakes is their inherent portion control. Each mini cheesecake is perfectly sized for one serving, allowing you to indulge without the guilt of overindulging. This aspect is especially appealing for those who are conscious of their sugar intake or those who simply want to enjoy a sweet treat without committing to a larger slice.
Moreover, mini cheesecakes are incredibly easy to serve and share. Imagine a dessert table filled with an array of colorful mini cheesecakes, each one beckoning guests to take a bite. Their small size allows for a variety of flavors to be showcased, encouraging guests to sample multiple options. This interactive dessert experience adds an element of fun to any gathering, making mini cheesecakes a fantastic choice for entertaining.
Understanding Key Ingredients
To achieve the perfect zesty mini key lime cheesecakes, it’s essential to understand the key ingredients that contribute to their delightful flavor and texture. Each component plays a significant role in creating the ideal balance of creaminess, tanginess, and sweetness.
– Graham Cracker Crumbs: The foundation of any great cheesecake, the crust provides a crunchy contrast to the creamy filling. Made from crushed graham crackers, the crust is typically combined with melted butter and sugar to create a rich, buttery base. This classic combination not only adds texture but also enhances the overall flavor of the cheesecake.
– Cream Cheese: As the heart of the cheesecake filling, cream cheese delivers the smooth, rich texture that defines a good cheesecake. It’s important to use high-quality cream cheese for the best results, as it contributes to the overall creaminess and flavor of the final product.
– Key Lime Juice vs. Regular Lime Juice: One of the standout features of these mini cheesecakes is the use of key lime juice, which offers a distinct flavor profile compared to regular lime juice. Key limes are smaller and have a more intense flavor, providing a refreshing, tangy kick that elevates the cheesecake. While regular limes can be used in a pinch, the unique taste of key limes is highly recommended for the best results.
– Sour Cream: Adding a layer of creaminess and tang, sour cream is an essential ingredient that enhances the overall texture of the cheesecake filling. It complements the cream cheese beautifully, creating a balanced flavor that is both rich and refreshing.
– Quality Ingredients: The importance of using high-quality ingredients cannot be overstated when it comes to baking. Freshly squeezed key lime juice, premium cream cheese, and real butter will all contribute to a superior flavor and texture, making your mini cheesecakes truly memorable.
Step-by-Step Guide to Making Zesty Mini Key Lime Cheesecakes
Now that we’ve explored the delightful world of mini key lime cheesecakes, it’s time to dive into the step-by-step process of making them. This comprehensive guide will ensure that your mini treats turn out perfectly every time.
Preheat the Oven
The first step in any baking endeavor is preheating the oven. For these zesty mini key lime cheesecakes, set your oven temperature to 325°F (163°C). Proper preheating is crucial, as it ensures that your cheesecakes cook evenly and achieve the desired texture. While the oven is warming up, you can prepare your crust and filling.
Preparing the Crust
The crust is a fundamental component of the mini cheesecakes, providing a crunchy base that complements the creamy filling. Here’s how to prepare it:
1. Mix the Ingredients: In a mixing bowl, combine 1 ½ cups of graham cracker crumbs, ¼ cup of granulated sugar, and ½ cup of melted unsalted butter. Stir until the mixture resembles wet sand and all the crumbs are well-coated in butter.
2. Press the Crust: Line a muffin tin with paper liners or lightly grease it with cooking spray. Using a tablespoon or your fingers, press the graham cracker mixture firmly into the bottom of each muffin cup, creating an even layer. Aim for a thickness of about ¼ inch. This step is crucial for achieving a sturdy crust that holds together when serving.
3. Achieve the Perfect Texture: For a crispier crust, you can bake the crust in the preheated oven for about 5-7 minutes before adding the filling. This will help the crust set and provide a delightful crunch that contrasts beautifully with the creamy filling.
Making the Filling
Now it’s time to create the luscious cheesecake filling that will crown your crust. Follow these comprehensive steps to ensure a smooth and creamy filling:
1. Prepare the Cream Cheese: Start by allowing 16 ounces of cream cheese to come to room temperature. This step is essential, as room temperature cream cheese blends more easily and reduces the risk of lumps in the filling.
2. Mix for Smoothness: In a large mixing bowl, beat the softened cream cheese with an electric mixer on medium speed until smooth and creamy. This usually takes about 2-3 minutes. Scrape down the sides of the bowl as needed to ensure even mixing.
3. Incorporate the Other Ingredients: Gradually add ½ cup of granulated sugar, ½ cup of sour cream, 2 large eggs, and ½ cup of freshly squeezed key lime juice. Mix on low speed until just combined, being careful not to overmix. Overmixing can incorporate too much air into the batter, leading to cracks in your cheesecakes.
4. Achieve a Smooth Consistency: To ensure a silky texture, you may want to mix the filling on low speed for an additional minute or so, ensuring all ingredients are fully incorporated. The final filling should be smooth and velvety, without any lumps.
5. Room Temperature Ingredients: Remember, the key to a perfect cheesecake filling is using room temperature ingredients. Cold ingredients can cause the filling to be lumpy and uneven, so plan ahead and take the time to let everything warm up before you start mixing.
With the crust and filling prepared, you are well on your way to creating zesty mini key lime cheesecakes that are sure to impress. Stay tuned for the next part of this article, where we will discuss how to bake and cool your mini cheesecakes to perfection, as well as tips for serving and storing them. Whether you’re planning a gathering or simply craving a sweet treat, these mini cheesecakes are bound to be a hit!
Filling the Molds
When it comes to filling your mini cheesecake molds, the technique can significantly impact the appearance and overall presentation of your zesty mini key lime cheesecakes. Start by preparing your cheesecake filling as directed in your recipe, ensuring it is smooth and lump-free. A smooth filling not only enhances the texture but also elevates the aesthetic appeal of your mini cheesecakes.
For a tidy and efficient filling process, consider using a piping bag. This method allows for precision and control, helping you fill each mold evenly without making a mess. To use a piping bag, simply transfer the cheesecake filling into the bag, twist the top to seal it, and then snip off the tip. Pipe the filling into each mold, filling them about three-quarters full to allow room for slight expansion during baking. This technique not only ensures uniformity but also adds a professional touch to your mini cheesecakes.
Baking the Cheesecakes
Baking the mini cheesecakes requires some attention to detail to achieve that perfect texture. Preheat your oven to the recommended temperature, usually around 325°F (160°C). Once the cheesecakes are in the oven, keep an eye on them. A key indicator of doneness is a slightly jiggly center. This jiggle is crucial; it indicates that the cheesecake is set but not overbaked. Overbaking can lead to cracks and a dry texture, which is not ideal for a creamy cheesecake.
To avoid common mistakes, consider using a water bath. This technique involves placing your cheesecake molds in a larger pan filled with hot water while baking. The steam from the water bath helps maintain moisture in the oven, preventing the cheesecakes from cracking. After about 20-25 minutes of baking, check for doneness. If the edges are set and the center still has a slight jiggle, it’s time to remove them from the oven.
Cooling and Chilling
Cooling your mini key lime cheesecakes is an essential step that significantly influences their final texture and flavor. After removing the cheesecakes from the oven, allow them to cool in the molds at room temperature for about 30 minutes. This gradual cooling helps prevent cracks from forming due to sudden temperature changes.
Once they have cooled, transfer the molds to the refrigerator to chill for at least 4 hours, or ideally overnight. Chilling is critical for allowing the flavors to meld together and for the cheesecake to fully set. The longer they chill, the firmer they will become, resulting in a delightful creamy texture that melts in your mouth.
Serving Suggestions
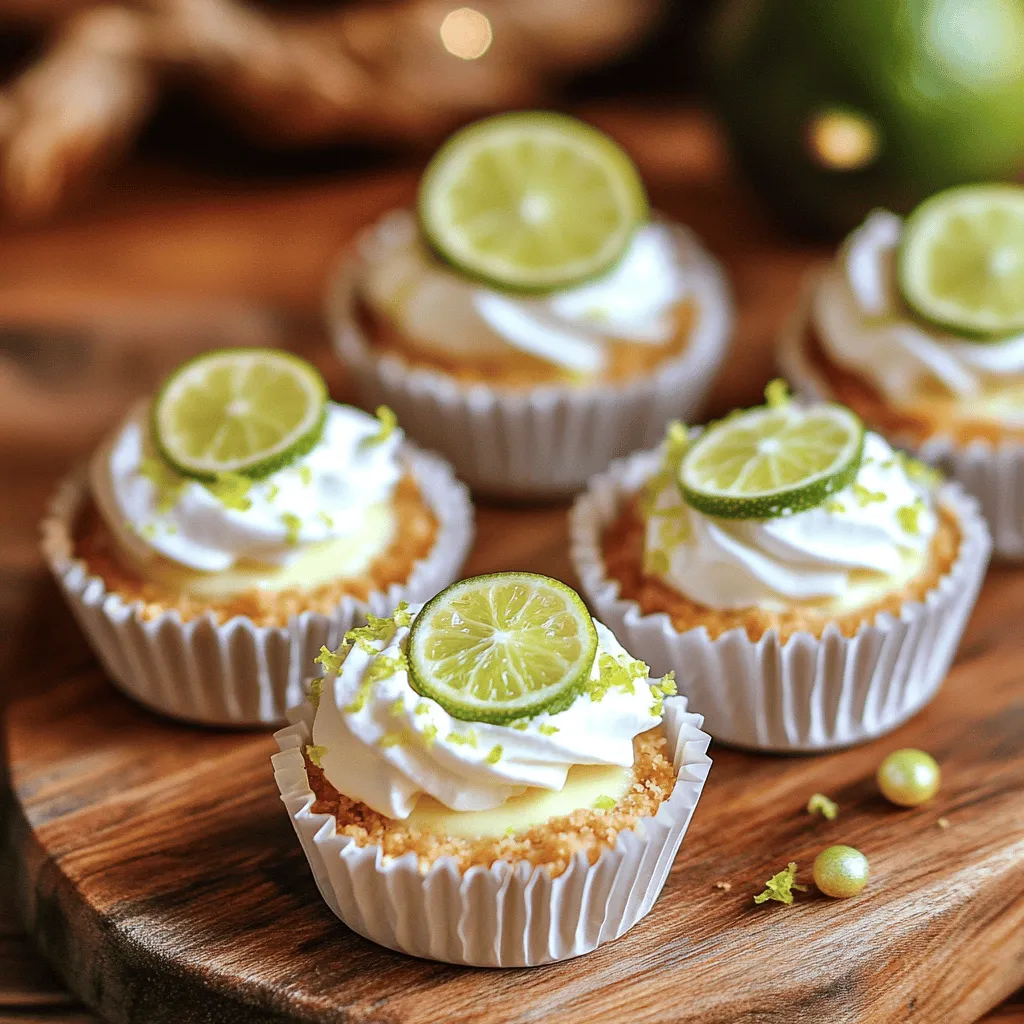
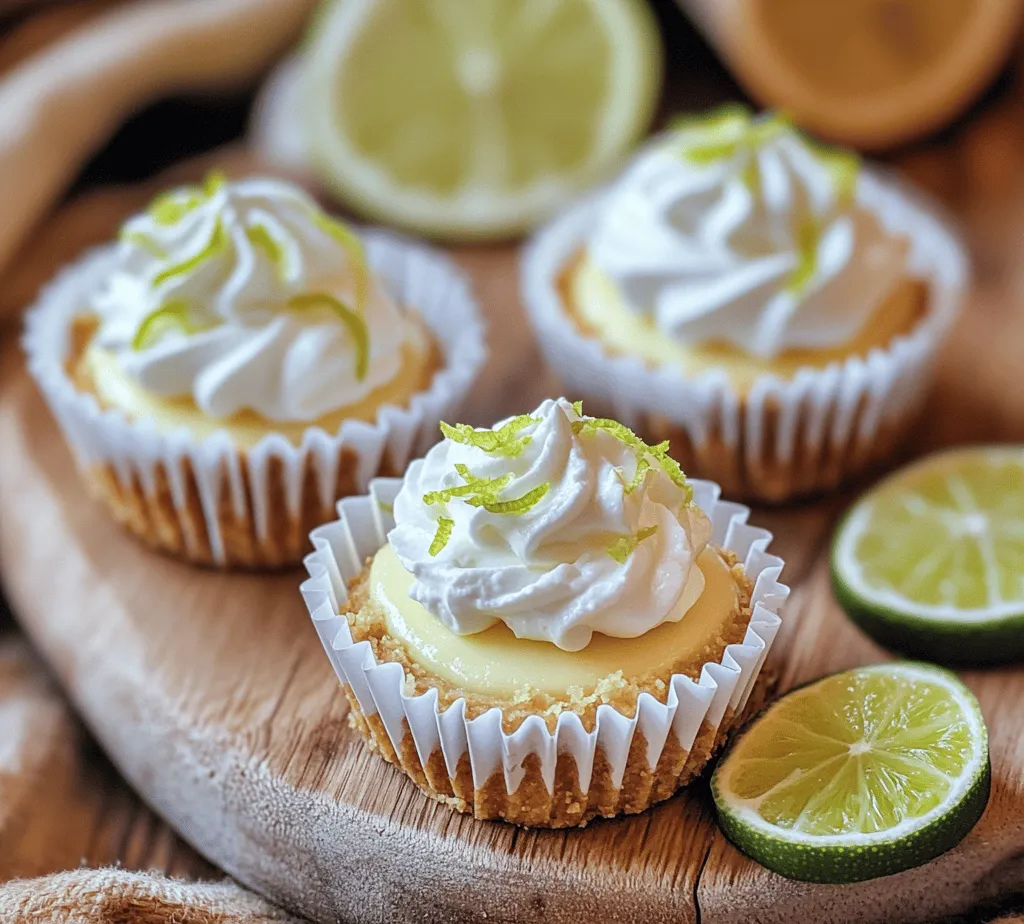
When it comes to serving your zesty mini key lime cheesecakes, creativity can elevate the experience. Consider garnishing each cheesecake with a dollop of whipped cream, a sprinkle of lime zest, or a few fresh berries to add a pop of color and enhance the overall presentation. You can also drizzle some key lime sauce or a raspberry coulis on the plate for an artistic touch that adds flavor and visual appeal.
For a more luxurious experience, serve the cheesecakes alongside a scoop of lime sorbet or vanilla ice cream. This pairing not only complements the zesty flavor of the cheesecakes but also introduces a delightful contrast in temperature and texture.
Flavor Profile and Pairing Options
The flavor profile of zesty mini key lime cheesecakes is a delightful combination of tangy and creamy. The sharpness of the key lime juice balances beautifully with the rich cream cheese base, creating a refreshing dessert that is perfect for warm weather or any occasion that calls for a light finish.
When it comes to beverage pairings, consider serving these cheesecakes with iced tea or lemonade for a refreshing experience. If you’re looking for something a bit more spirited, cocktails such as a classic mojito or a light gin and tonic can enhance the citrus notes of the key lime. For a non-alcoholic option, sparkling water infused with lime or mint can also serve as a refreshing complement to your dessert.
Variations and Customization Ideas
One of the best aspects of mini key lime cheesecakes is their versatility. While the classic version is undeniably delicious, exploring different flavor variations can add excitement to your dessert repertoire. Here are some ideas:
– Alternative Citrus Fruits: Experiment with other citrus fruits like lemon or orange to create a fresh twist on the classic recipe. Each fruit brings its unique flavor profile and brightness.
– Fruit Toppings or Sauces: Top your cheesecakes with fresh berries, mango slices, or a homemade fruit sauce. This not only adds flavor but also an appealing visual element to your dessert.
– Chocolate Incorporation: For chocolate lovers, consider adding a layer of chocolate ganache on top of the cheesecake or mixing in cocoa powder for a chocolate key lime cheesecake variation.
– Gluten-Free Options: If you’re catering to gluten-free guests, substitute the crust with crushed gluten-free cookies or nuts, ensuring that everyone can enjoy this delicious treat.
– Dietary Needs: For those requiring dairy-free or vegan options, swap the cream cheese with cashew cream or a store-bought vegan cream cheese alternative. Use coconut milk instead of heavy cream to maintain that creamy texture.
Storing and Serving Tips
Storing your mini cheesecakes properly is crucial for maintaining their flavor and texture. Keep them in an airtight container in the refrigerator for up to five days. If you plan to make them ahead of time, chilling them overnight is ideal, as it enhances the flavor and ensures they are ready to serve when your guests arrive.
When it’s time to serve your mini cheesecakes, consider presentation ideas that will captivate your guests. Arrange them on a beautiful platter, and add garnishes like mint leaves or edible flowers for a touch of elegance. Individual servings can also be presented in decorative cupcake liners or small glass jars for a charming rustic feel.
For gatherings or parties, consider serving the cheesecakes on a dessert table alongside other sweet treats. This not only provides a variety of options for your guests but also creates an inviting and festive atmosphere.
Conclusion
Making zesty mini key lime cheesecakes is a delightful culinary experience that results in a refreshing dessert perfect for any occasion. The simple yet effective combination of tangy key lime and creamy cheese creates a flavor explosion that is hard to resist. Whether you enjoy them as a special treat for yourself or share them with friends and family, these mini cheesecakes are sure to impress.
With their versatile nature, you can customize these cheesecakes to suit any palate or dietary need, making them an excellent choice for gatherings or casual get-togethers. Embrace the joy of baking and indulge in the refreshing taste of zesty mini key lime cheesecakes. Once you try this recipe, you’ll understand why it’s a favorite among dessert lovers. So roll up your sleeves, gather your ingredients, and get ready to enjoy a slice of paradise in every bite!


