Introduction
There’s something undeniably comforting about the aroma of freshly baked cinnamon rolls wafting through the kitchen. These delightful pastries are not just a breakfast staple; they hold a special place in our hearts as a beloved treat that evokes warmth and nostalgia. Whether enjoyed as a leisurely brunch indulgence or a sweet dessert after dinner, cinnamon rolls are versatile and universally adored.
This article presents a detailed guide on how to make heavenly cinnamon rolls from scratch. With a soft, pillowy dough, a rich and gooey filling, and a creamy icing that ties it all together, these cinnamon rolls are sure to impress your family and friends. What’s more, this recipe is accessible to everyone, from seasoned bakers to novices taking their first steps into the world of baking. So roll up your sleeves and get ready to embark on a delightful baking adventure!
Understanding the Ingredients
Before diving into the baking process, it’s essential to understand the role of each ingredient in creating the perfect cinnamon roll. Each component contributes to the overall flavor, texture, and quality of the final product.
The Dough Components
1. All-Purpose Flour: The foundation of the rolls, all-purpose flour provides the necessary structure and texture. It contains the right balance of protein and starch, which helps create a chewy yet tender dough.
2. Granulated Sugar: This ingredient adds sweetness to the dough while also helping it brown beautifully during baking. Sugar plays a vital role in enhancing the overall flavor profile of the rolls.
3. Active Dry Yeast: The key to achieving that fluffy, light texture, active dry yeast is the leavening agent that causes the dough to rise. It ferments the sugars in the dough, producing carbon dioxide and causing the dough to expand.
4. Salt: While it may seem like a minor ingredient, salt is crucial in enhancing the flavors in the dough. It also strengthens the dough’s structure, ensuring that it holds its shape during baking.
5. Whole Milk and Water: These liquids hydrate the dough and help activate the yeast. The combination of milk and water creates a tender crumb and enriches the flavor.
6. Unsalted Butter: Adding richness and flavor to the dough, unsalted butter is melted and incorporated to create a moist and tender roll. It also contributes to the overall mouthfeel of the finished product.
7. Eggs: Eggs play a vital role in the dough’s structure and moisture. They provide richness and help bind the ingredients together, resulting in a cohesive dough.
The Filling Essentials
1. Unsalted Butter: The base of the filling, melted unsalted butter helps create a luscious texture that allows the filling to adhere to the dough. It adds flavor and richness to the rolls.
2. Brown Sugar: This ingredient adds depth and a slight caramel flavor to the filling. The molasses content in brown sugar enhances the overall taste and keeps the filling moist.
3. Ground Cinnamon: The star spice in cinnamon rolls, ground cinnamon is what gives these rolls their signature taste. Its warm, sweet flavor is what makes cinnamon rolls so irresistible.
4. Nutmeg (Optional): Nutmeg is a warm spice that complements cinnamon beautifully. Adding a pinch can elevate the flavor profile and add a subtle complexity to the filling.
5. Chopped Nuts (Optional): For those who enjoy a bit of crunch, adding chopped nuts such as pecans or walnuts can enhance the texture and provide a nutty flavor that balances the sweetness of the filling.
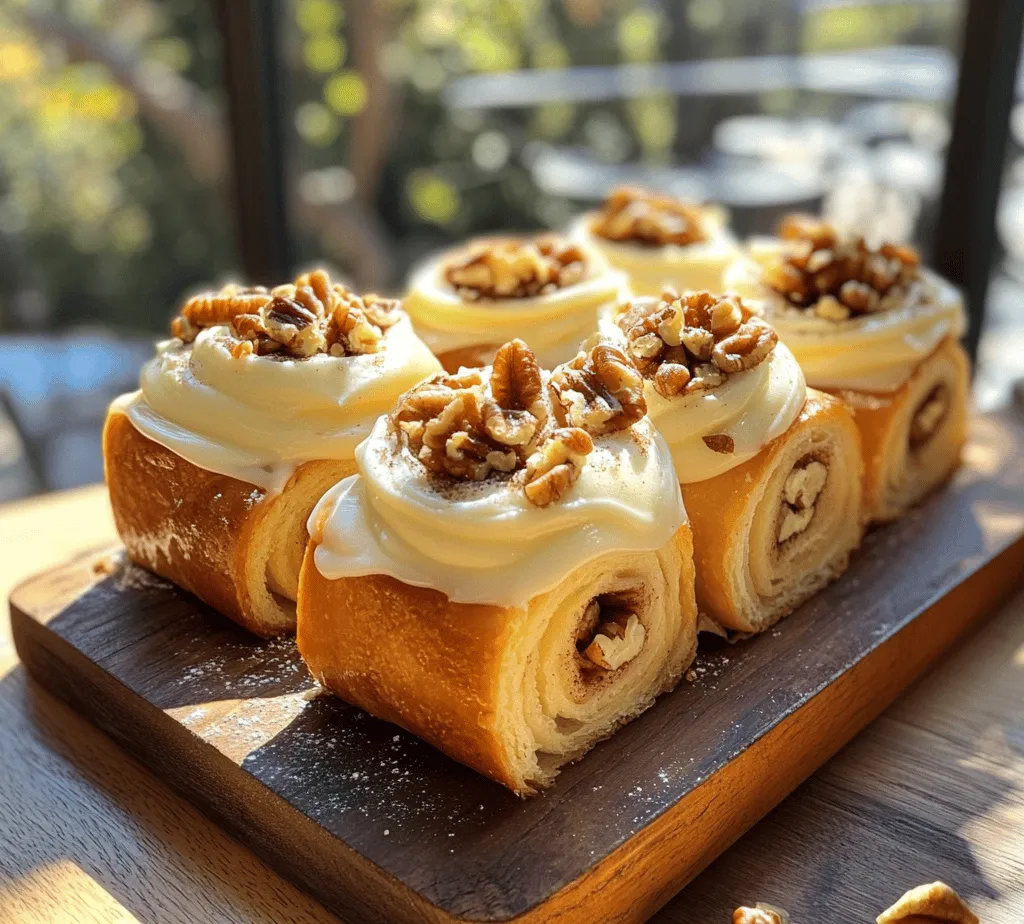
The Cream Cheese Icing
1. Cream Cheese: The base of the icing, cream cheese provides a tangy flavor that perfectly complements the sweetness of the rolls. Its creamy texture is essential for achieving the right consistency.
2. Powdered Sugar: This ingredient sweetens the icing and provides a smooth, velvety texture. It dissolves easily, making it ideal for creating a luscious topping.
3. Unsalted Butter: Adding richness and creaminess to the icing, unsalted butter ensures that the icing is not overly sweet and balances the flavors.
4. Vanilla Extract: A splash of vanilla extract enhances the flavor profile of the icing, adding warmth and depth that elevates the overall taste experience.
5. Milk: Milk is used to adjust the consistency of the icing. Depending on your preference, you can add more or less to achieve your desired thickness.
Step-by-Step Guide to Making Heavenly Cinnamon Rolls
Now that you understand the essential components of this recipe, it’s time to dive into the step-by-step process of making these heavenly cinnamon rolls. Follow these instructions carefully, and you’ll be rewarded with a batch of soft, gooey cinnamon rolls that are sure to impress.
Activating the Yeast
The first step in making cinnamon rolls is to activate the yeast. This is a crucial process that sets the foundation for your dough. For this, you will need warm milk and water. The ideal temperature for activating yeast is between 100°F to 110°F. If the liquid is too hot, it can kill the yeast, while too cold will not activate it.
1. In a mixing bowl, combine the warm milk and water.
2. Sprinkle the active dry yeast over the surface of the liquid. Allow it to sit undisturbed for about 5 to 10 minutes. This waiting period is essential; you should see the yeast begin to froth and bubble, indicating that it’s alive and ready to work its magic.
Mixing the Dry Ingredients
While the yeast is activating, you can prepare your dry ingredients. This step ensures that the dry components are evenly distributed, which is crucial for a consistent dough.
1. In a large mixing bowl, combine the all-purpose flour, granulated sugar, and salt.
2. Whisk the dry ingredients together until well combined. The sugar and salt should be evenly dispersed throughout the flour, ensuring that every bite of your cinnamon rolls is perfectly flavored.
Combining the Wet Ingredients
After activating the yeast, it’s time to combine the wet ingredients. This step involves bringing together the melted butter, eggs, and the yeast mixture.
1. In a separate bowl, whisk together the melted unsalted butter, eggs, and the activated yeast mixture.
2. Make sure the mixture is smooth and well combined before adding it to the dry ingredients. This ensures that your dough will come together seamlessly.
Once you have combined all the wet ingredients, you can proceed to mix them with the dry ingredients. This is where the magic begins, and the dough starts to form!
By understanding the ingredients and following these initial steps, you’re well on your way to creating heavenly cinnamon rolls. The process may seem intricate, but with patience and attention to detail, you’ll soon have a warm, delicious batch of these delightful pastries to share with loved ones. Stay tuned for the next part, where we’ll continue our journey and dive deeper into the assembly and baking process of these irresistible rolls.
Kneading the Dough
Kneading is a crucial step in the cinnamon roll-making process, as it develops the gluten in the dough, giving it the structure and elasticity needed for fluffy rolls. To knead effectively, start by transferring your dough to a lightly floured surface. Use the palms of your hands to push the dough away from you, and then fold it back over itself. Rotate the dough a quarter turn and repeat the process. This technique allows you to incorporate air and create the elasticity necessary for a perfect texture.
A well-kneaded dough should be smooth and elastic. To test if your dough is ready, perform the “windowpane test.” Take a small piece of dough and stretch it between your fingers. If it stretches into a thin membrane without tearing, your dough is perfectly kneaded. If it tears easily, continue kneading for a few more minutes until it reaches the desired elasticity.
Allowing the Dough to Rise
The first rise, also known as fermentation, is essential for developing flavor and creating a light texture in your cinnamon rolls. During this process, yeast ferments the sugars in the dough, producing carbon dioxide, which causes the dough to expand.
To provide ideal conditions for rising, place your dough in a warm, draft-free area. A common method is to preheat your oven to the lowest setting for a few minutes, then turn it off and place the covered dough inside. The gentle warmth encourages yeast activity. Cover the dough with a clean kitchen towel or plastic wrap to retain moisture. You should allow the dough to rise until it doubles in size, which typically takes around 1 to 1.5 hours.
Preparing the Filling
Mixing the Filling Ingredients
The filling for your cinnamon rolls is what makes them truly heavenly. To create the perfect filling, combine softened butter, brown sugar, cinnamon, and a pinch of salt in a mixing bowl. Blend these ingredients thoroughly until smooth and creamy. The butter should be soft enough to spread easily but not melted. If the filling is too thick, you can add a teaspoon of milk to achieve a spreadable consistency. Aim for a mixture that is thick enough to stay on the dough without running off but creamy enough to spread evenly.
Shaping the Rolls
Once your dough has risen, it’s time to roll it out. Start by lightly flouring your work surface and rolling pin. Gently punch down the dough to release any trapped air and then shape it into a rectangle, approximately 16×12 inches in size. Use even pressure as you roll to ensure that the dough is of uniform thickness, about 1/4 inch thick.
When it comes to spreading the filling, use an offset spatula or the back of a spoon to apply the mixture evenly across the surface of the dough, leaving a small margin around the edges. Be gentle to avoid tearing the dough. Once the filling is in place, you can start rolling the dough tightly from the long side, creating a log shape. Ensure that you keep the roll tight but not so tight that it squishes the filling out.
Cutting and Second Rising
Rolling and Cutting the Dough
After rolling your dough into a log, it’s time to cut it into even rolls. Use a sharp knife or, ideally, unflavored dental floss for the cleanest cut. If using a knife, make sure it’s sharp to avoid squishing the rolls. Slice the log into 12 equal pieces, each about 1.5 inches wide.
To ensure uniform baking, it’s essential to cut the rolls evenly. A good tip is to mark the log with small indentations before cutting to guide you. Once cut, place the rolls in a greased baking dish, leaving some space between them to allow for expansion during the second rise.
The Importance of the Second Rise
The second rise is crucial for achieving fluffy cinnamon rolls. This final rise allows the rolls to puff up and develop their light, airy texture. Cover the rolls with a clean kitchen towel and let them rise for about 30-45 minutes in a warm area. You’ll know they’re ready when they’ve doubled in size and feel soft to the touch.
Baking the Cinnamon Rolls
Preheating the Oven
Preheating your oven is a vital step that should not be overlooked. An adequately preheated oven ensures that your cinnamon rolls bake evenly from the start, resulting in a perfect golden-brown exterior and soft interior. Set your oven to 350°F (175°C) and allow it to preheat fully before placing the rolls inside.
Baking Process
Once your oven is ready, carefully place the cinnamon rolls in the center rack. Bake them for 20-25 minutes, or until they are golden brown on top. Keep an eye on the rolls during the last few minutes of baking; the visual cues for doneness include a golden-brown color and a slightly firm texture when gently pressed. If your rolls are browning too quickly, you can tent them with aluminum foil to prevent over-browning while the insides continue to cook.
Making the Cream Cheese Icing
Ingredients and Mixing
While your cinnamon rolls are baking, you can prepare the cream cheese icing. For this delicious topping, you will need cream cheese, powdered sugar, vanilla extract, and a little milk. Start by softening the cream cheese to room temperature to ensure easy mixing. In a mixing bowl, combine the softened cream cheese and powdered sugar, mixing until smooth and creamy. Add a splash of vanilla extract and milk, adjusting the quantity of milk until you reach your desired consistency. The icing should be thick enough to hold its shape but thin enough to drizzle over the warm rolls easily.
Frosting and Serving the Rolls
Drizzling the Icing
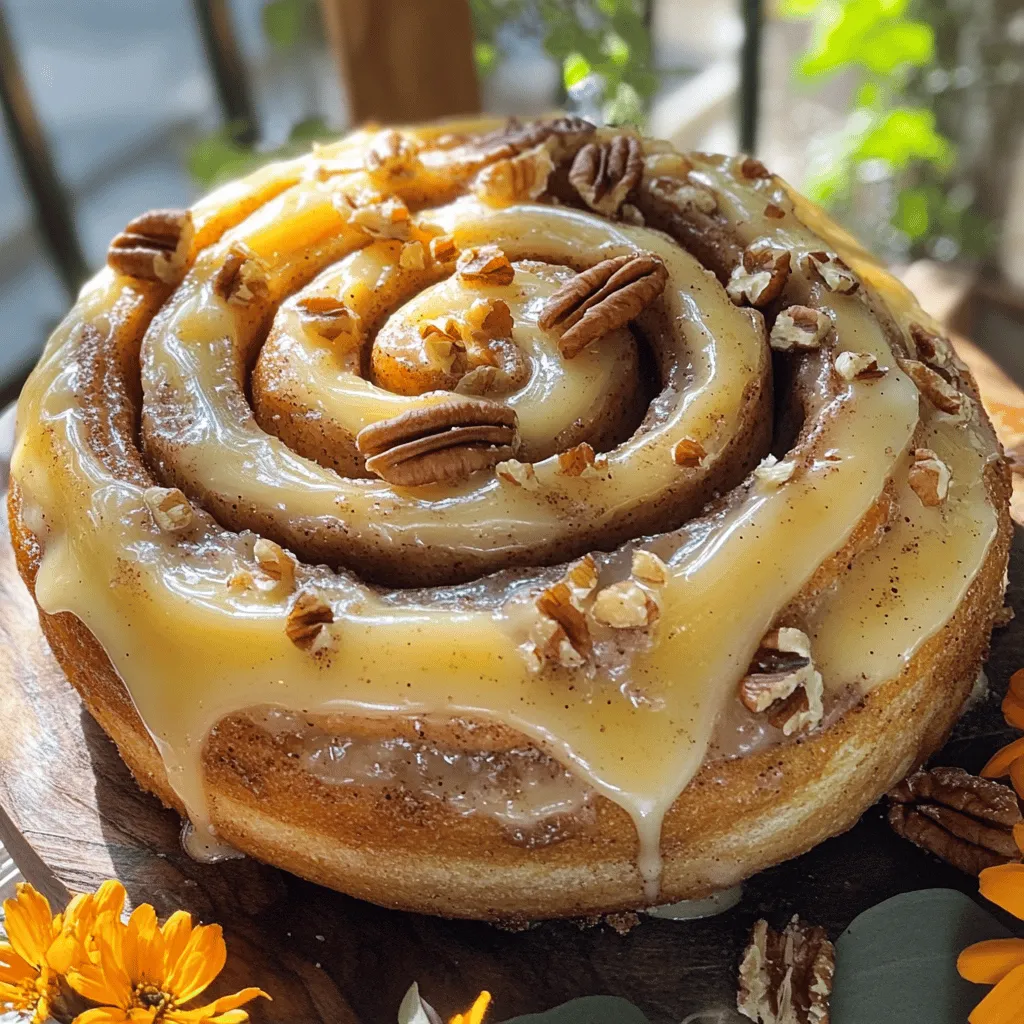
Once your cinnamon rolls are out of the oven and slightly cooled, it’s time to add the icing. Use a spoon or a piping bag to drizzle the icing generously over the top of the rolls. For an even distribution, start from the center and work your way outwards in a circular motion. The warmth of the rolls will cause the icing to melt slightly, creating a luscious glaze that seeps into all the nooks and crannies.
Enjoying the Rolls
Cinnamon rolls are best enjoyed fresh out of the oven, but they can also be stored in an airtight container for a few days. Serve them warm with a cup of coffee or tea, or enjoy them as a decadent breakfast treat. They also make a delightful dessert, especially when paired with a scoop of vanilla ice cream. For added flair, consider garnishing with a sprinkle of cinnamon or chopped nuts for a bit of texture and flavor.
Conclusion
Heavenly cinnamon rolls are more than just a recipe; they are an experience that brings joy and comfort to any occasion. With detailed steps and careful attention to each ingredient, you can create these delicious rolls that are sure to delight everyone at your table. Enjoy the process of baking and the heavenly aroma that fills your kitchen, and savor the warm, gooey perfection of homemade cinnamon rolls. Whether you’re making them for a special gathering or just to treat yourself, these rolls are bound to become a cherished favorite that you’ll return to time and time again.


