
Are you ready to treat yourself to a delight that combines rich chocolate, gooey caramel, and crunchy pretzels? This No-Bake Chocolate Caramel Pretzel Pie is a simple and satisfying dessert that you can whip up without ever turning on the oven. In this post, I’ll share all the ingredients, step-by-step instructions, and tips to make this pie a sure hit at your next gathering. Let’s dive in!
Why I Love This Recipe
- Easy to Make: This no-bake pie comes together quickly and requires minimal effort, perfect for any occasion.
- Delicious Flavor Combination: The sweet and salty balance of pretzel crust, creamy filling, and rich chocolate make each bite irresistible.
- Perfect for Sharing: This recipe yields 8-10 servings, making it a great dessert for gatherings and parties.
- Customize Your Toppings: Feel free to add nuts, extra chocolate, or your favorite toppings to make it your own!
Ingredients
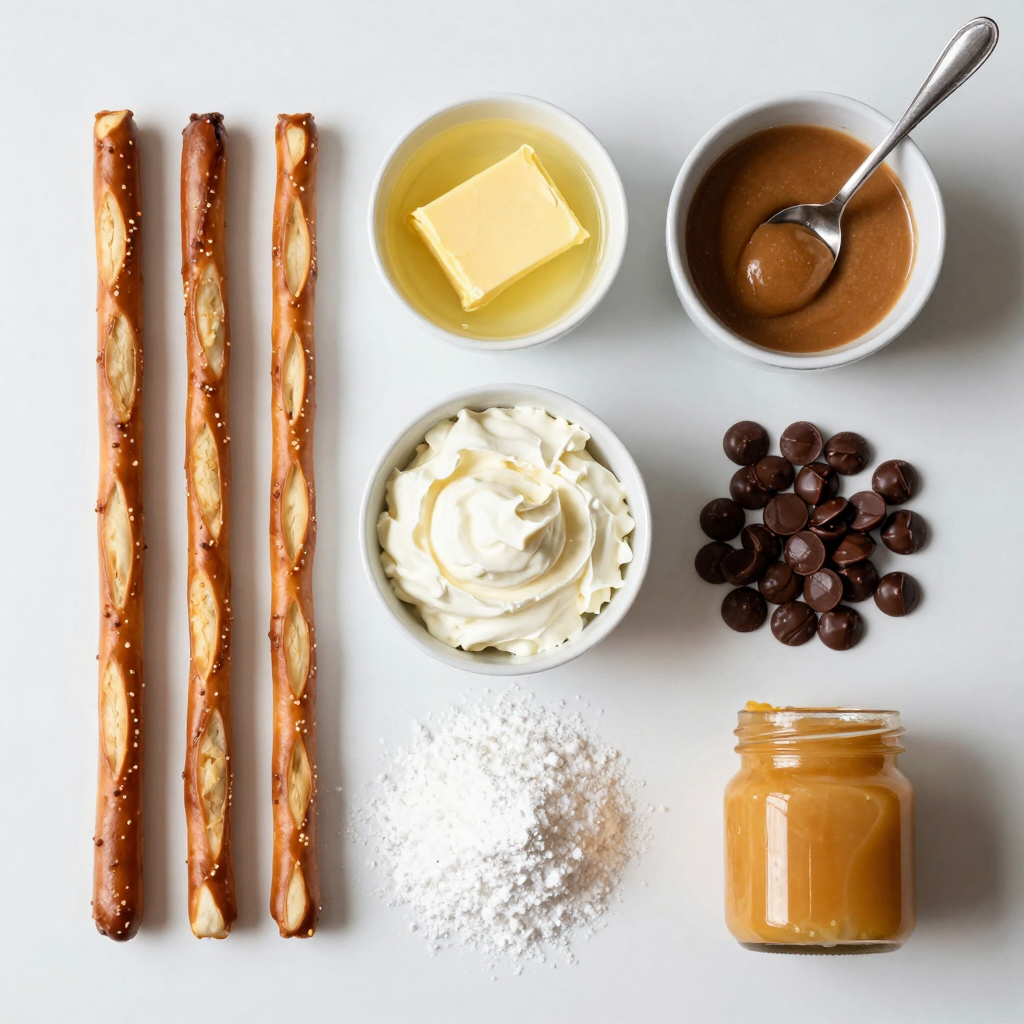
Complete Ingredient List
– 2 cups pretzel sticks
– ½ cup unsalted butter, melted
– 1/4 cup brown sugar
– 1 cup cream cheese, softened
– 1 cup powdered sugar
– 1 cup whipped topping
– 1 cup chocolate chips (semi-sweet or dark)
– 1 cup caramel sauce (store-bought or homemade)
– Sea salt for garnish
Alternative Ingredients
You can swap some ingredients for different flavors or dietary needs.
– Use gluten-free pretzels for a gluten-free pie.
– Cream cheese can be replaced with a vegan cream cheese.
– For a lighter option, try low-fat cream cheese.
– Use dark chocolate chips for a richer taste.
– Maple syrup can replace caramel sauce for a unique twist.
Notes on Ingredient Quality
Choosing the right ingredients makes a big difference in flavor.
– Pick fresh pretzels for a crunchy crust.
– Use high-quality chocolate chips for a richer, deeper taste.
– Fresh cream cheese adds a creamier texture.
– If using homemade caramel, ensure it’s smooth and sweet.
– Always go for unsalted butter for better control over saltiness.
Step-by-Step Instructions
Preparing the Crust
Start by making the crust. Take your pretzel sticks and pulse them in a food processor. You want coarse crumbs, not dust. In a mixing bowl, combine the pretzel crumbs, melted butter, and brown sugar. Mix well until all is combined.
Now, take this mixture and press it into the bottom of a 9-inch pie pan. Make sure to push it up the sides too. You want a nice, even crust. Put the crust in the fridge to chill while you make the filling. This helps it hold its shape.
Making the Cream Cheese Filling
Next, focus on the cream cheese filling. In a mixing bowl, beat the softened cream cheese with a mixer until it’s smooth. Gradually add the powdered sugar while mixing. Keep going until it is well combined and creamy.
Now, take your whipped topping and gently fold it into the cream cheese mixture. You want to mix until you don’t see any streaks. This makes the filling light and fluffy.
Assembling the Pie
Once your crust has chilled, it’s time to assemble the pie. Spread the cream cheese filling evenly over your pretzel crust. Take your time to make it look nice.
Now for the fun part: drizzle half of the caramel sauce over the filling. Spread it out evenly. Next, melt your chocolate chips in the microwave or over a double boiler until smooth. Drizzle the melted chocolate over the caramel layer.
Finally, drizzle the rest of the caramel sauce on top. Use a knife to swirl it gently into the chocolate for a marbled look.
Chilling the Pie
After assembling the pie, cover it with plastic wrap. Put it in the fridge for at least 4 hours, but overnight is even better. This helps the pie set up nicely.
When you’re ready to serve, sprinkle a pinch of sea salt on top. This will enhance the sweet and salty flavors. Slice it up and enjoy every bite!
Pro Tips
- Use Fresh Ingredients: Ensure your cream cheese is softened to room temperature for a smooth filling. Fresh ingredients enhance the flavor and texture of your pie.
- Chill Thoroughly: Allow the pie to chill in the refrigerator for at least 4 hours, but overnight is ideal. This allows the layers to set properly and makes slicing easier.
- Customize Your Toppings: Feel free to add crushed nuts, additional caramel drizzle, or even a sprinkle of cocoa powder on top for a unique twist to your pie’s presentation.
- Make Ahead: This pie is perfect for preparing ahead of time. It can be made up to two days in advance, making it a great option for parties and gatherings.
Tips & Tricks
Achieving the Perfect Crust
To get a great crust, use fresh pretzel sticks. Pulse them into fine crumbs. Mix the crumbs with melted butter and brown sugar. Make sure to press the mixture firmly into the pie pan. This step helps the crust hold its shape. Chill the crust in the fridge for at least 30 minutes. Chilling helps it set and stay firm when adding the filling.
How to Get the Right Texture for the Filling
Start with softened cream cheese for a smooth filling. Beat it until it’s creamy and lump-free. Add powdered sugar slowly to avoid clumps. Gently fold in the whipped topping. This gives the filling a light and airy texture. Be careful not to overmix, as it can deflate the air. The right texture makes the filling rich and creamy.
Common Mistakes to Avoid
One common mistake is not chilling the crust long enough. If it’s warm, the filling can make it soggy. Another mistake is adding too much caramel at once. This can make the filling too sweet. Ensure you drizzle the caramel evenly. Lastly, don’t skip the sea salt garnish. It adds a perfect balance to the sweet flavors.
Variations
Incorporating Different Flavors (e.g., Nut Butters, Fruit)
You can change up the flavors in this pie easily. For a nutty twist, try adding peanut butter or almond butter to the cream cheese filling. Just mix in half a cup when you beat the cream cheese. This adds a rich taste and pairs well with the caramel. You can also add fresh fruit like sliced bananas or strawberries on top. This gives a bright flavor and nice color.
Vegan or Dairy-Free Alternatives
Want to make this pie vegan or dairy-free? Swap the cream cheese for a plant-based cream cheese. Use coconut whipped cream instead of whipped topping. For the chocolate, choose dairy-free chocolate chips. You can also find vegan caramel sauce at the store. These small changes let everyone enjoy this treat without dairy.
Gluten-Free Options
To make this pie gluten-free, use gluten-free pretzel sticks. Many brands offer tasty options that work well. Make sure to check the labels for any hidden gluten. You can follow the same steps in the recipe. This way, those with gluten sensitivities can dive into this sweet treat without worry.
Storage Info
How to Store Leftovers
After you enjoy this pie, store any leftovers in the fridge. Use an airtight container to keep it fresh. If you do not have a container, cover the pie with plastic wrap. This helps to prevent it from drying out. Make sure to eat the leftovers within three days for the best taste.
Freezing Options
You can also freeze the pie if you want to save it for later. First, slice the pie into pieces. Wrap each slice tightly in plastic wrap. Then, place the wrapped slices in a freezer-safe bag. This will keep the pie fresh for up to two months. To enjoy, thaw the pie in the fridge overnight before serving.
Shelf Life of the No-Bake Pie
The no-bake chocolate caramel pretzel pie stays good in the fridge for about three days. If you freeze it, the pie lasts for two months. Always check for any changes in smell or texture before eating. Trust your senses; they will guide you!
FAQs
Can I make this pie ahead of time?
Yes, you can make this pie ahead of time. In fact, I recommend it! The pie tastes best after it chills for several hours. You can prepare it the night before and let it set in the fridge. This makes it easier for parties or special occasions. Just remember to cover it well to keep it fresh.
What can I use instead of pretzel sticks?
If you don’t have pretzel sticks, you can use crushed graham crackers or cookies. Both options give a sweet crunch. You can also try using rice cereal for a lighter texture. Just mix the chosen base with butter and sugar, just like the recipe says.
How do I modify the recipe for dietary restrictions?
To modify this pie, consider these easy swaps:
– For gluten-free, use gluten-free pretzels or cookies.
– For dairy-free, use non-dairy cream cheese and whipped topping.
– To lower sugar, use a sugar substitute in the filling and crust.
These changes keep the pie tasty while meeting different diets.
This post covered everything you need to know to make a no-bake pie. We looked at ingredient choices, steps to make it, and tips for a great result. Remember, you can customize flavors and adjust for dietary needs. Store leftovers properly to enjoy later. With these insights, you can create a pie that impresses everyone. Now, get ready to make a delicious dessert that suits your taste!


